|
|
Post by mikedski on Jan 4, 2016 11:32:17 GMT
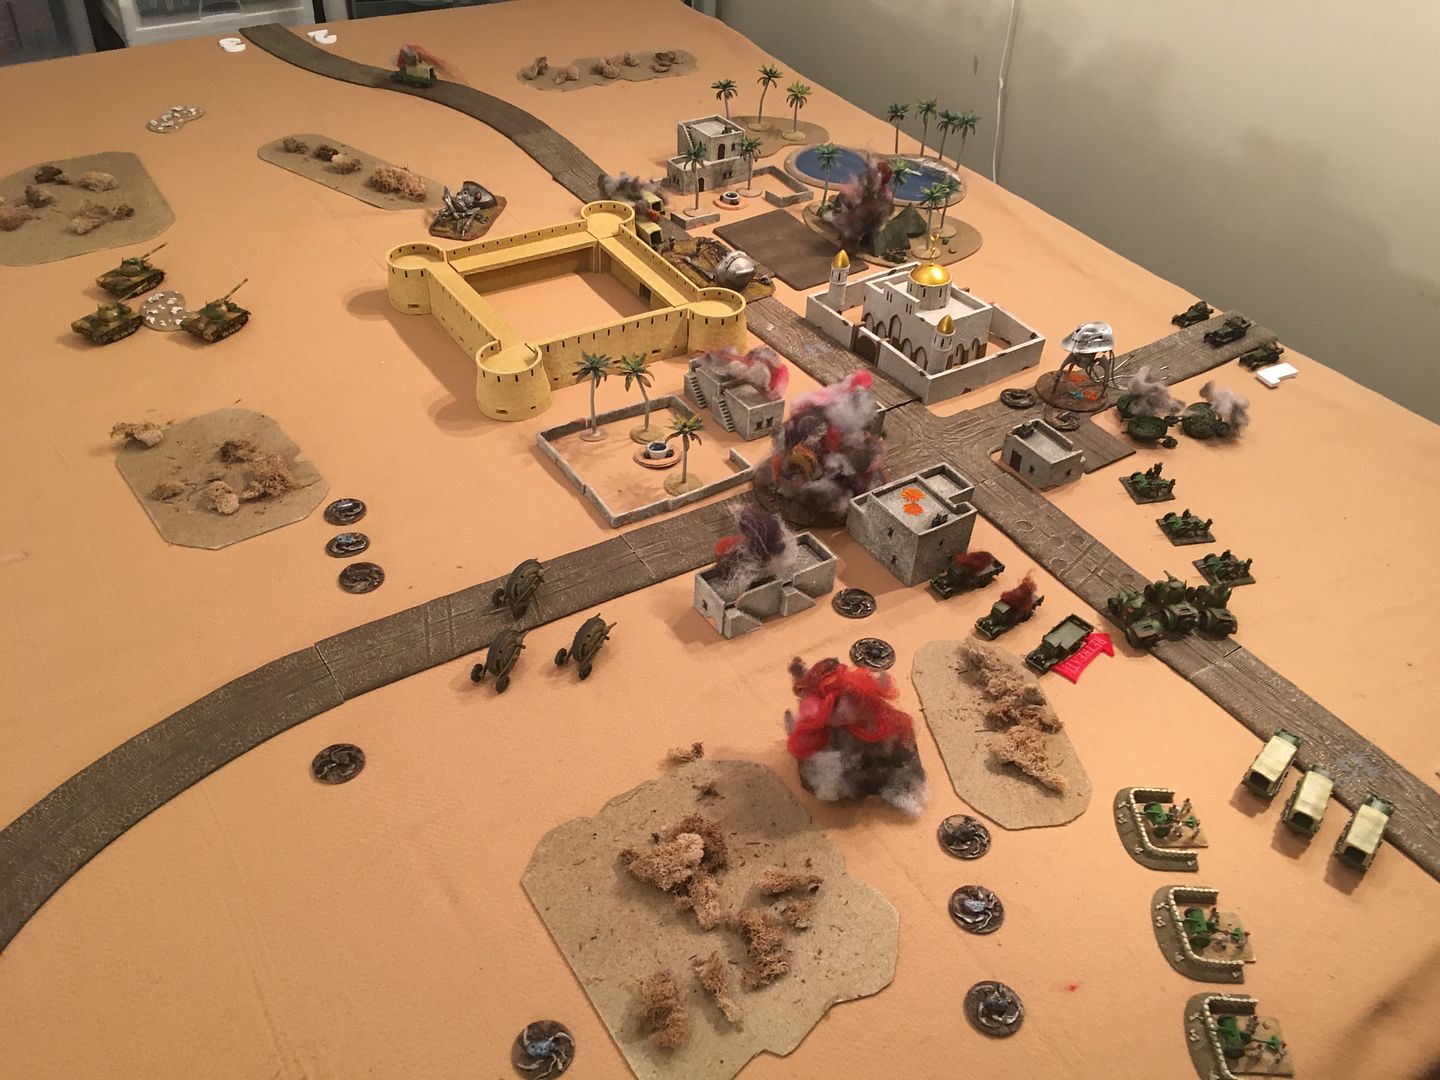
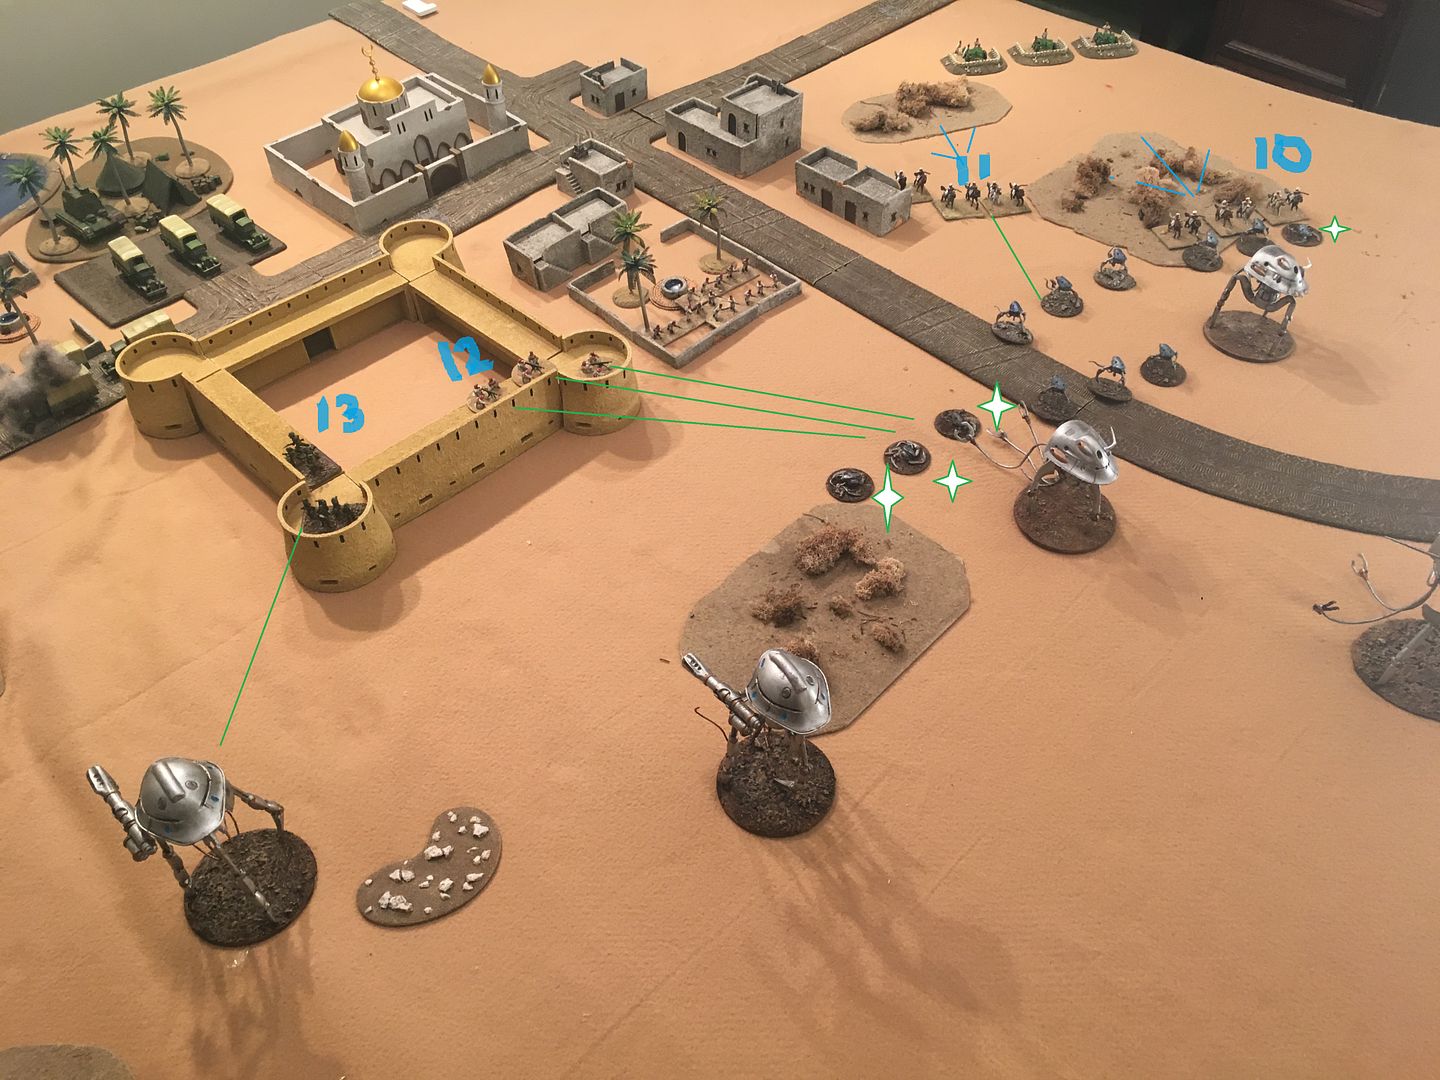
Turn 4 - Forever Known as the Miracle Minute to the British Army
British reinforcement:
Spector cars can move and shoot arrival point #1
Defiant cars can move from point 6
British Win Initiative
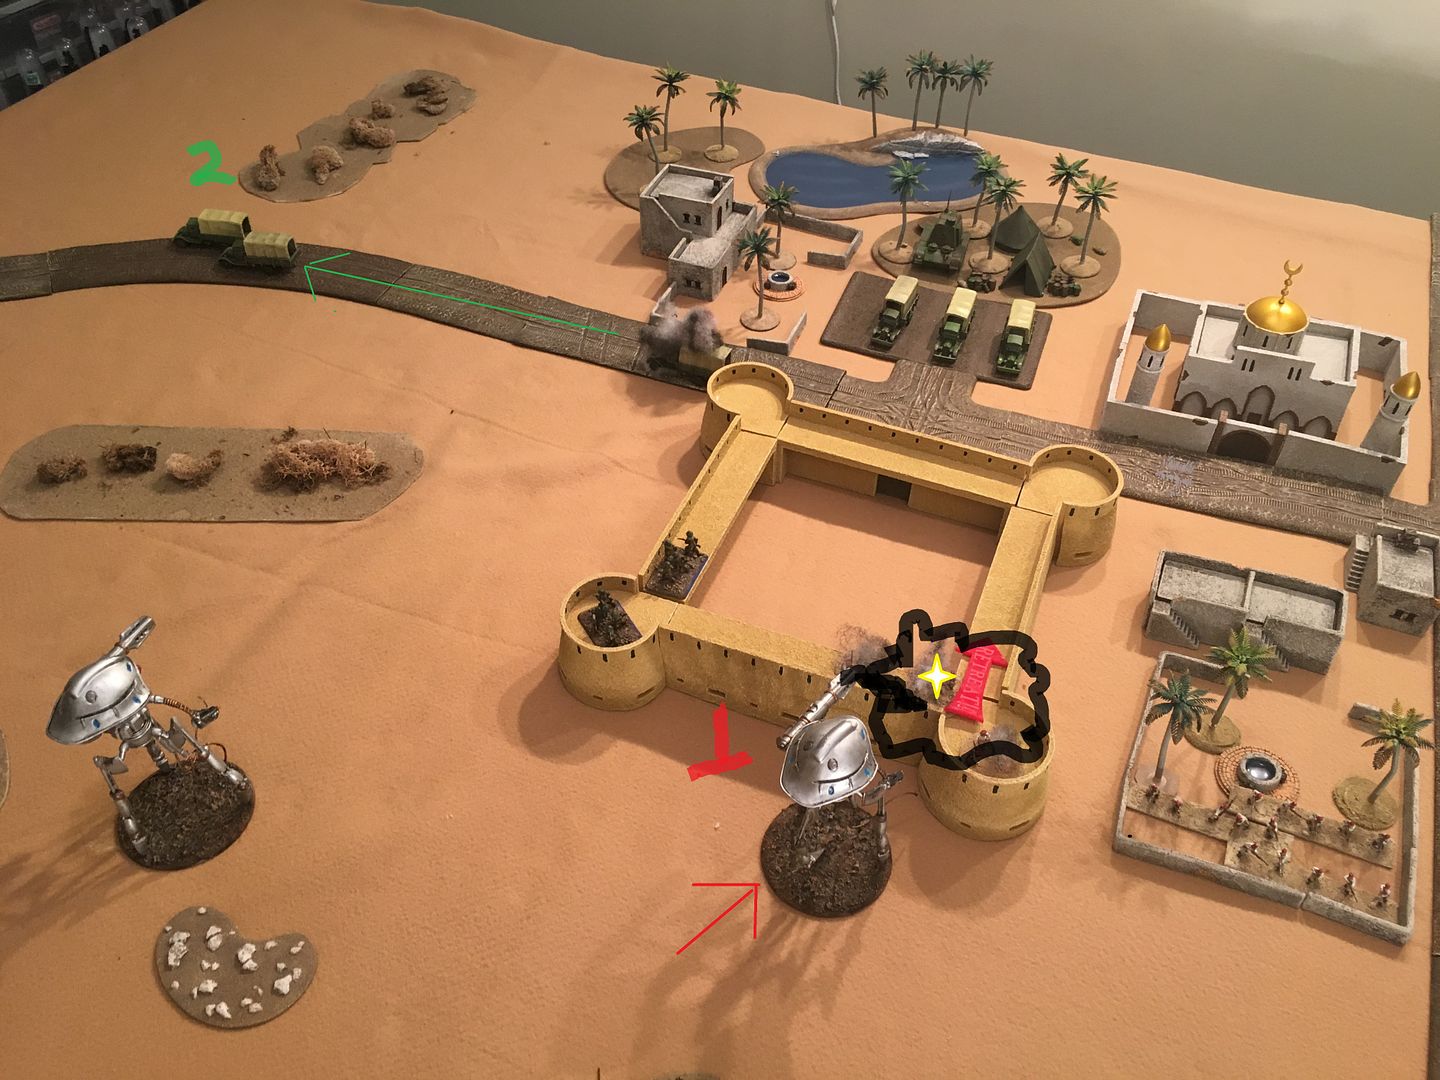
Impulse - 1 - Mono tanks unload 12 shots on harvester - 9 hit - 4 penetrate - die roll 7 on damage table and +3 for multiple shots - BOOM - adjacent reaper takes a point of damage and a weapons critical hit. Two flivvers are destroyed and the third routes. Adjacent building takes damage. Impulse 2; Tripod A sweeps the Lloyd command carrier and rest station hoping to disrupt human command and force a break - misses the Lloyd but destroys the station. Impulse 3 - Mono tanks fire at the obscured reaper and achieve a single damage point
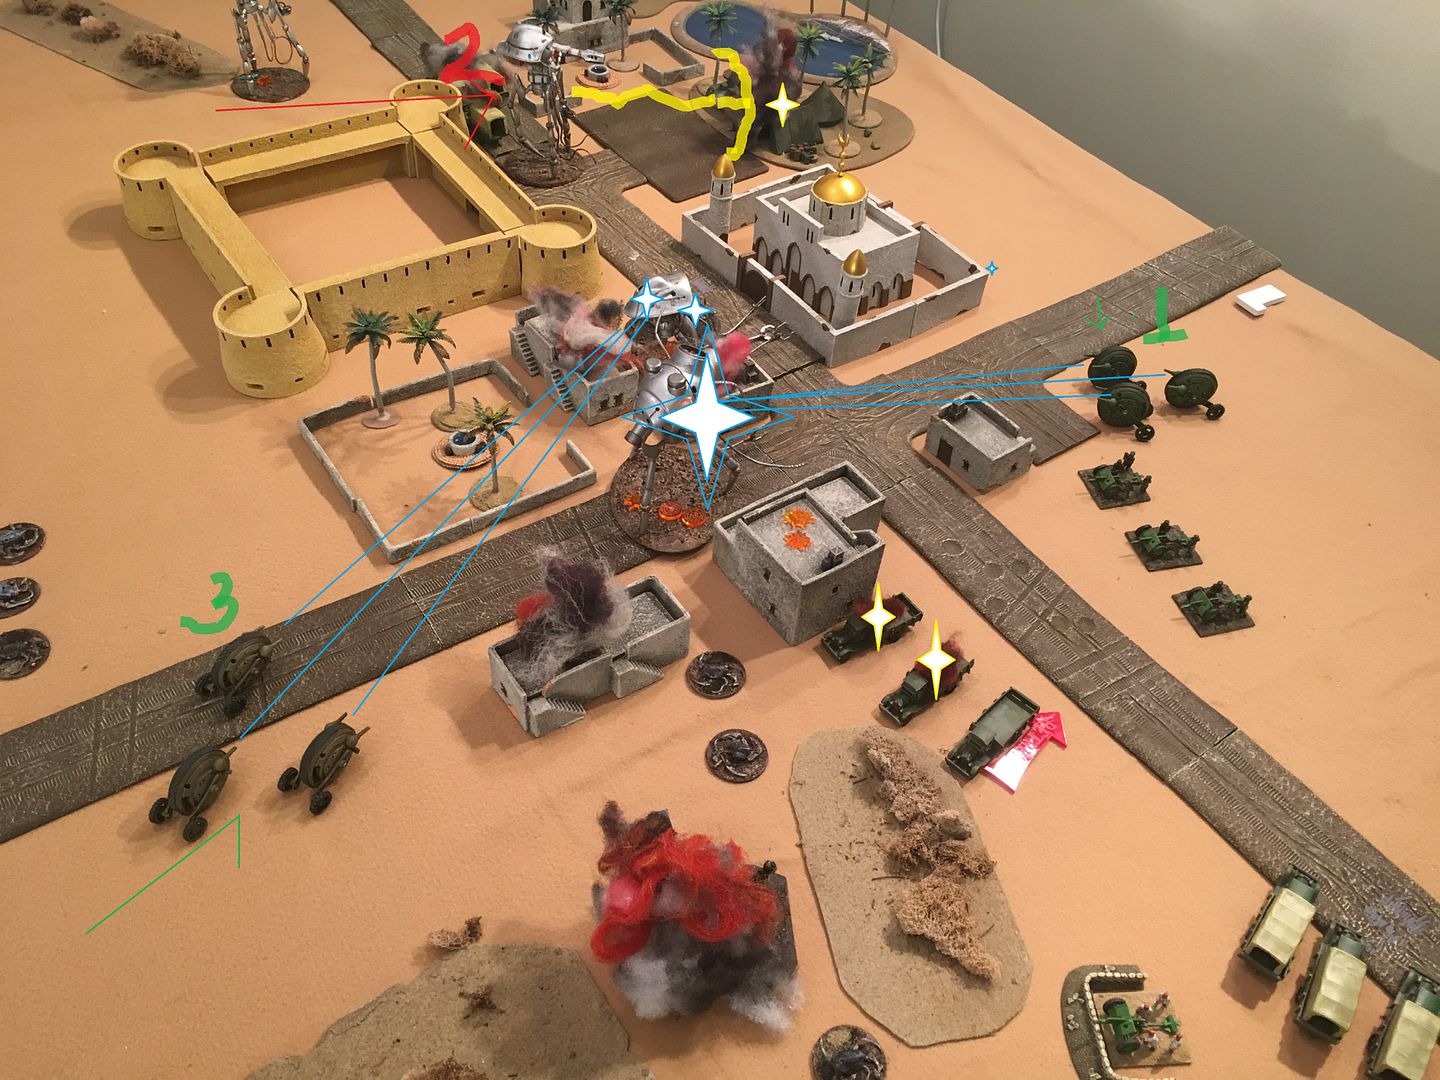
Impulse 4 - Reaper advances with drones and fires at mono tanks - unit is destroyed. Impulse 5 - Spectors arrive and attack the drones - destroying one.
Impulse 6 - Tripod B shoots and destroys the escaping truck and destroys it. Impulse 7 - The imperial tanks are doubled move to be able to shoot main guns and HMGs - multiple hits bring down the tripod.
Impulse 8 - British field guns shoot at drones and reaper - kills the last drone.
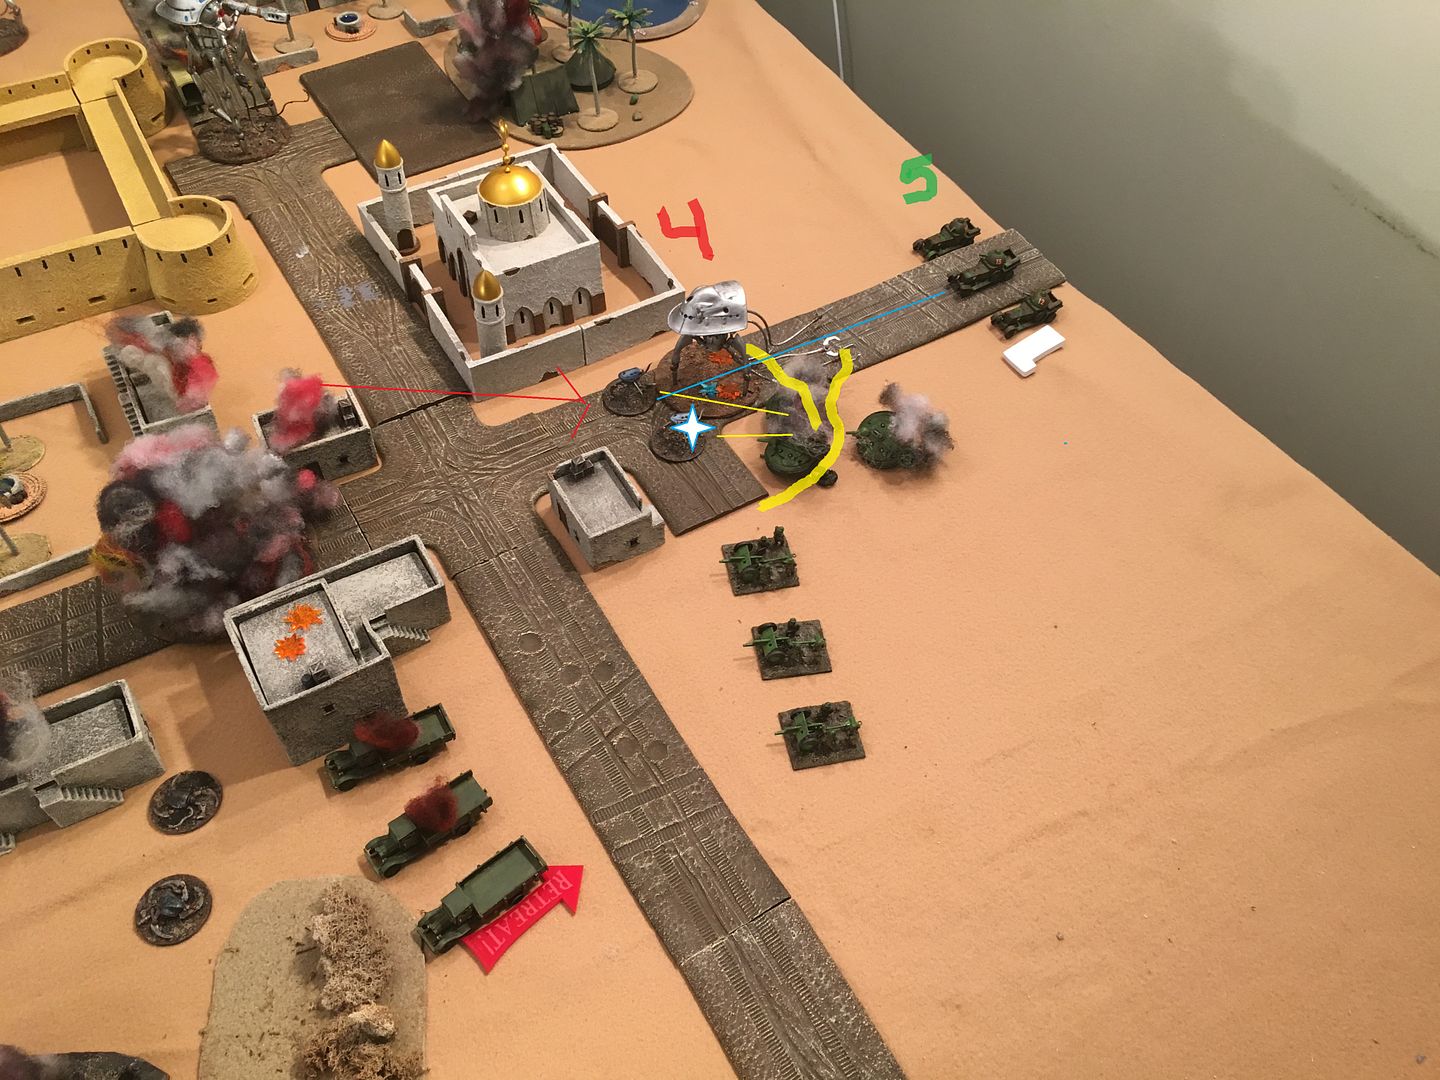
Impulse 9) Native field guns shoot at the obscured tripod near the rest/ refuel point - hits with a 10 - power roll 9 - rolls an 8 on damage table - rolls 9 for damage for nine damage points.
Impulse 10) Lloyd command carrier shoots with HMG (ROF 1) - hits and penetrates - tripod topples to ground. Impulse 11) - Defiant armored cars arrive
Martian force breaks due to greater than 50% losses and only one damaged reaper on board
|
|
|
|
Post by mikedski on Jan 4, 2016 8:58:24 GMT
Thanks. Cigar Box plain grass mat. A yellow-green color.
|
|
|
|
Post by mikedski on Jan 4, 2016 1:23:24 GMT
I didn't like the ammo rack on top as well. Made mine more a cargo carrier. Curiously, the historical fluff picture of US organization has munitions carriers in the infantry unit towed artillery company. I wouldn't have a problem with using them for field and heavy artillery. Though in the case of heavy arty maybe a little over kill given the rules already give a 3 gun heavy battery a crazy power rating.
|
|
|
|
Post by mikedski on Jan 4, 2016 1:06:48 GMT
Turn 3
British reinforcements
Mono Wheelie Tanks at entry point 1
British win initiative
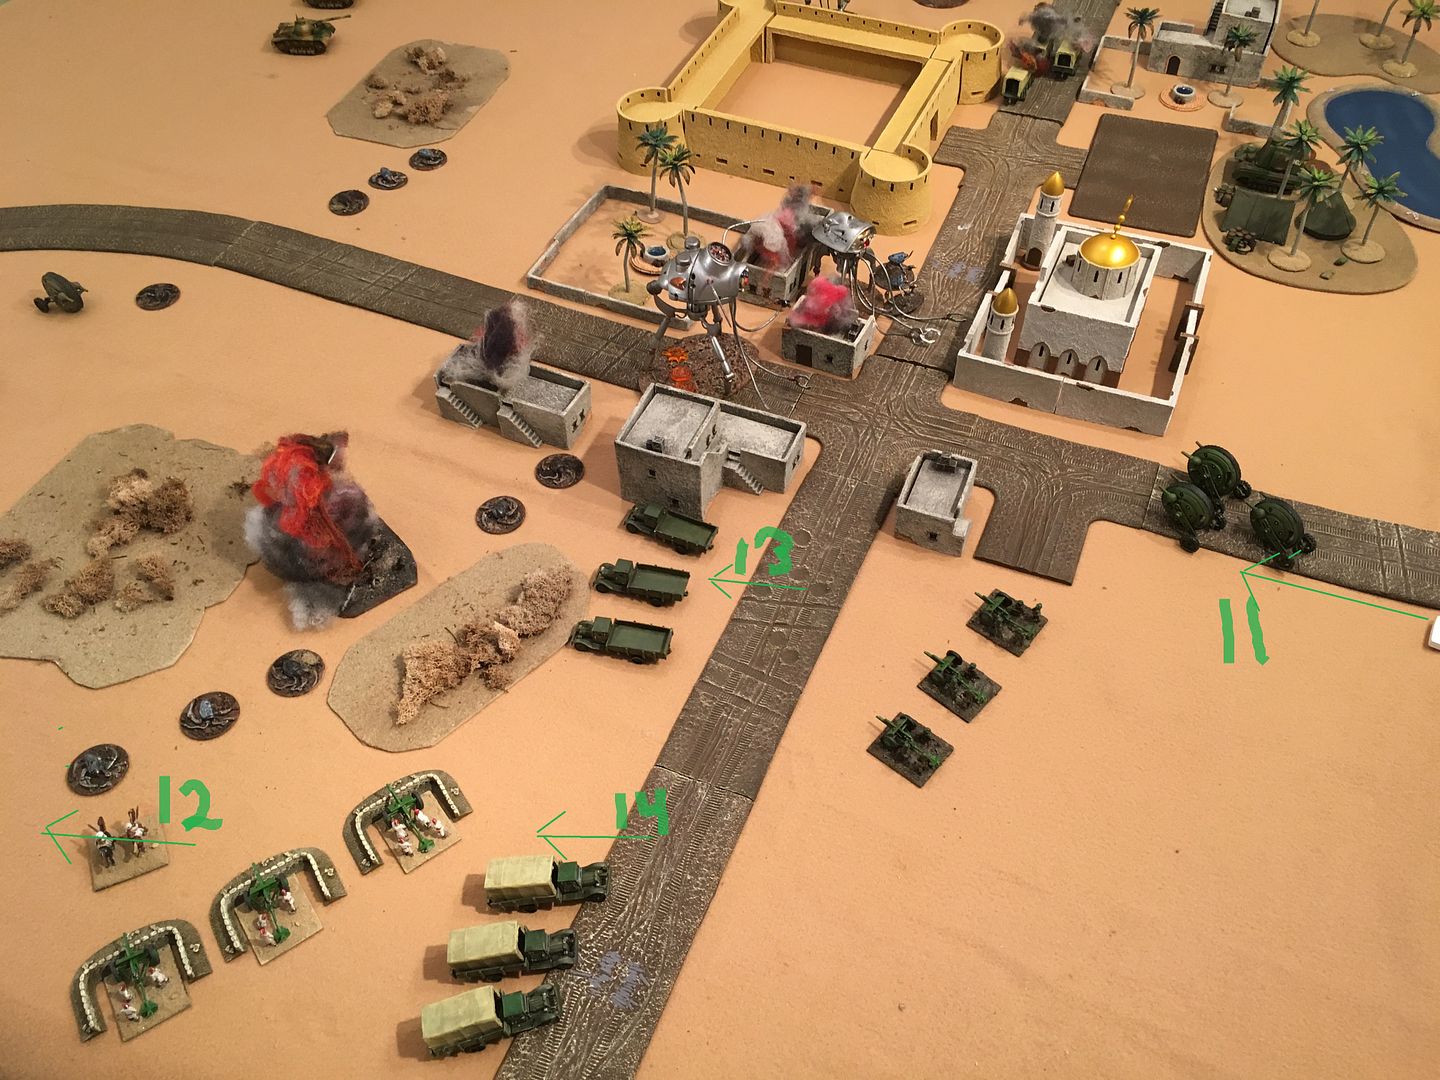
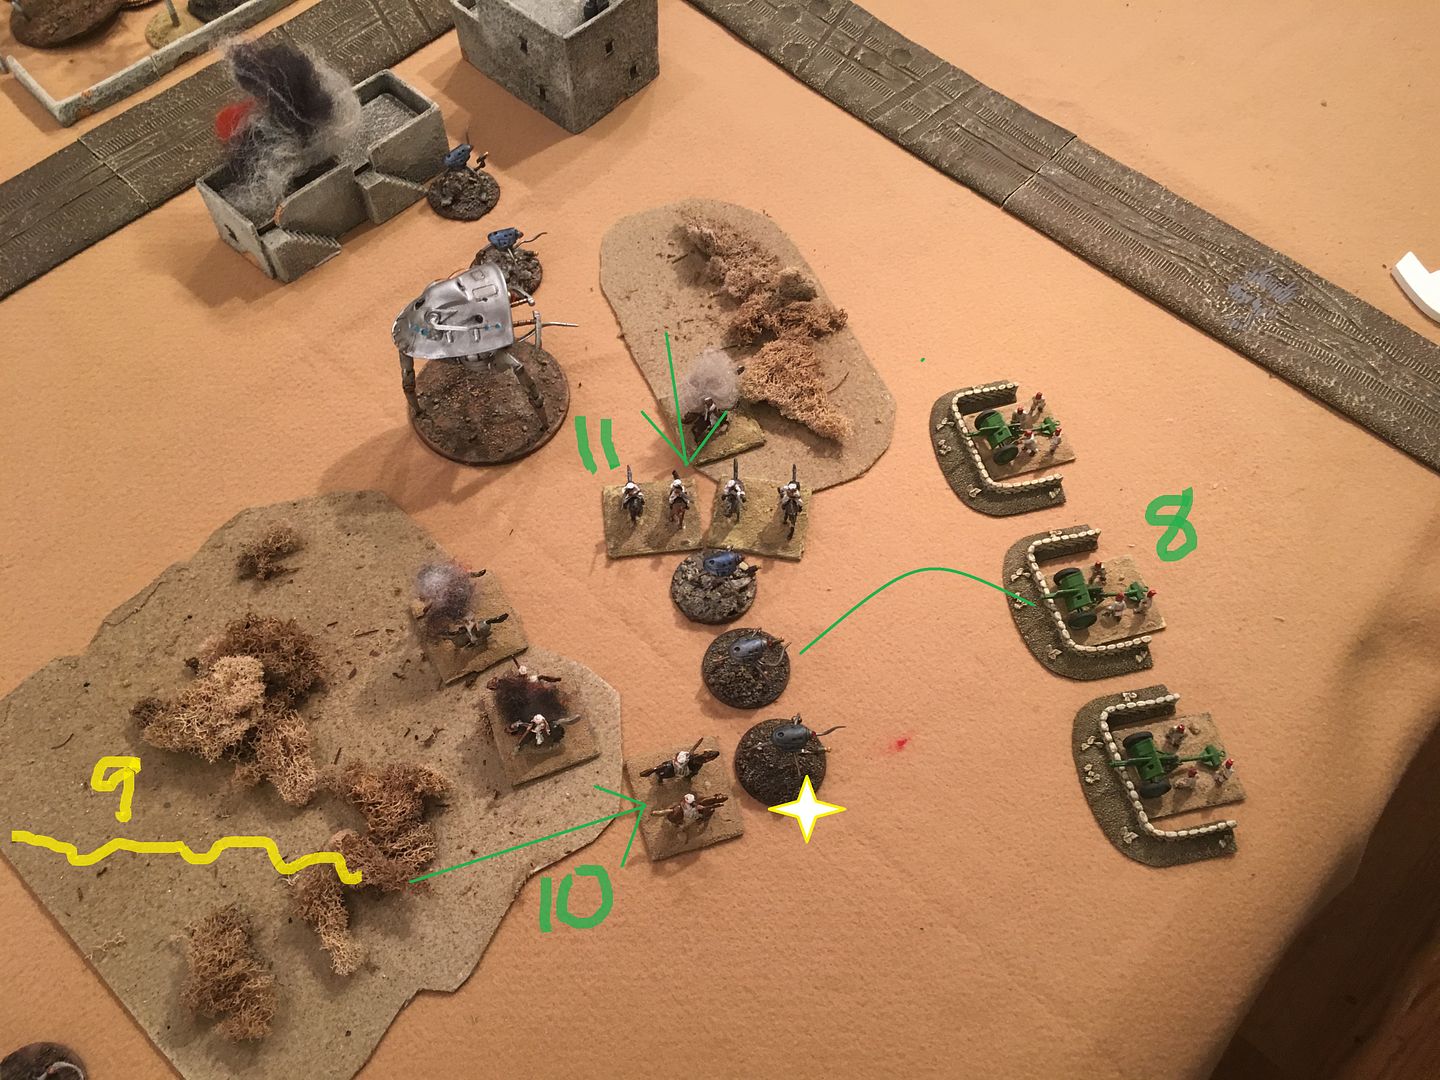
1) Imperial tanks double move and shoot at Tripod B - cause damage and mobility critical hit 2) Harvester moves into village and take shot at BEF field guns - miss 3) Wheelie tanks move and fire on the slaver - two hits penetrate - rolls 9 on damage table +1 bonus - "Boom" - down goes slaver along with all its remaining drones and the unlucky Bedouin cavalry unit.
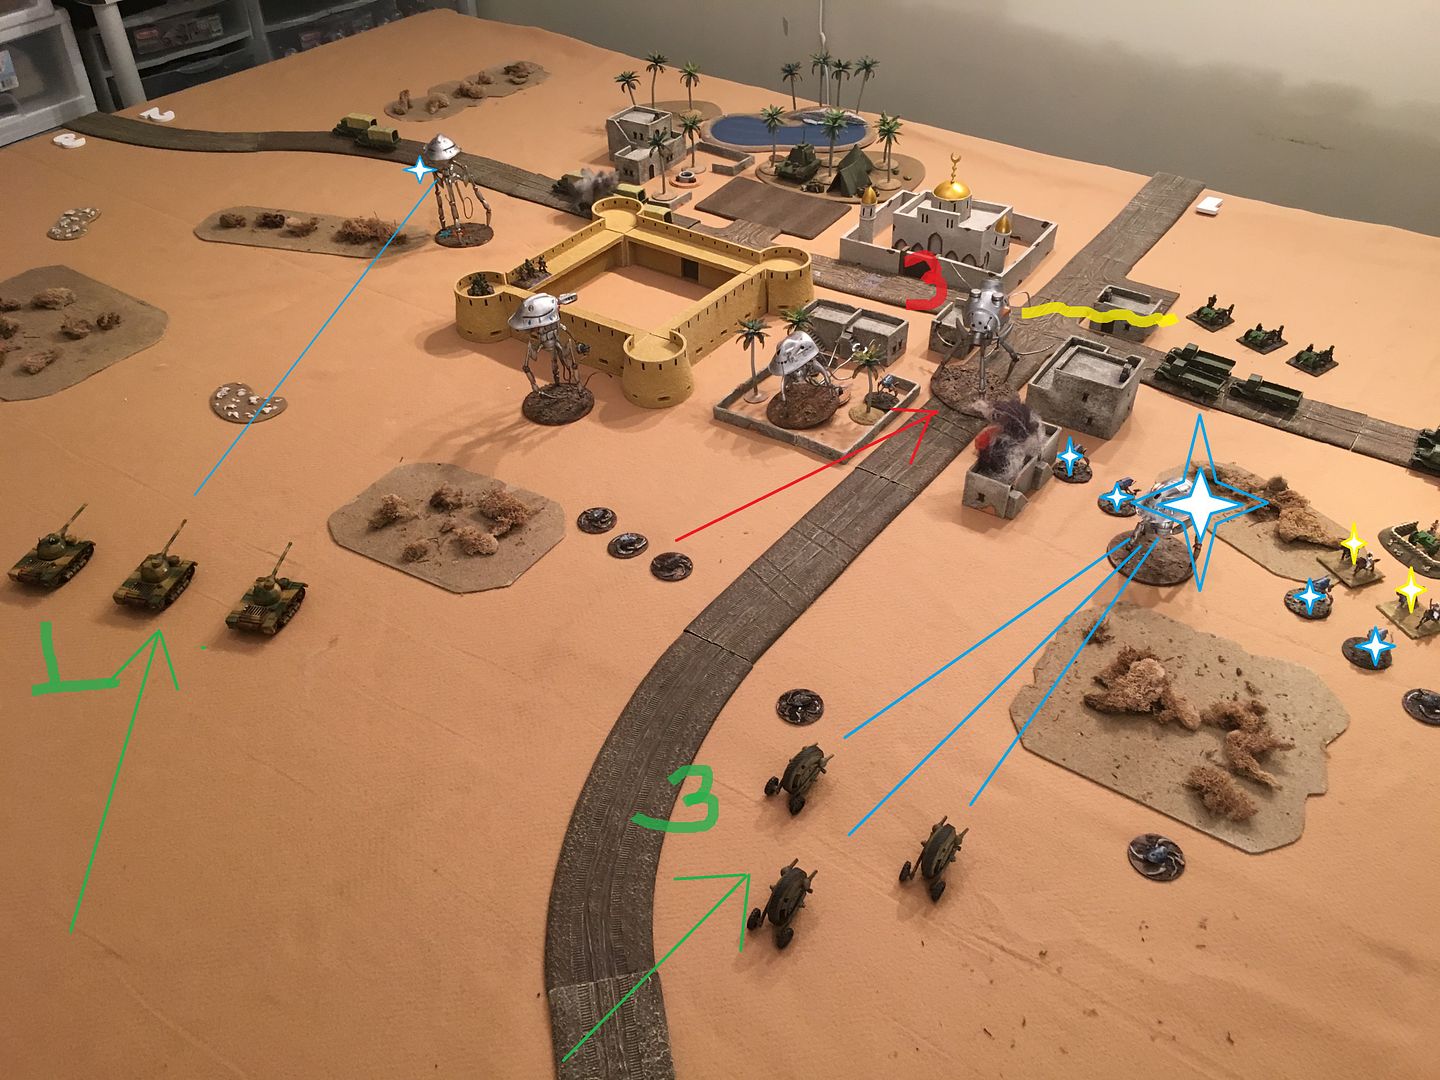
4) Tripod A moves and fires black dust at BEF infantry squad with one team killed - the other routes and is subsequently scattered. 5) Two evac tracks exit the north road 6) Tripod B elects not to move - sweeps evac trucks and destroys 2. The remaining evac truck will move further north later in turn.

7) British Field guns fire at Harvester and miss. 8) Reaper and drones assault buildings, destroy them and transfer capture to the harvester and move to just outside mosque. 9) Native field guns fire and score a damage point on the harvester.
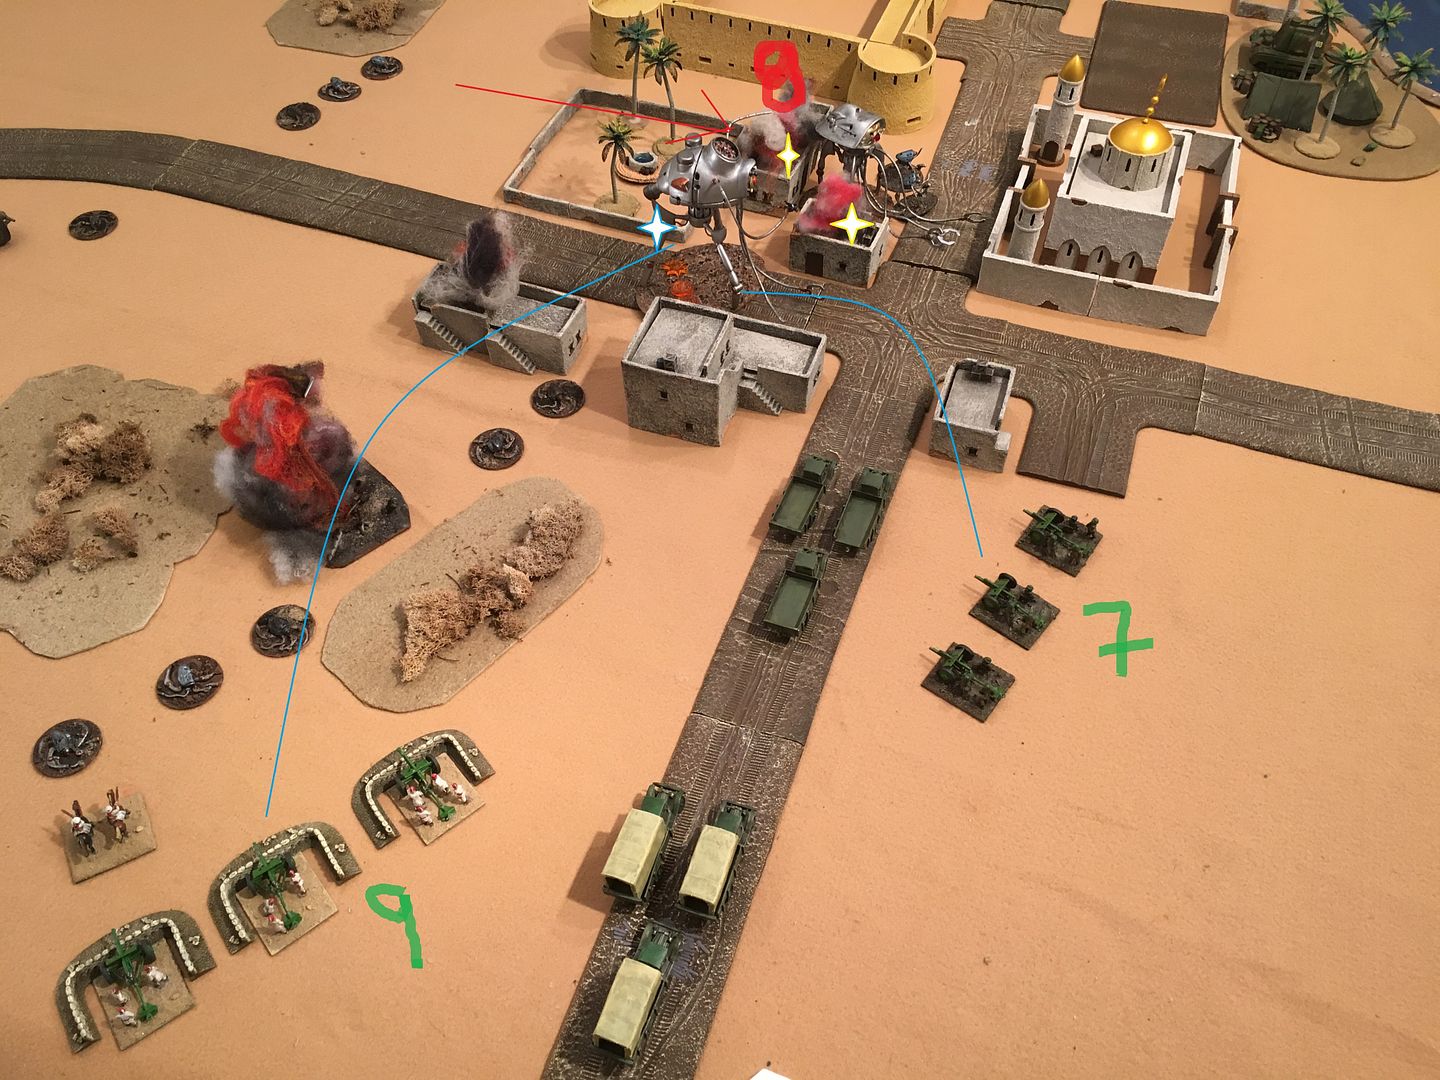
10 - 15 pulses) - Mono tanks arrive at entry point 1. The flivvers and evac trucks south of village get off the road and line of fire. The remaining Bedouin cavalry element is moved out of combat to avoid further loss.
|
|
|
|
Post by mikedski on Jan 3, 2016 19:10:24 GMT
1) Those would look good as British assault infantry with their heavy rifles.
2) Would like to see the officers. I need a British command team.
Of course I would like them to size up well with my AQMF mini's.
|
|
|
|
Post by mikedski on Jan 3, 2016 19:00:04 GMT
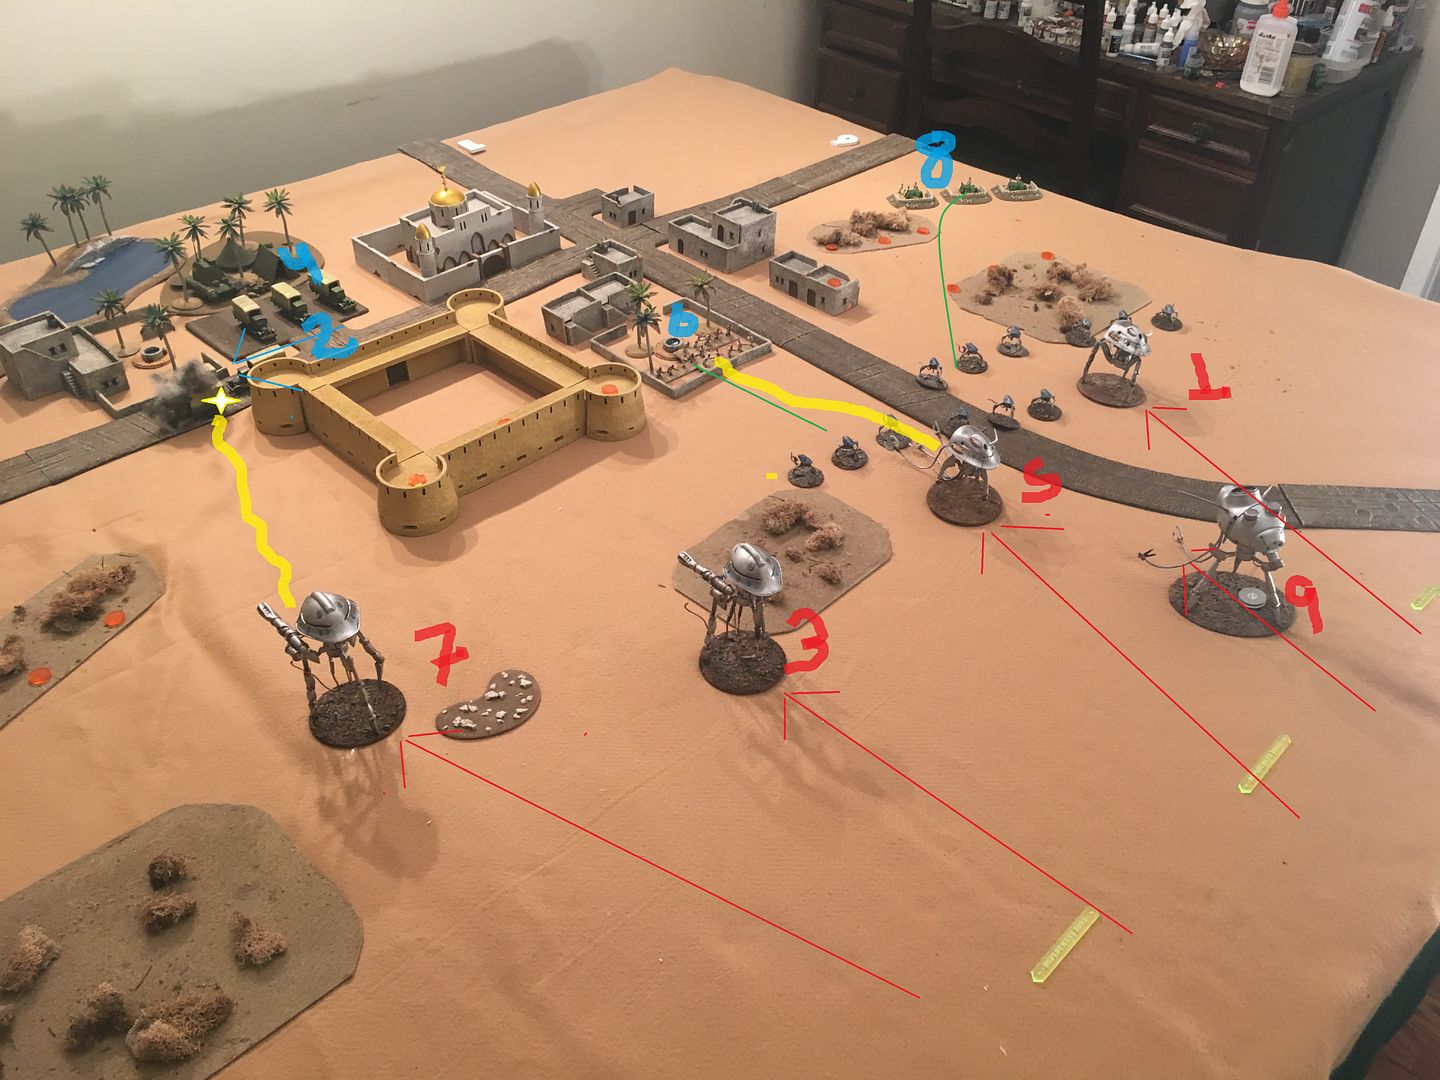
turn 2
British reinforcements due to arrive
Imperial tanks move, no shoot at point 4
Mono Wheelies move , no shot at point 4
Flivvers with field guns at point 1
Evac truck platoon - move only one phase.
Martians easily win initiative
Impulse 1) Tripod A moves towards for and sprays black dust on HMG teams. One team dies the others route and are scattered by the tripod's second move. Impulse 2) truck platoon moves further north.
Impulse 3) slaver double moves - 2 drones assault building (destroyed) and 2 drones assault cavalry (two elements destroyed). Slaver sweeps native cavalry and one team destroyed. Impulse 4) Native infantry shoots and destroys a drone. Impulse 5) Reaper double moves with remaining two drones and assaults native infantry and destroys the infantry - moves further into court yard.
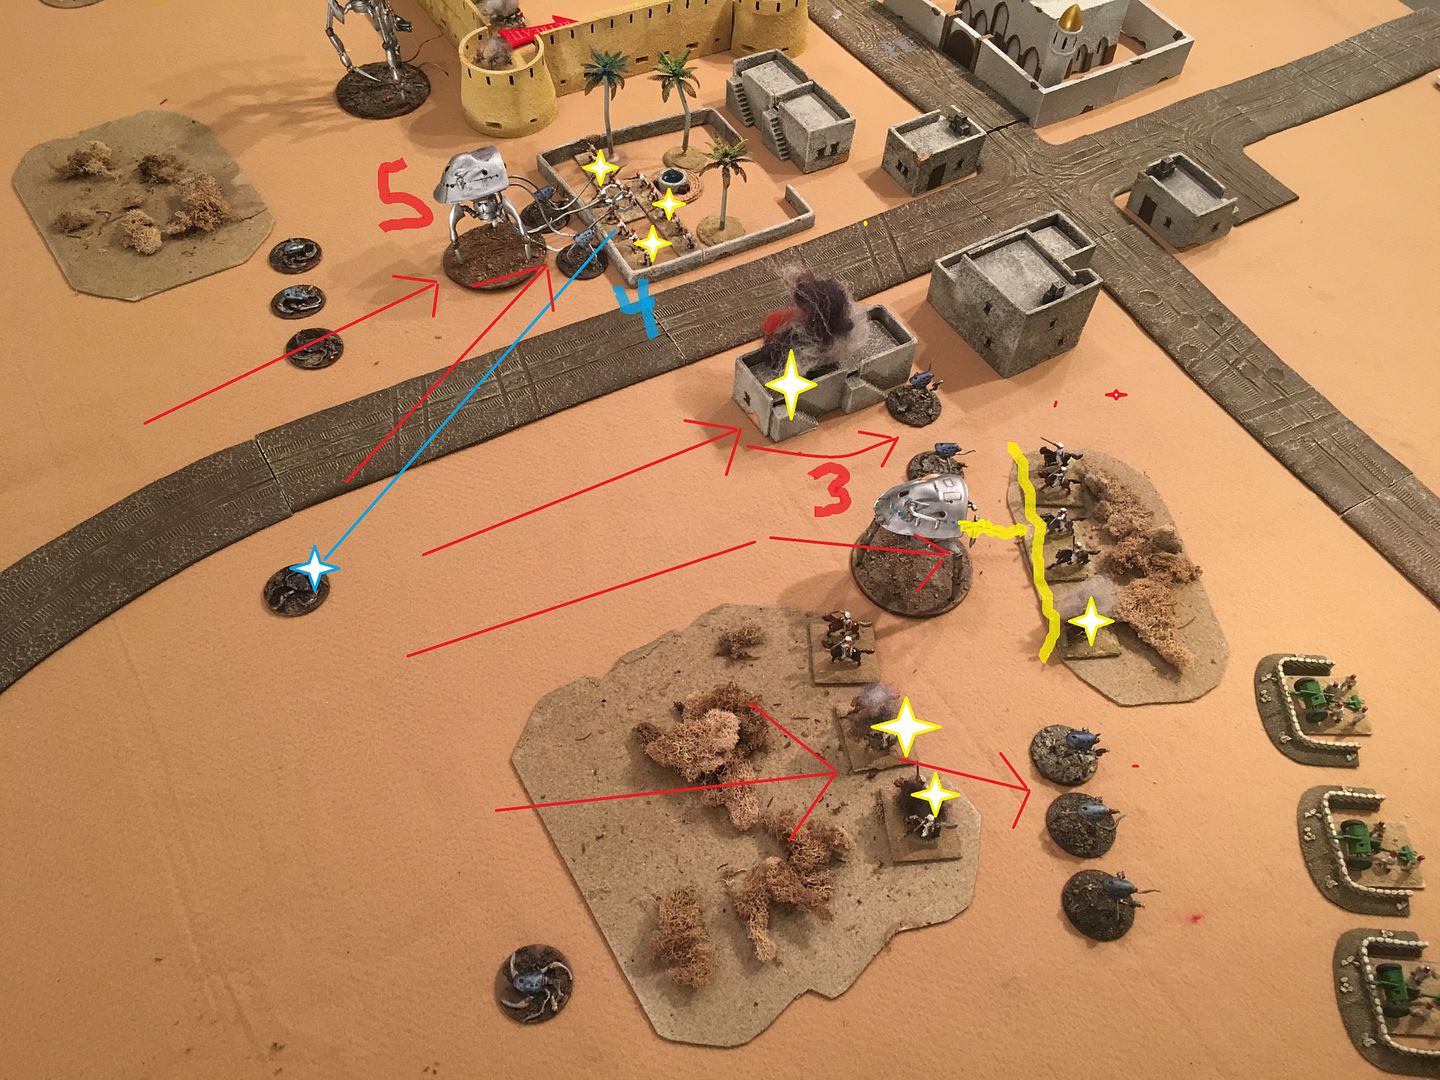
Impulse 6) British infantry fires mini-coil gun at Tripod B no effect. Impulse 7 ) Tripod B moves and sweep escaping trucks - both are missed!
Impulse 8) native field guns fire template on drone but no damage. Impulse 9) Harvester moves and shots at cavalry but misses. Impulse 10) - single native cavalry element assaults drones and destroys one. Impulse 11) Native cavalry unit assaults drones - no damage
Impulse 12 - 15) - imperial tanks arrive and double move with intent to fire on Tripod B next turn if so lucky. Wheelies arrive at point 4. Flivvers arrive from the south and field guns deploy. Evac truck arrive from south.
Impulse 16) - truck platoon at Oasis activates and moves one movement phase.
|
|
|
|
Post by mikedski on Jan 3, 2016 18:43:25 GMT
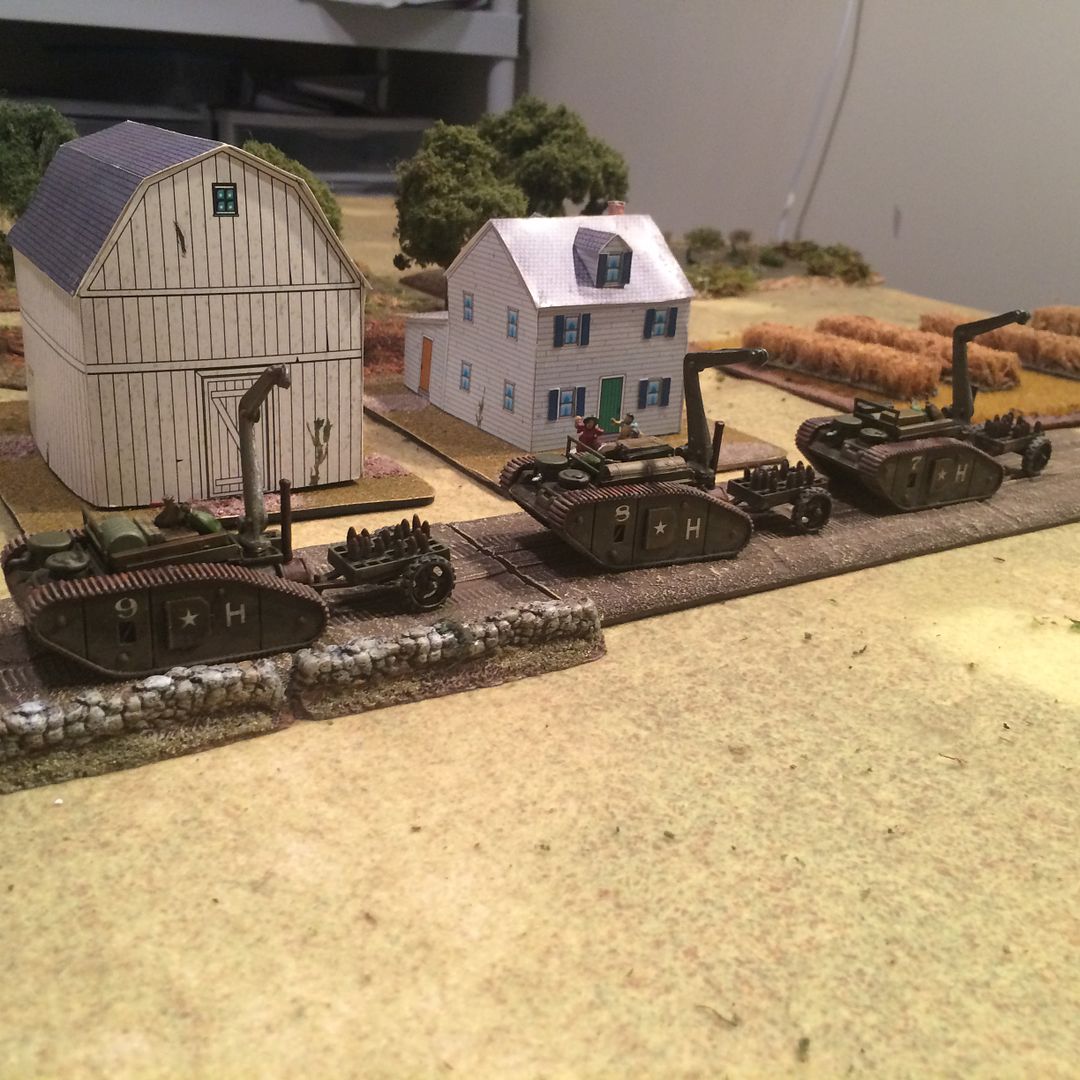
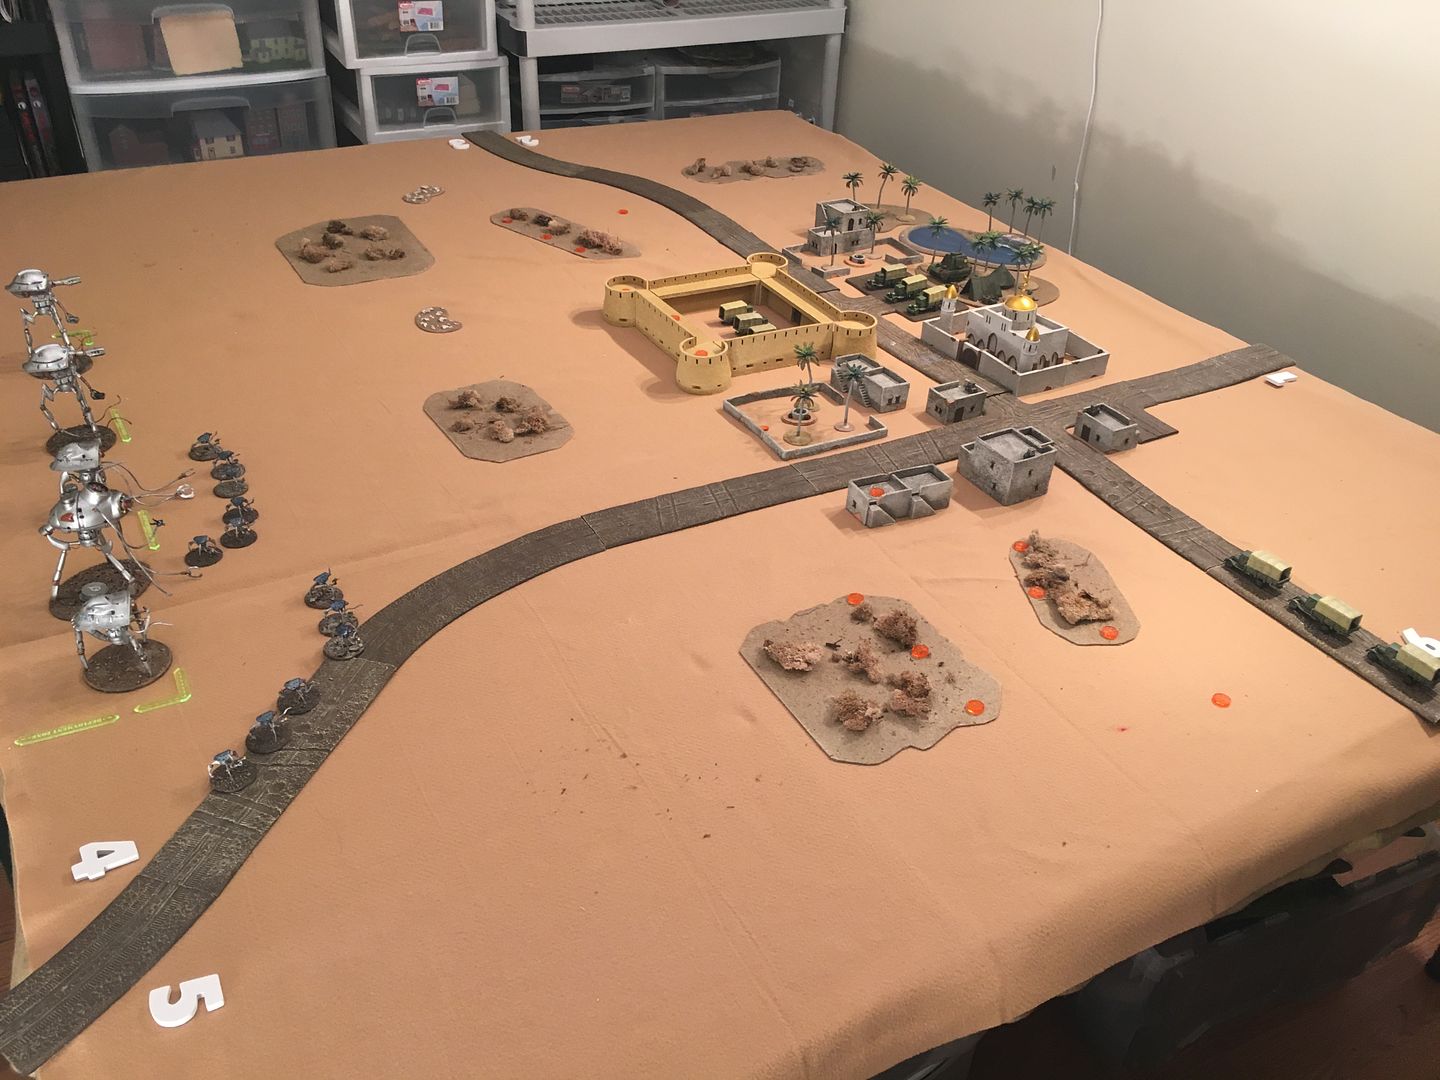
Omgs what a great setup!! Are those portee gun trucks I see!!. Must tell me how you did those (vendor/conversion work et al). I recognize most of the terrain vendors but where'd you get the oversize numbers (great btw). I use Learning Resources from Amazon with their huge rubber dice and numbers, but yours looks more table like and cleaner somehow. Once again a great scenario; interesting to see the various rule changes you suggested in action. Did the HMG fire be resolved as 1 die or 3 (per RF change)? Also, I believe the Brit ACs are pointed as individual elements, so one cost 55 and 3 (platoon) costs 165 points. More, more, more! HMG are ROF against infantry targets (drones/ lobos) - ROF 1 against other targets.
Controller tripod and drones move all as one unit.
The trucks are not portee - just guns stacked on top for space. The Lloyd Command vehicle is an own unit - I under pointed at 125.
Numbers from Hobby Lobby.
I figured the humans are trying to protect something (a supply line, people, places) , Martians are just hungry and destructive.
|
|
|
|
Post by mikedski on Jan 3, 2016 12:42:33 GMT
Turn 1 - Martian wins initiative die roll. - British elects not to use token for turn 1 initiative advantage.
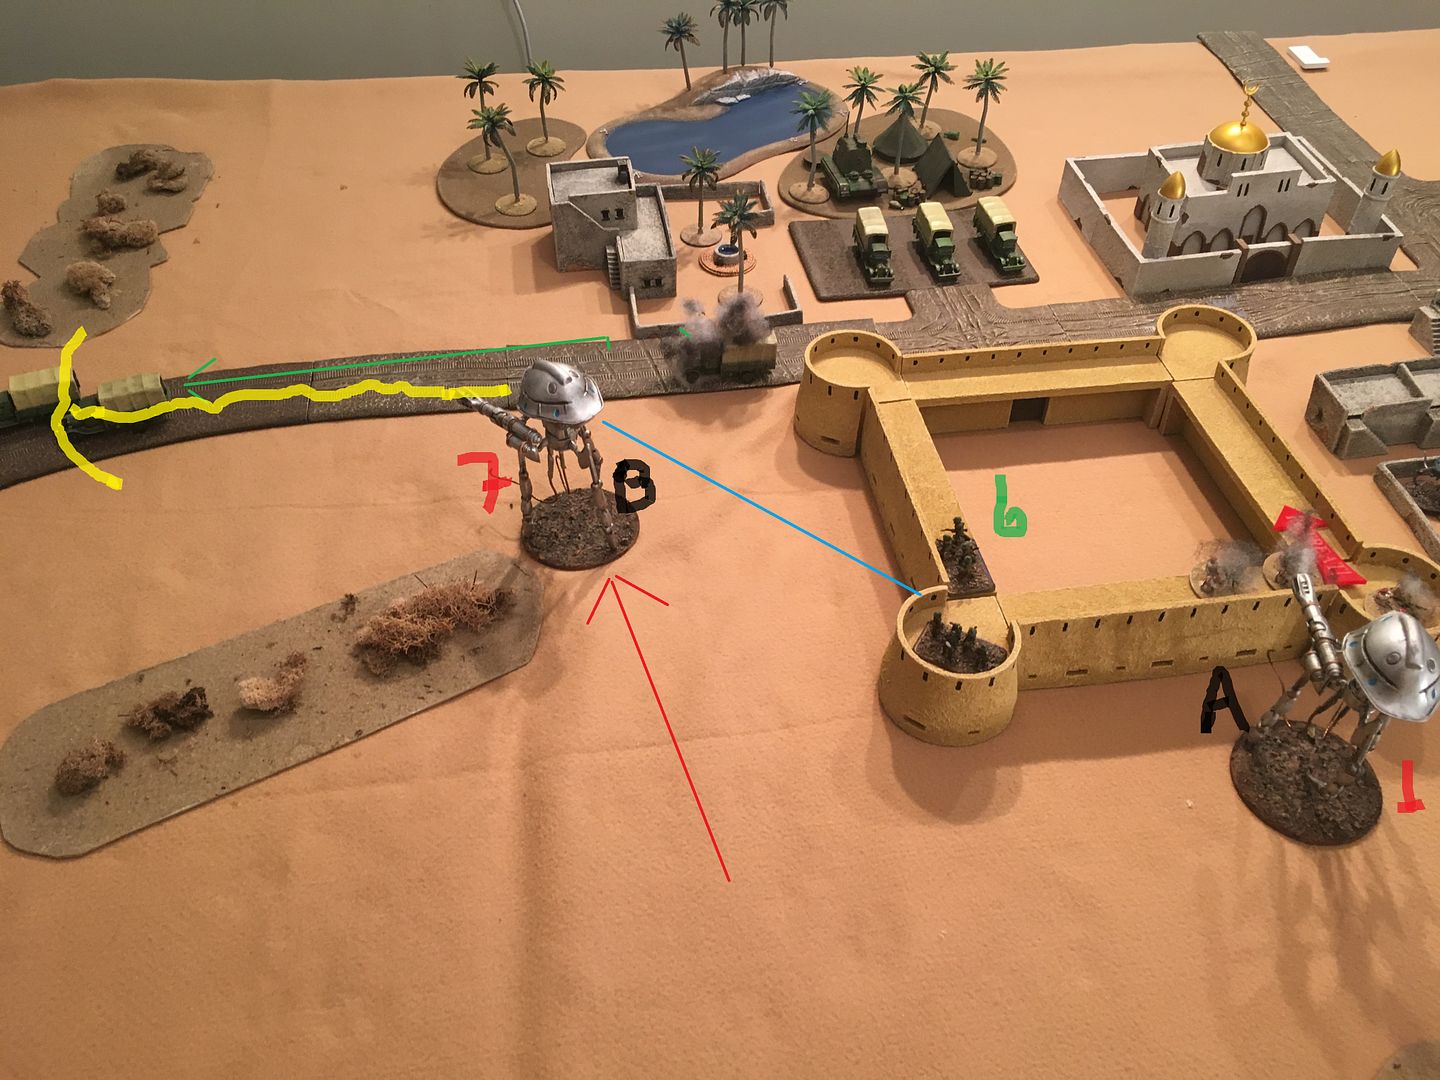
Impulse 1) Slaver and drones moved at double speed. Slaver shoots blip and no effect. Impulse 2) - Human activated truck unit in the fort - able to move second movement phase, heads north.
Impulse 3 ) Tripod A moves and shoots blip on fort wall - no effect. Impulse 4) - human attempts to activated truck unit B - no movement . Impulse 5) Double move Reaper and drones. Shoots blip behind wall and exposes native infantry. Impulse 6) - Native infantry shoots at drones - no damage. Impulse 7) Tripod B is doubled move and shots at escaping trucks and destroys one. Impulse 8) - Native field guns come out of hiding and drops a template on drones - no effect. 9) Harvester moves.
Impulse 10 and 11) - Native cavalry comes out of hiding and engages drones - only one destroyed in an assault. Impulse 12) Native HMGs reveal themselves on fort wall, fires, and destroys 3 drones. Impulse 13) British infantry shoots tripod B with mini-coil gun - no effect.
|
|
|
|
Post by mikedski on Jan 3, 2016 10:09:07 GMT
Maybe larger scale telephone poles like these Telephone Poles and some sort of electrical wire strung between them. I am thinking O scale telephone poles will work. |
|
|
|
Post by mikedski on Jan 3, 2016 4:07:49 GMT
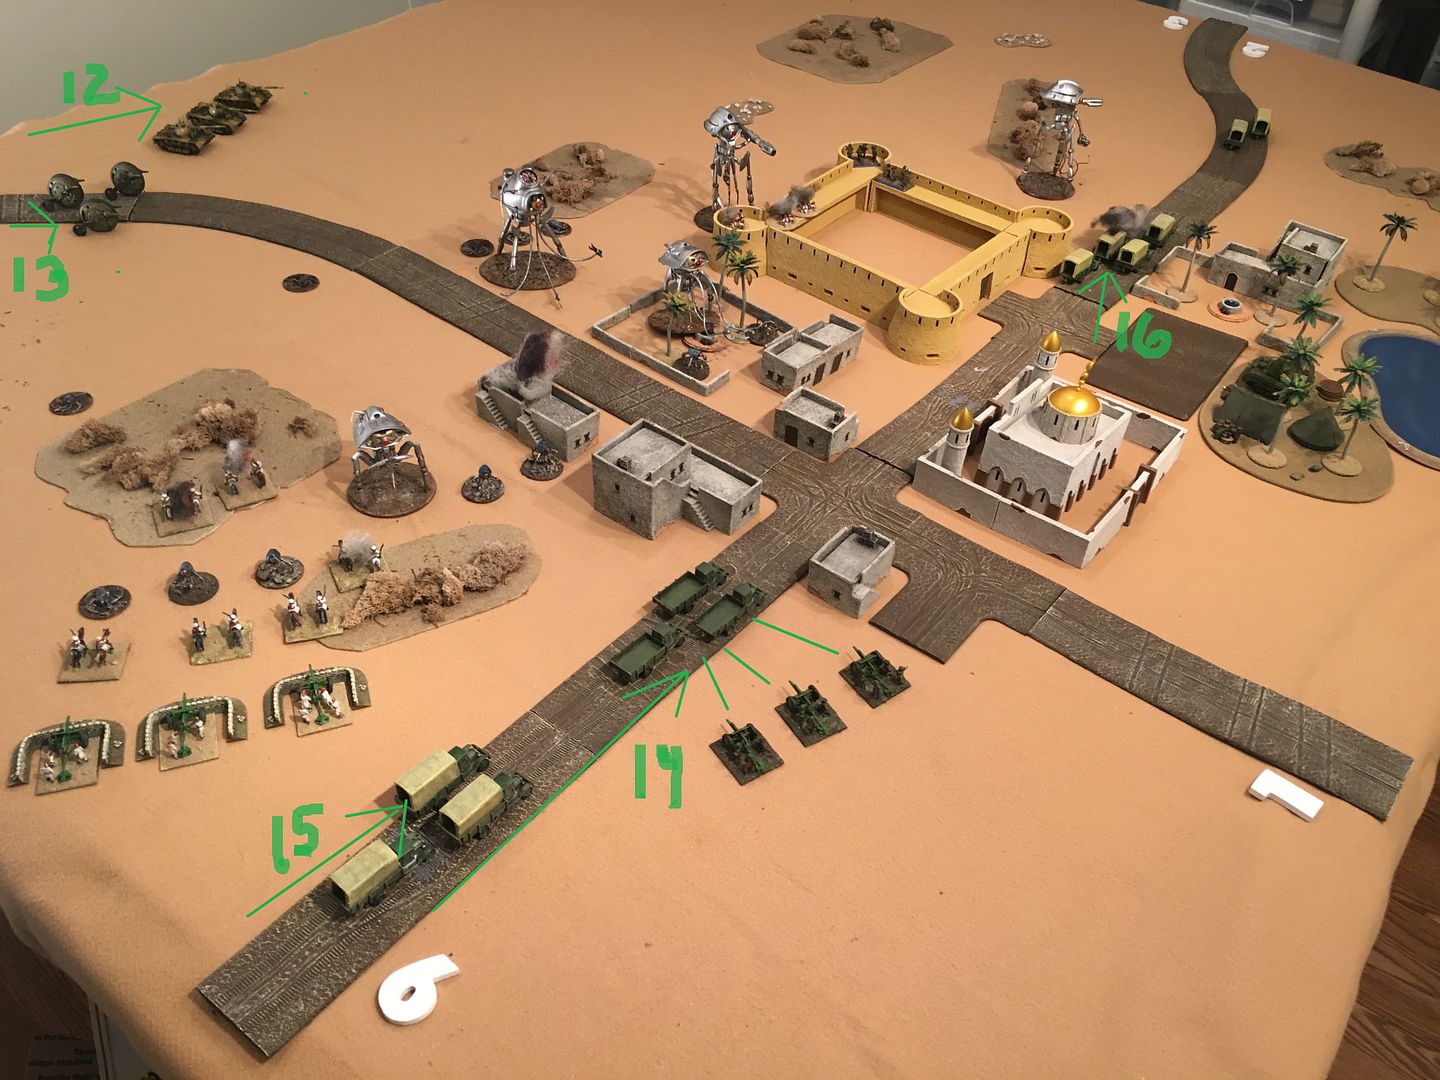
The British Army hurriedly evacuated what they could from southern Egypt and northern Sudan after the fall of Khartoum. The south to north travel route to Cairo was a long trek of hundreds of kilometers and refuel and rest stops were established for the multitude of convoys making the long march. The flying columns of the British Army provided security but were spread very thin. Not only were the Martians advancing from the south but new cylinder landings in the Libyan desert and Qattara Depression produced a new threat that threaten to cut off the retreat to Cairo.
British Forces:
On board:
Refuel and Rest point at the small El Fayida Oasis with a evacuation truck unit preparing to leave (needs reinforcement roll to activate).
El Fayida Fort with evacuation truck platoon preparing to leave for Cairo (needs reinforcement roll to activate)
El Fayida garrison:
Lloyd Command Carrier - Hq for local flying column and refuel point. 125 points - 5 orders tokens
British Army Security detail - Rifle squad 35 points
Native HMG unit - 25 points
Native infantry squad - 20 points
Native field gun battery - 70 points
Bedouin Cavalry two units - 50 points
Reinforcements. Elements of flying column scattered across the area and recalled to defend El Fayida. Each unit will secretly roll prior to game turn 1 to determine there entry road. And then roll starting on turn 2 to determine arrival. With radio communications the British Commander has a good idea generally were his scattered forces are but time of arrival to battle area is not so predictable.
Defiant scout care unit - 55 points
Spector scout car platoon - 55 points
Mono Wheelie unit x2 - 320 points
Field gun battery with flivvers - 95 points
Imperial tank platoon - 270 points
Evacuation truck unit arriving from south at point 6 to travel north to Cairo.
Total - 1120 points
Martian Forces:
Deploy with in center 3 foot section of western edge of board, 6 inches from edge. Drone can be placed a further 6 inches out of the deployment area.
Two assault tripods with black dust launchers : 500 points
One Harvester - 150 points
One Reaper - 150 points
One Slaver - 100 points
4 drone units - 240 points
points - 1140 - 5 orders tokens
Victory Conditions - Martian will earn victory points .
refuel point destroyed - 3 points
Each evac truck destroyed - 2 points
Each evac truck destroyed in assault with harvester within 6 inches - 3 points.
Each building destroyed by direct fire - 1 point (occupants destroyed)
Each building attacked by assault with harvester within 6 inches - 2 points (occupants captured)
Mosque destroyed - 3 Points, I f assaulted successfully 6 points
Harvester has to survive the battle to get the appropriate points.

British Player determined reinforcement entry roads prior to play. All at the southern end of the board.

Home Brew Rules:
Alternate movement impulses within each turn. Initiative determines which side has first movement impulse. British player will roll for reinforcement arrival prior to any movement and then bring on the reinforcement if available as a separate impulse during the turn. Represents advantage of radios.
Artillery has a template of four inches - 3 guns add +1 to to hit die roll, 2 guns no modification, 1 gun then -1 from to hit roll.
More to follow
|
|
|
|
Post by mikedski on Jan 2, 2016 14:43:32 GMT
Thanks for your input.
|
|
|
|
Post by mikedski on Jan 2, 2016 2:10:08 GMT
I found a wonderful item in the Rebel Miniatures line - its a power pole look with generator box at base. Go to rebelminis.com under 28mm Sci-Fi button to Energy Field/Fence stock # efence @ $19.95. Set of 4 poles, with small guage copper wire (craft section Walmart et al.) looks great. BTW this site also has two different Martian Walkers, under the 15mm Sci-Fi tab. A mini at $14.95 and a larger at $29.95 - both of which I use for other machine designs in the game. Originally I did those up as Anti-Aircraft Tripods, but will be expanding their use for other things. Additionally I use the 15mm Modern Tab SAS teams and weapons for British Assault Infantry squads and heavy weapons. Their 15mm Pulp line is also very good with lots of figures to period, even some British colonials with gasmasks on! Do check out the site. Thanks for the tip on Rebel Minis. I see the pole set but they are not what I'm looking for. Though nice looking they are a bit futuristic looking. |
|
|
|
Post by mikedski on Jan 1, 2016 10:16:28 GMT
Some of the items I was looking forward to getting was the human fortification options such as the command and gun towers. Also I was intrigued by he Edison Wires. I guess these are high voltage (or high amp?) direct current lines meant to electrocute a tripod on contact. In the rule book they appear much taller than usual telephone/ telegraph poles.
1) Any ideas on proxy models?
2) Any ideas on rules?
A Tripod attempting to cross during movement phase will suffer a automatic hit with +4 attack. If attack is successful then apply damage per tripod damage table. The wires remain intact. Back up the tripod ( if it survives) an inch away along its approach path.
If the tripod suffers no damage then the wires are snapped and that section is removed.
The wire can be destroyed by direct fire by targeting or assaulting a pole (defense 2 and armor 8) |
|
|
|
Post by mikedski on Jan 1, 2016 9:53:10 GMT
I believe that when a tripod fires you use the front face or the tripod to determine the line of sight and fire within a 180 degree arc parallel to the face piece.
I have been playing that it is NOT weapon with a turret. This has important implications for where a tripod can shoot when immobilized, has a critical weapons hit, or when it has a critical mobility hit and needs to move to bring a target into view. I didn't see anything in the rules or errata.
Am I wrong? |
|
|
|
Post by mikedski on Jan 1, 2016 9:37:58 GMT
Some further thoughts - it would be pretty helpful to come up with some scale for the game. Both in time and especially in space, there is no scales used in AQMF. Interesting and helpful to keep the games ranges, etc. open for free flowing play. I've seen so many historically 'accurate' games bog down due to arguements on ranges or rates of fire due to exact measurements. But, I purpose as a jumping off point for discussion that the game scale is 3mm = 1'. This is based on the size of the figure (18mm) respresenting a 6' man. I realize that most human species have only recently in human history achieved a 6' average size, but for game purposes we can use this. So a human figure is roughly 2yds tall. For time lets give it a 12 minute per turn base. This allows for 5 turns being an hour, the rolled extension bringing the battle close to and hour & one-half. 12 is also very divisionable, by 2s or 3s, allowing for more complex turns for those wanting to change the turn sequence. The lack of opportunity fire is assumed in the the turns size, with the move/fire or assault/move being more tactical and the orders move (no fire/assault phase) putting you in affect in a opportunity fire by the defenders phase setup. I'm not making alot of sense here I'm afraid - more coffee. Bottom line Time Scale - one turn is 12 minutes Space Scale 3mm = 1'. Comments? I do not think the designer of the game was thinking that hard about the distance/ time scales other than HO provides a cool opportunity for modeling and still can play on the usual 6x4 foot table. The relatively short direct fire weapon ranges encourage maneuver. A turn is a turn because someone has to move and shoot.
How's the coffee? Happy New Year!
|
|


