|
|
Post by mikedski on Jan 16, 2016 22:29:44 GMT
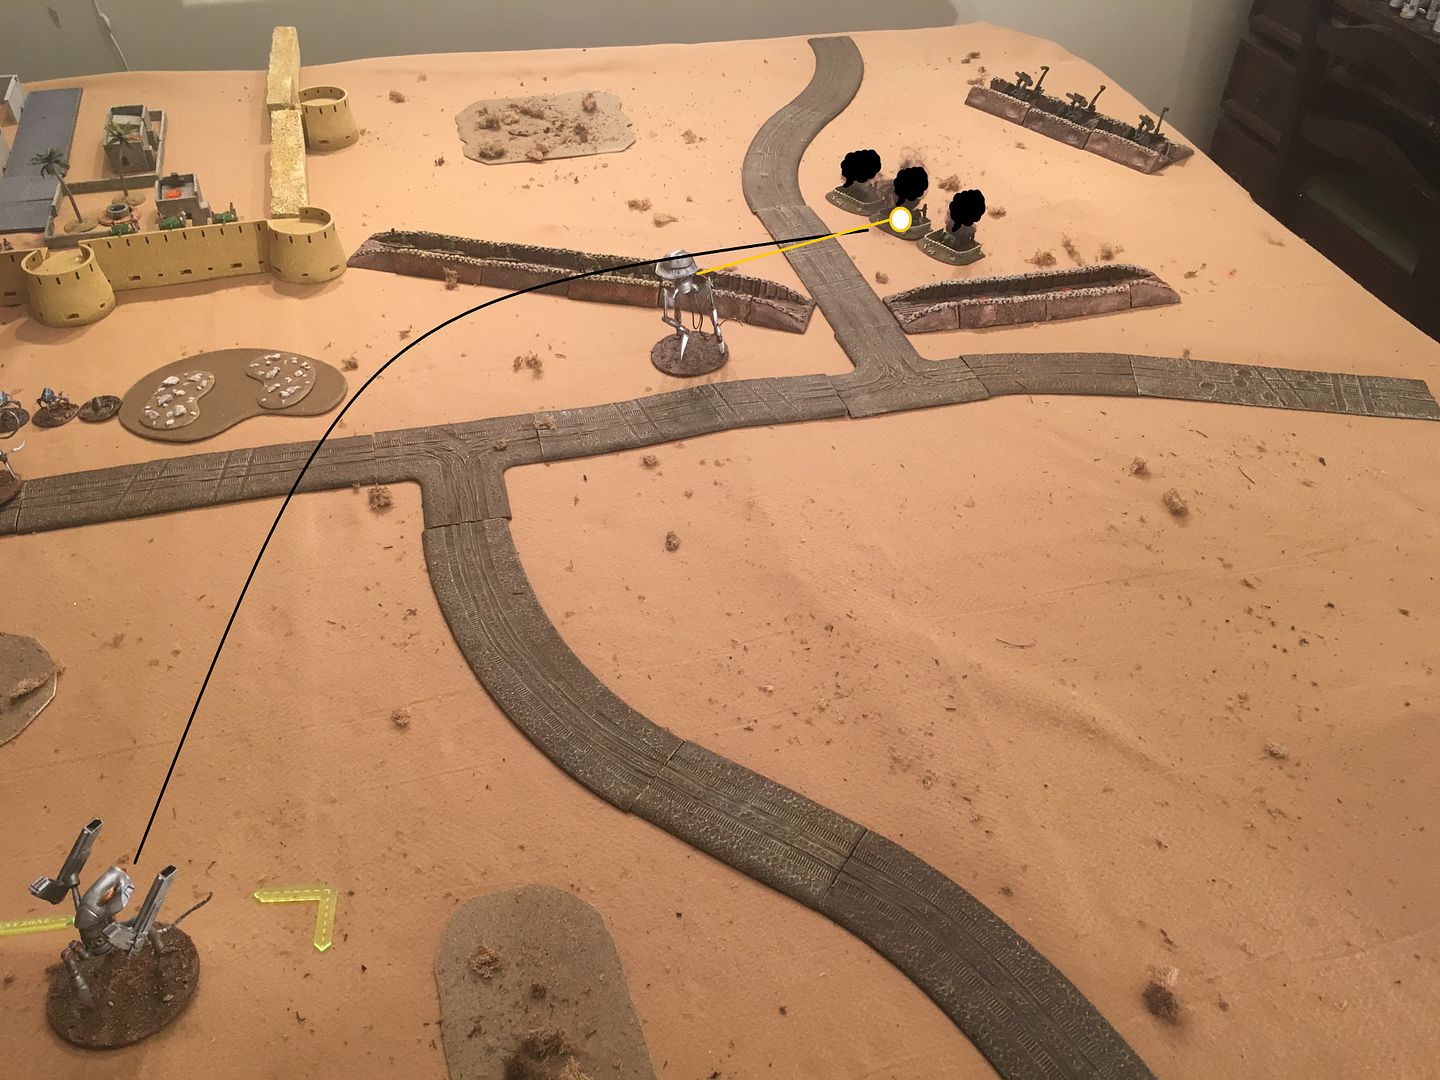
Turn 4 Reinforcements - No Martian, British coil guns can arrive. USMC HMG unit can move and shoot. Martians win initiative. The Reapers and Command Tripod continue to smash at the wall causing further damage. Remaining drones attack but can only destroy one native infantry team. The arriving USMC machine guns and native infantry destroy the last of the drones. The British infantry use coil guns to shoot Command tripod and inflict a damage point. Arriving harvesters get a lucky shot and destroy the last field gun. A routed native infantry fails morale at the board edge. 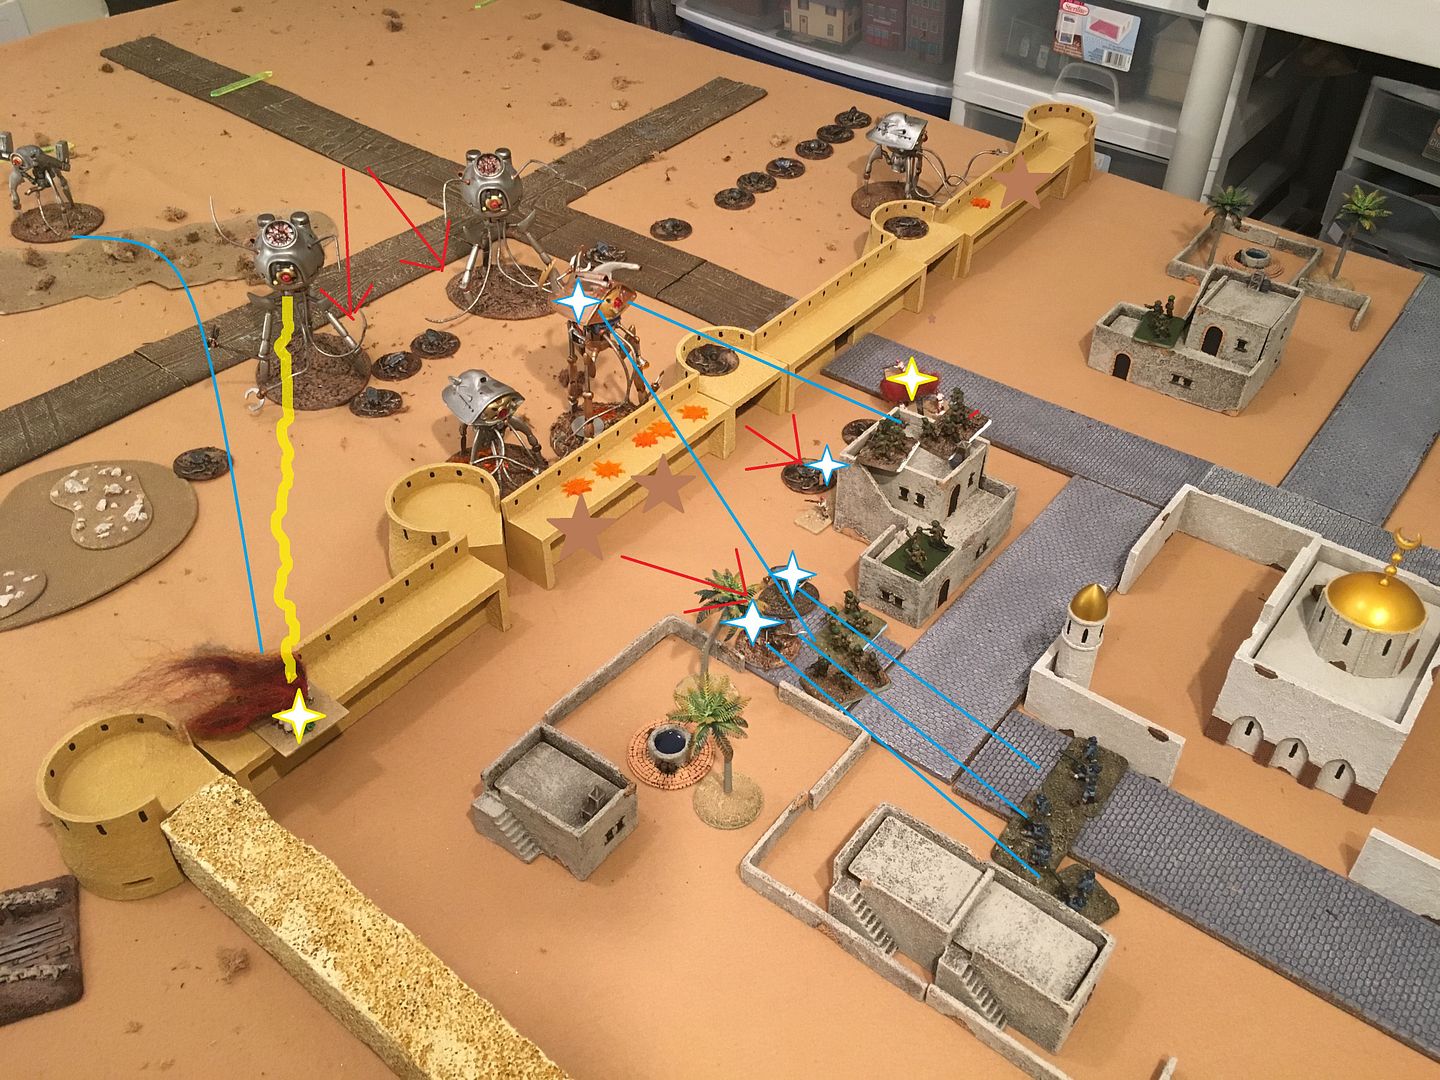 The imperial tanks double move to shoot the damaged reaper. whiff. The assault tripod doubles and sweeps destroying a tank. The tanks move, fire and damage the tripod in return. The veteran tripod doubles, sweeps the tanks (+4 sweep) and destroys both. Grenadiers using shock bombs destroy the other remaining tanks. 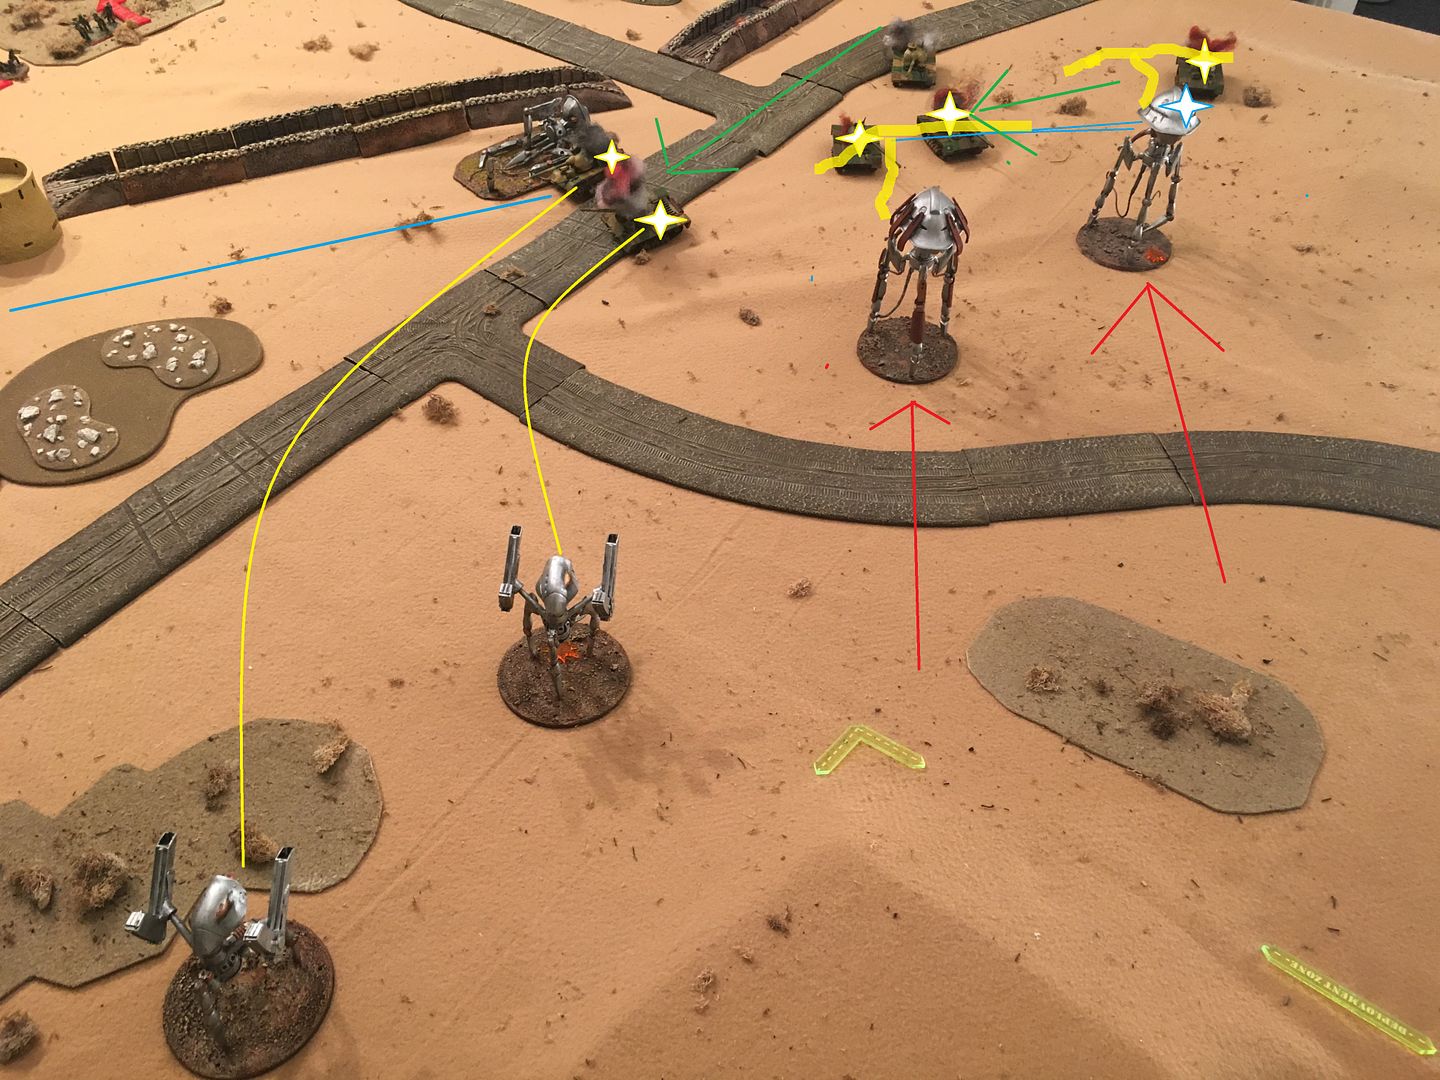 The Martians are now in position for the breach at any moment. Only a thin infantry screen awaits them. The coil tanks (highlighted) arrive next to the remaining routed Heavy Gun. The routed HMG and squad continue to move. Human Losses 9 units - Remaining 13 units ( two units on verge of needing morale check at board edge). 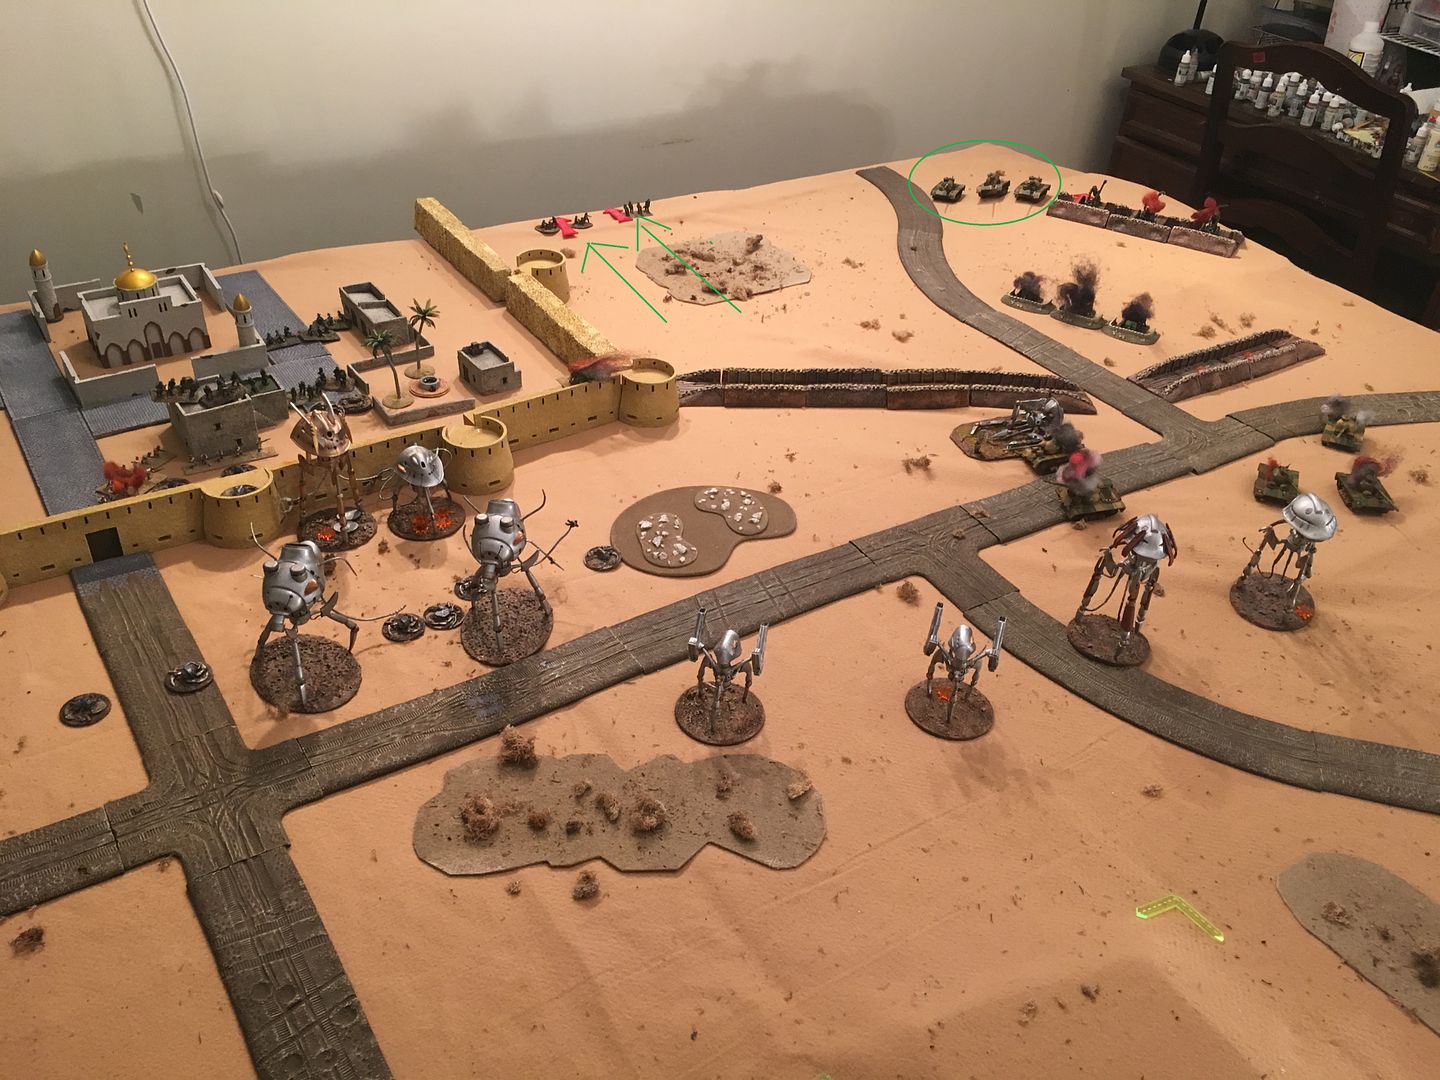 |
|
|
|
Post by mikedski on Jan 16, 2016 20:46:13 GMT
Turn 3 Reinforcements - no British, no USMC. Martians can move an assault tripod. Martians win initiative. Southern reaper damages wall again and the surviving HMG team is destroyed as collateral damage. The command tripod moves over to smash at the weakened wall and causes another damage point. The northern tripod damages a wall section. Further melee occurs as the drones move off the wall. HQ units reveal themselves to double time infantry to counterattack. 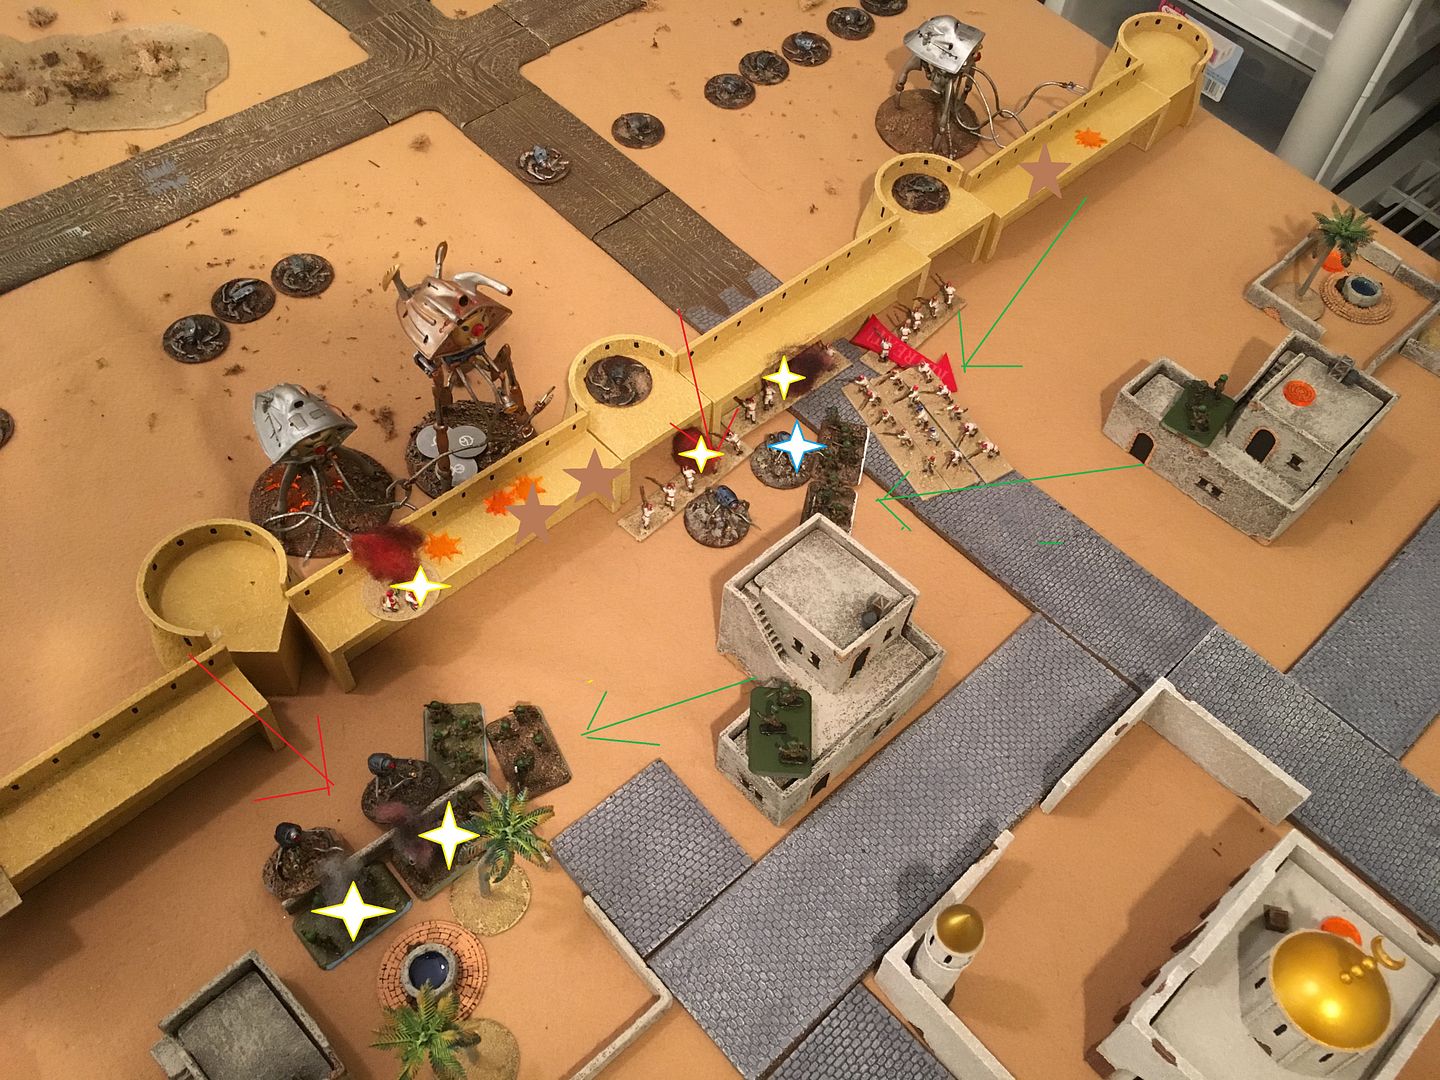 Io the south tripods and tanks trade shots - the veteran tripod destroys an imperial tank. A grenadier smokes the British infantry, kills one, the other routs. The imperial tanks fire on a grenadier and can only inflict a measly damage point. 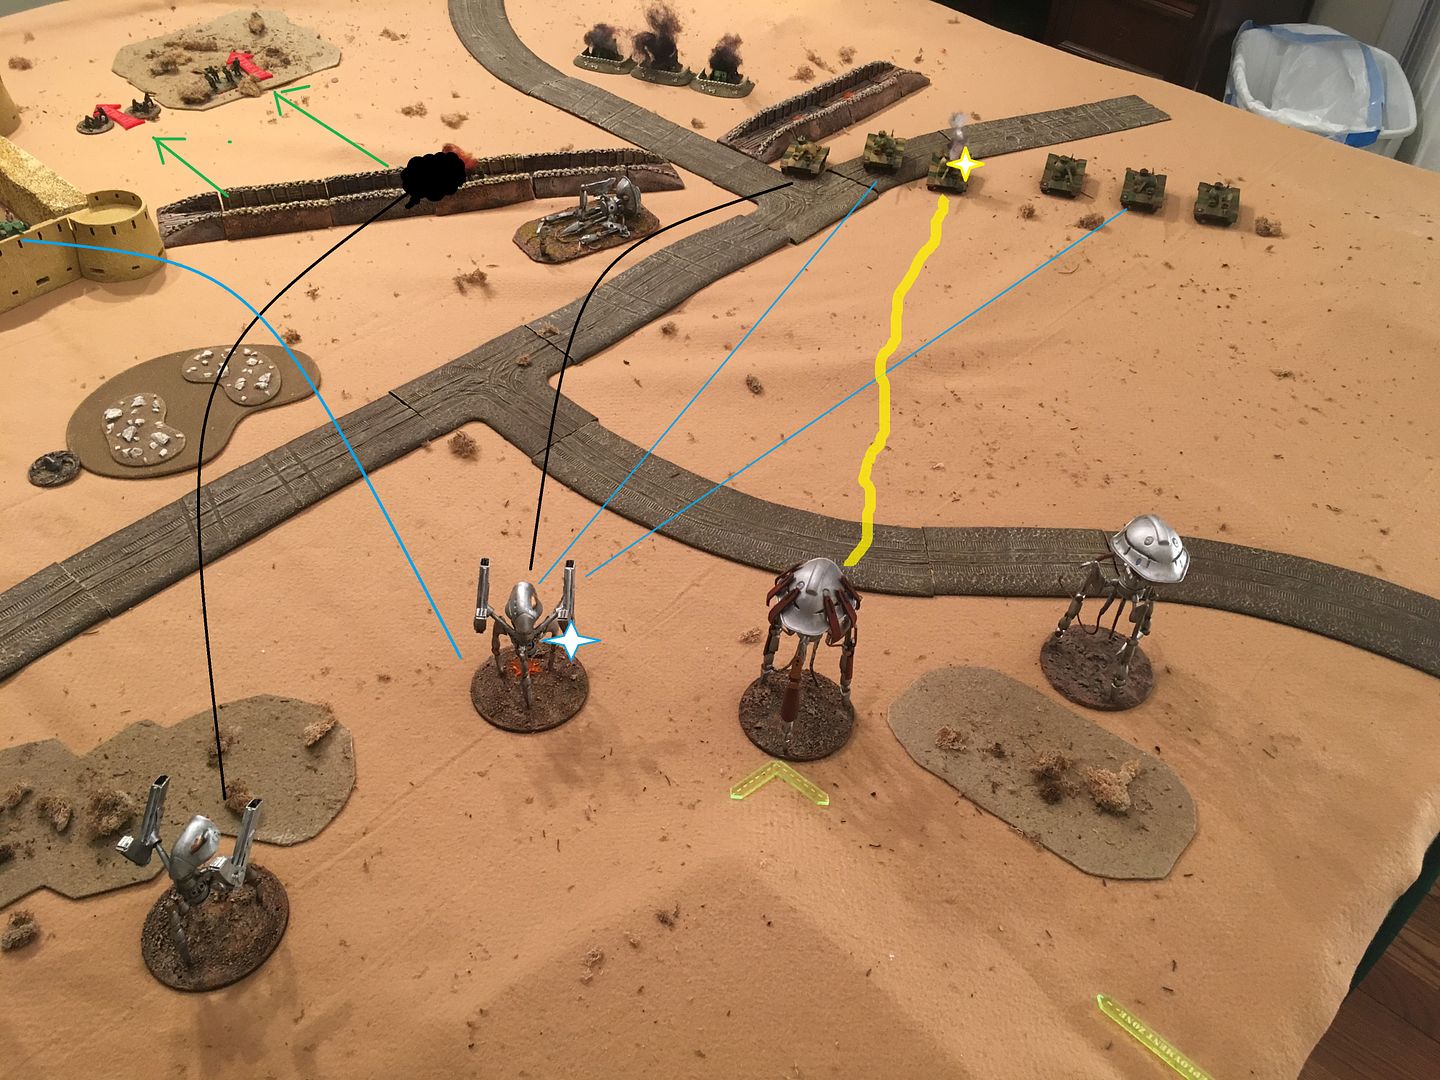 |
|
|
|
Post by mikedski on Jan 16, 2016 20:29:37 GMT
Turn 2 Reinforcements. British can bring on imperial tanks - move and shoot. No USMC arrives. Martians can bring on veteran tripod move and shoot. Martians win initiative. Martians quickly double move damaged reaper and inflicts a damage point on the wall (fortress wall rules page 73). Its companion drones move and assault the field guns on the wall and destroy two guns. Hvy arty damages the reaper again. Then it's a melee between drones and infantry defenders. British squads come out of hiding to counter assault. The Northern reaper assaults the native HMGs on the northern wall instead of smashing the wall and flails them to death. 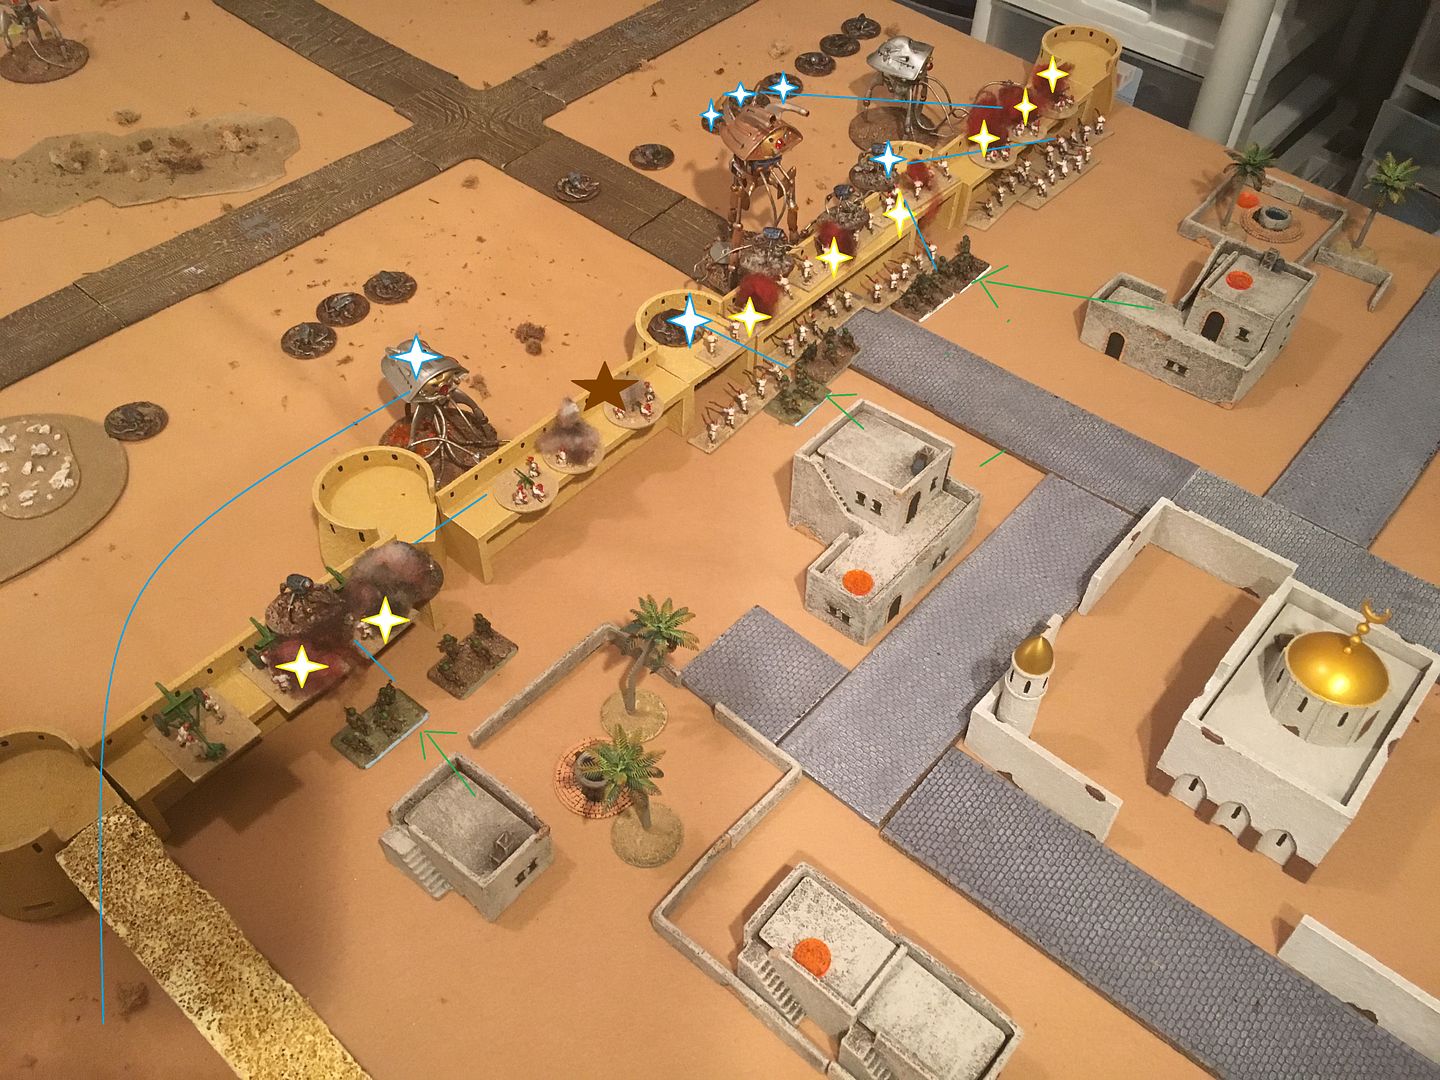 South of the city walls the scout paints the hvy guns and a grenadier uses black dust to destroy two and route the third (what happens to a routed unit that cannot move?}. The near by British infantry assaults and causes a damage point. The second grenadier kills a British HMG team and the other two rout. Two imperial tank platoon arrive and engage the scout - multiple hits cause the scout to collapse. 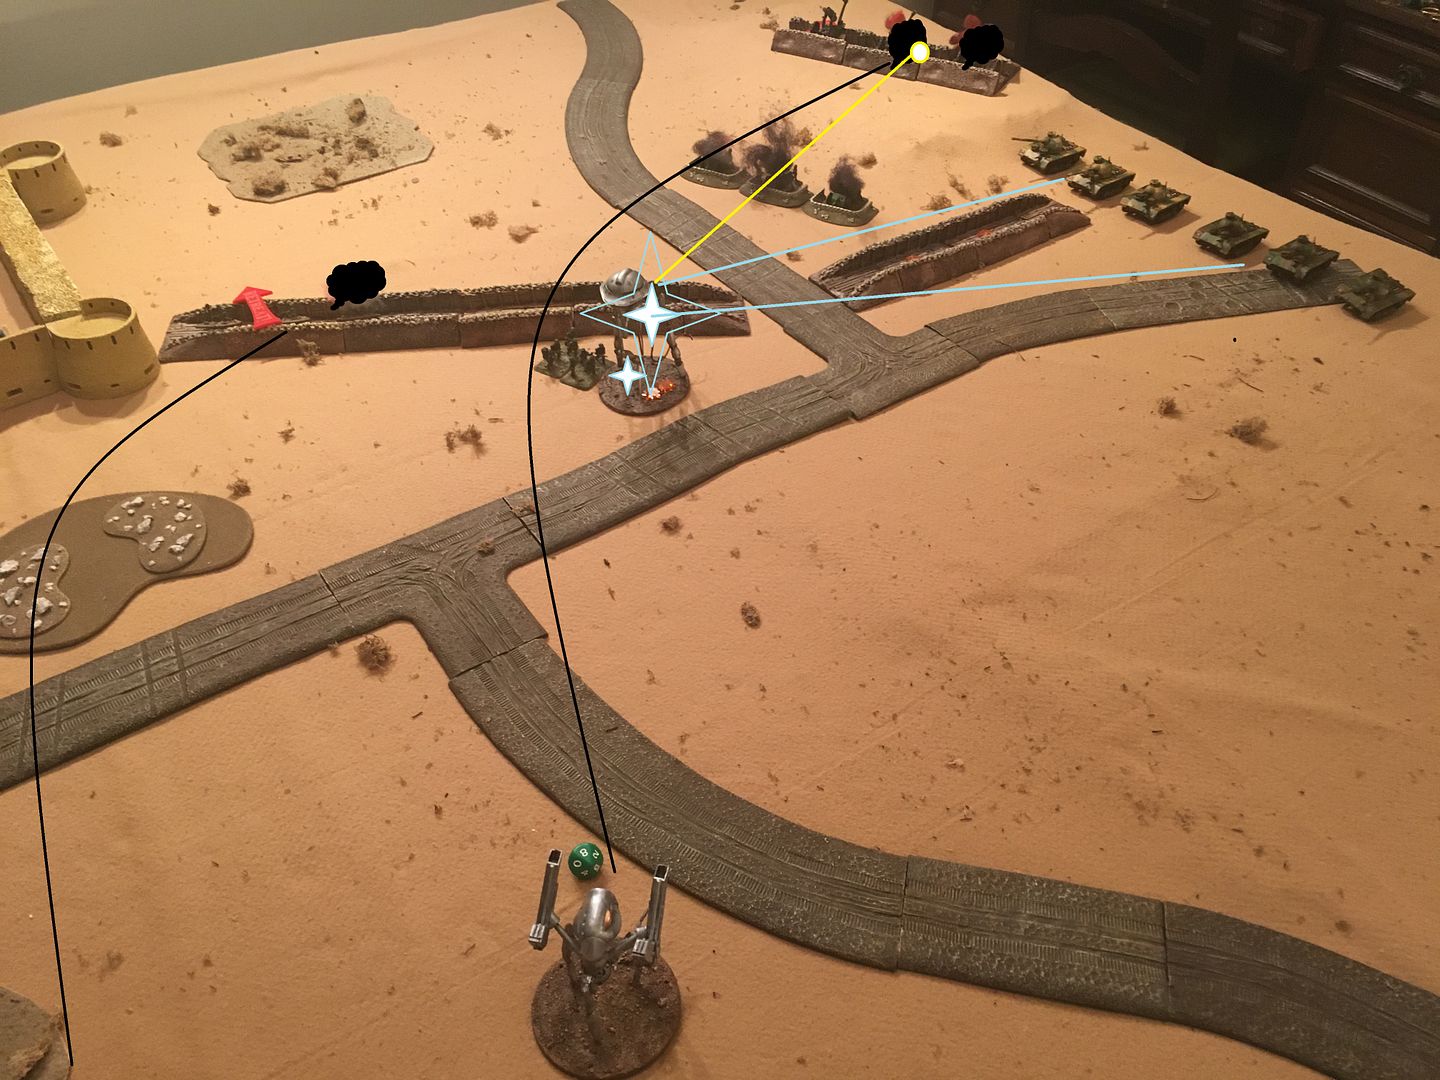 Not pictured: The harvesters are brought on board and approach the city walls, The veteran tripod arrives and takes a shot and misses. Surviving native field gun misses grenadier. |
|
|
|
Post by mikedski on Jan 16, 2016 16:05:46 GMT
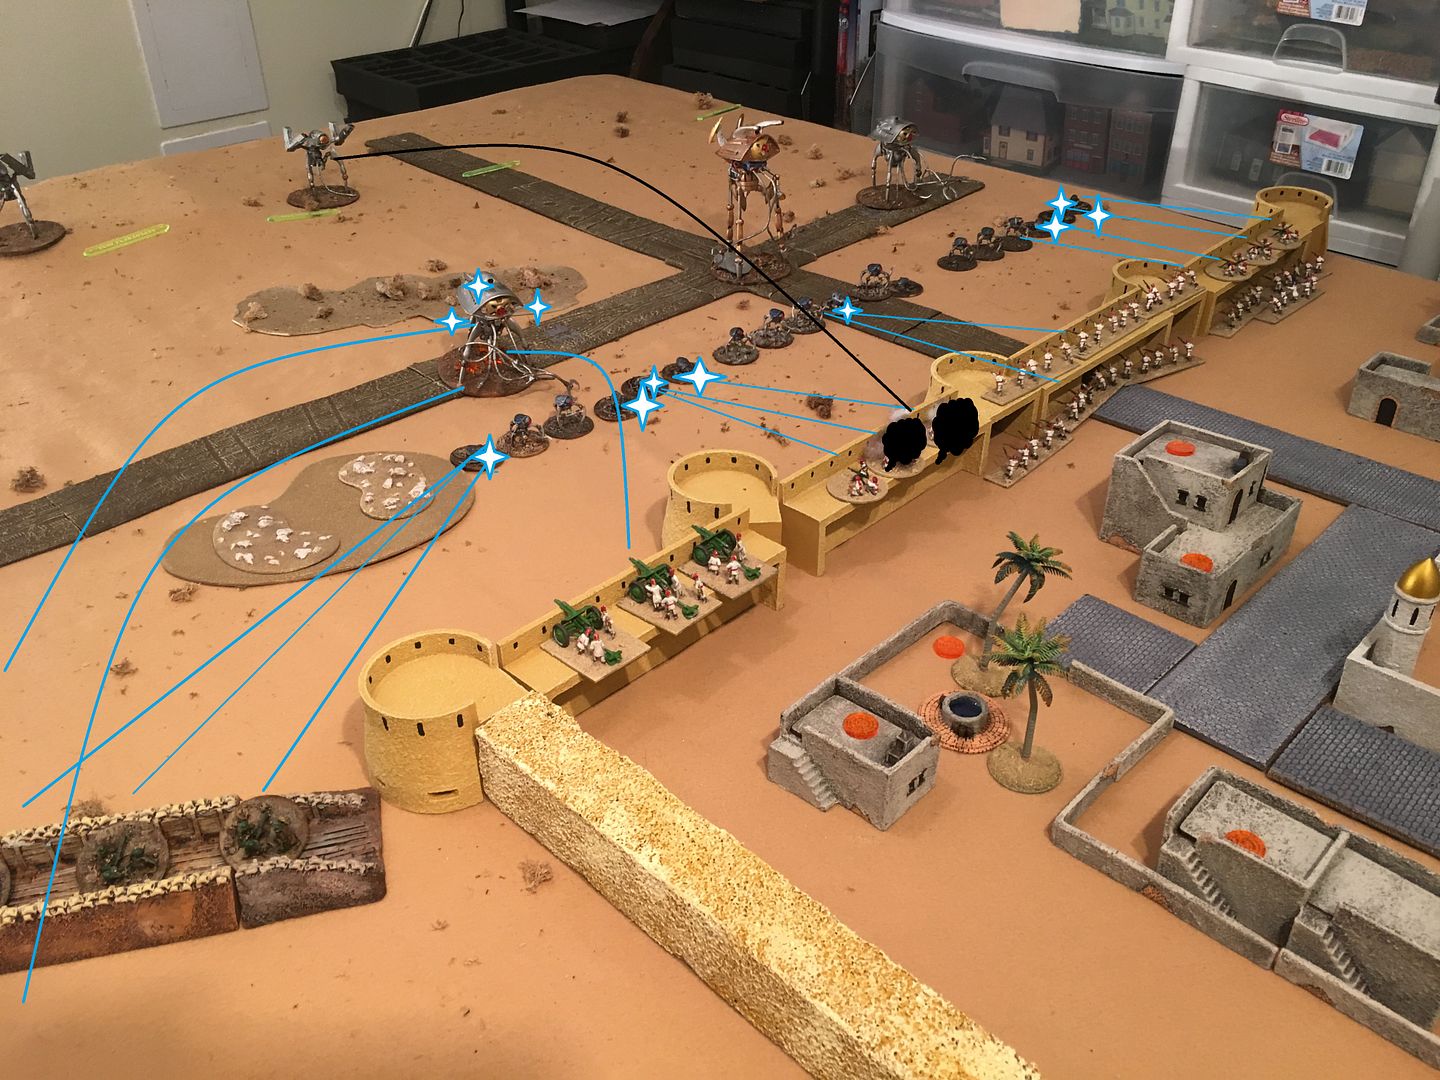
Martians have initiative - pre game bombardment - southern reaper is hit - on damage point.
Turn 1 - The Martians advance with a double move - the defenders open up and destroy half the drones. Black dust kills two native MG teams. Humans mass arty fire on the wounded southern reaper inflicting 2 more damage points.
Turn1: The Martian scout double times to spot the now revealed British field guns. The grenadier makes short work of them with black dust. The British infantry fired coil gun at scout - no effect.
|
|
|
|
Post by mikedski on Jan 15, 2016 9:40:21 GMT
Couple thoughts on modifying alternating movement and initiative that I have used:
1) Maybe allow the player that won initiative to expend an order token to allow an additional friendly unit to move in the first impulse.
or
2) depending on the spread between the competing die rolls for initiative determine how many friendly units can take the first impulse:
If a player wins the initiative roll by 3 points or greater - can move two units first impulse If a player wins the initiative roll by 5 points or greater - can move three units first impulse
Would tend to favor human player more with the initiative modifiers or British initiative rules. But then again initiative is a human concept.
|
|
|
|
Post by mikedski on Jan 15, 2016 9:27:28 GMT
Wow looks great, what type of paint did you use for the gold on the royal scientist? Thanks.
Base of army painter plate metal spray, citadel auric gold, dry griffon gold. I think. I can never remember the recipes I use.
|
|
|
|
Post by mikedski on Jan 15, 2016 9:19:31 GMT
Wonderful layout - what is the size of the table(s) and in particulary where did you get those wonderful round fortress towers and walls (yes I recongize the painted styrofoam, I mean the models). Looking forward to the report - will you be using alternative intiative unit or the more free flowing system you first described?? Good stuff and thanks for the background report (OOBs). 1) Awh schucks. You recognize the floral foam. Back to the drawing board. 
2) The walls and turrets are from the battle front/ flames of war desert fortress and ruins set.
3) I dunno. Most likely alternating impulses.
|
|
|
|
Post by mikedski on Jan 15, 2016 1:23:07 GMT
The Walls of Cairo
The Martians begin the long anticipated assault on Cairo. After the General Maxwell's disastrous initial expedition into the desert the British Army of Egypt learned two lessons. Going toe to toe with the invaders in the deep desert was a battle of attrition that could not be won. However, the Martian machines were not invincible and quite vulnerable to the new British weapons. The past six weeks during the general retreat back to Cairo did produce tactical victories such as El Fayid Oasis but strategically the results were preordained. Defending Cairo negated what ever advantage the British Army had in mobility and trading space for time. But it would not fall without a fight.
Martian Forces: 2215 points
Objective - Breach the walls of Cairo and move into the heart of the city by exiting as many machines as possible off the east edge of the board within the city walls .
Deployed Breaching Cell :
Royal Assault Tripod/ Breach Leader ( Armor 11, speed 6, Heavy Heat ray, Reaper Claws x2, Heat Saw power +6 using sweep template range 4 inches , controller)
250 points
Reaper tripods x2 300 points
drones 6 units 360
Deployed Bombardment Cell
scout with targeter 155
grenadier tripod x2 200
Reserves (Move on table when breach is imminent)
Hunting cell
Harvesters x2 300
Reinforcements ( Exploit the breach of fight counterattacks)
Assault Cell
Veteran Tripod 250
Assault Tripod x2 400
Human Forces. 1690 points
Prevent the breach of the walls. Failing that prevent Martian exploitation of the breach.
Cairo Garrison
Native Infantry 3 units 60 points
Native HMG 2 units 60 points
Native field guns 70 points
British Cmd Squad x2 50 points
British Infantry 4 units 140 points
British HMG 40 points
British field guns 80 points
British Heavy Artillery 180 points
City Reinforcements (arrive east edge within city walls)
The United States had dispatched forces to assist in the evacuation of US nationals from Egypt. The US Consulate has committed US Marines to the defense of Cairo.
USMC HQ and infantry unit - 115 points
USMC snipers 40 points
USMC HMG teams 45 points
Mobile Reserve (Arrives east or south edge of board outside city walls)
The British Army has been able to piece together a single tank squadron as a mobile reserve and is now being ferried across the Nile south of Cairo . The first platoon has just arrived and is available.
Imperial tank platoon 270 points
Mobile Reinforcements (Arrives east or south edge of board outside city walls)
Remainder of the scratch tank squadron still being ferried.
Imperial tank platoon 270 points
Imperial coil tank platoon 270 points
|
|
|
|
Post by mikedski on Jan 8, 2016 17:19:31 GMT
I am in the occupied zone. Darn allergy to red weed!
|
|
|
|
Post by mikedski on Jan 8, 2016 12:33:13 GMT
I'm happy for your success. You just reminded me to preorder the other book, too. Congratulations!
|
|
|
|
Post by mikedski on Jan 6, 2016 18:43:12 GMT
I guess red felt sections with lichen on top. What are the table top rules for red weed?
|
|
|
|
Post by mikedski on Jan 6, 2016 13:30:27 GMT
I rather they make red weed mat cutouts like they have for steams, roads , woods to place as desired.
|
|
|
|
Post by mikedski on Jan 6, 2016 12:23:49 GMT
If I have any frustration with Martian tactics is that all the interesting tripods are too slow and generally under armored. Human prey and infantry can outrun a good part of the Martian war machines. 6 inch move vs an 8 inch move is a bigger deal than it appears. Also the ones that have a decent speed cannot assault.
|
|
|
|
Post by mikedski on Jan 4, 2016 14:12:18 GMT
Love all the touches and what a great battle. Did you make the downed drone markers yourself? Also are the truck the actual fliver models? I made the destroyed drones using a resin molding kit I bought at the local big box craft store Hobby Lobby. I have some for my scorpions, too. The flivvers are from Alien Dungeon. |
|
|
|
Post by mikedski on Jan 4, 2016 14:08:05 GMT
Wow what a miracle moment. The lack of the Martian reinforcements was felt. Not sure how I'll ever top your displays with all the markings on the movement/fire/etc. How do you overlay those pinned in stuff?? Excellent write up as always and wonderfully great setup and battle!  There is a paint tool with my photo editor. I mark them up and load into photobucket. In this scenario I had all the Martian points on board to give the Martians the edge given the scenario. |
|


