|
|
Post by mikedski on Jan 3, 2016 4:07:49 GMT
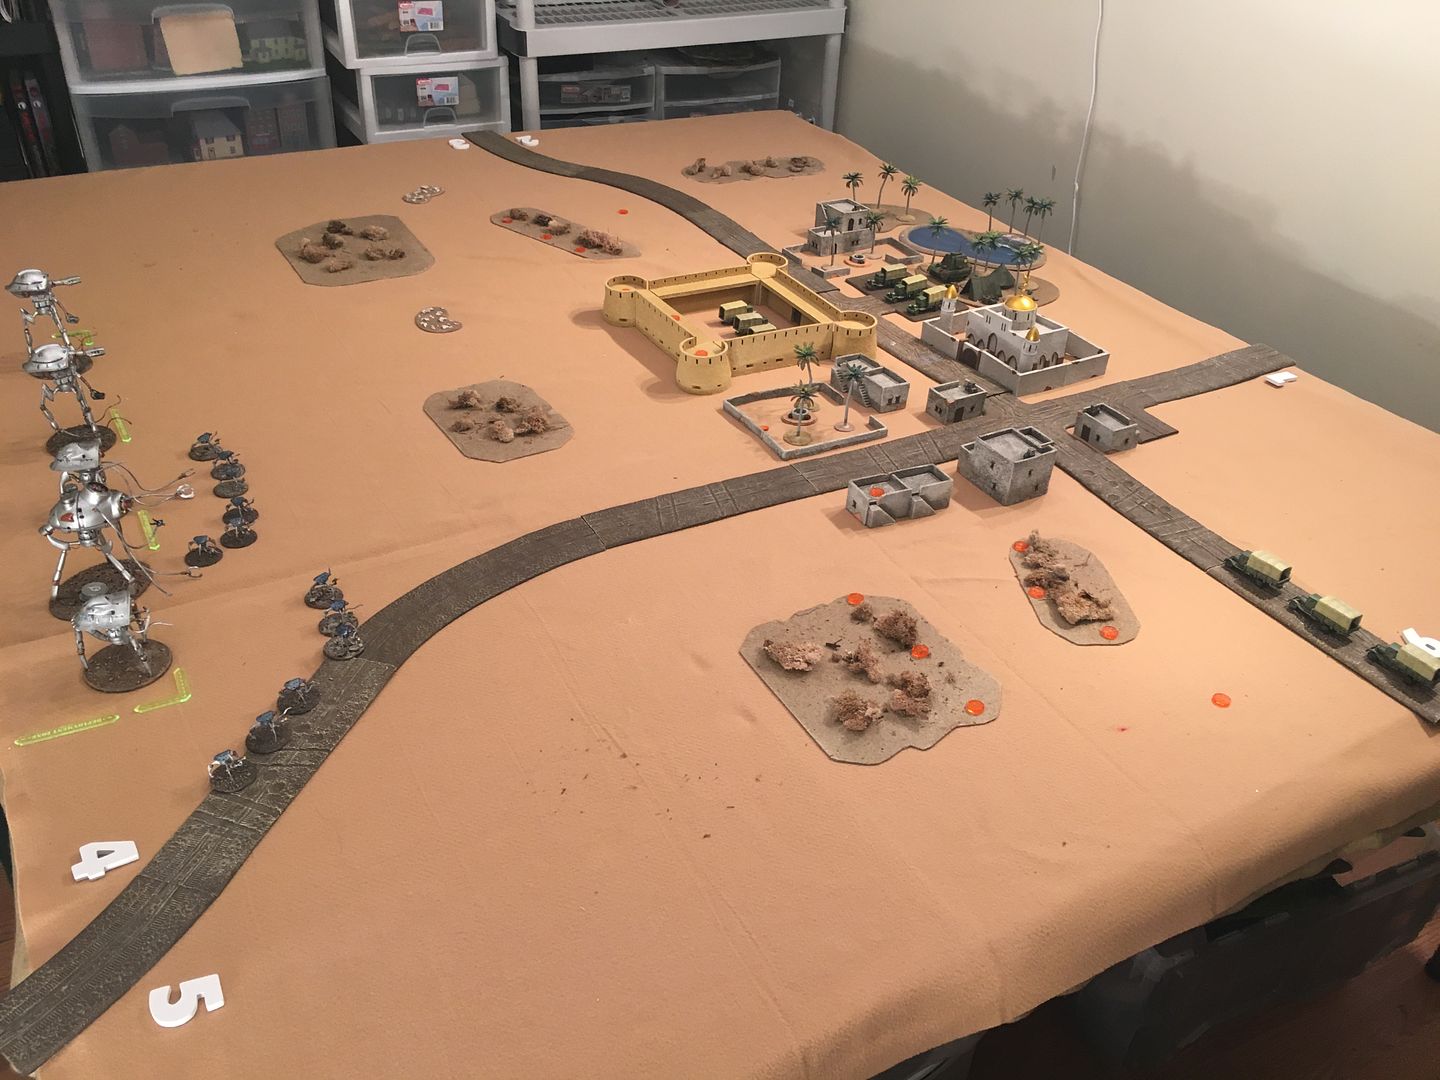
The British Army hurriedly evacuated what they could from southern Egypt and northern Sudan after the fall of Khartoum. The south to north travel route to Cairo was a long trek of hundreds of kilometers and refuel and rest stops were established for the multitude of convoys making the long march. The flying columns of the British Army provided security but were spread very thin. Not only were the Martians advancing from the south but new cylinder landings in the Libyan desert and Qattara Depression produced a new threat that threaten to cut off the retreat to Cairo.
British Forces:
On board:
Refuel and Rest point at the small El Fayida Oasis with a evacuation truck unit preparing to leave (needs reinforcement roll to activate).
El Fayida Fort with evacuation truck platoon preparing to leave for Cairo (needs reinforcement roll to activate)
El Fayida garrison:
Lloyd Command Carrier - Hq for local flying column and refuel point. 125 points - 5 orders tokens
British Army Security detail - Rifle squad 35 points
Native HMG unit - 25 points
Native infantry squad - 20 points
Native field gun battery - 70 points
Bedouin Cavalry two units - 50 points
Reinforcements. Elements of flying column scattered across the area and recalled to defend El Fayida. Each unit will secretly roll prior to game turn 1 to determine there entry road. And then roll starting on turn 2 to determine arrival. With radio communications the British Commander has a good idea generally were his scattered forces are but time of arrival to battle area is not so predictable.
Defiant scout care unit - 55 points
Spector scout car platoon - 55 points
Mono Wheelie unit x2 - 320 points
Field gun battery with flivvers - 95 points
Imperial tank platoon - 270 points
Evacuation truck unit arriving from south at point 6 to travel north to Cairo.
Total - 1120 points
Martian Forces:
Deploy with in center 3 foot section of western edge of board, 6 inches from edge. Drone can be placed a further 6 inches out of the deployment area.
Two assault tripods with black dust launchers : 500 points
One Harvester - 150 points
One Reaper - 150 points
One Slaver - 100 points
4 drone units - 240 points
points - 1140 - 5 orders tokens
Victory Conditions - Martian will earn victory points .
refuel point destroyed - 3 points
Each evac truck destroyed - 2 points
Each evac truck destroyed in assault with harvester within 6 inches - 3 points.
Each building destroyed by direct fire - 1 point (occupants destroyed)
Each building attacked by assault with harvester within 6 inches - 2 points (occupants captured)
Mosque destroyed - 3 Points, I f assaulted successfully 6 points
Harvester has to survive the battle to get the appropriate points.

British Player determined reinforcement entry roads prior to play. All at the southern end of the board.

Home Brew Rules:
Alternate movement impulses within each turn. Initiative determines which side has first movement impulse. British player will roll for reinforcement arrival prior to any movement and then bring on the reinforcement if available as a separate impulse during the turn. Represents advantage of radios.
Artillery has a template of four inches - 3 guns add +1 to to hit die roll, 2 guns no modification, 1 gun then -1 from to hit roll.
More to follow
|
|
|
|
Post by Quendil on Jan 3, 2016 10:54:03 GMT
Love that terrain and looking forward to seeing more pictures
|
|
|
|
Post by mikedski on Jan 3, 2016 12:42:33 GMT
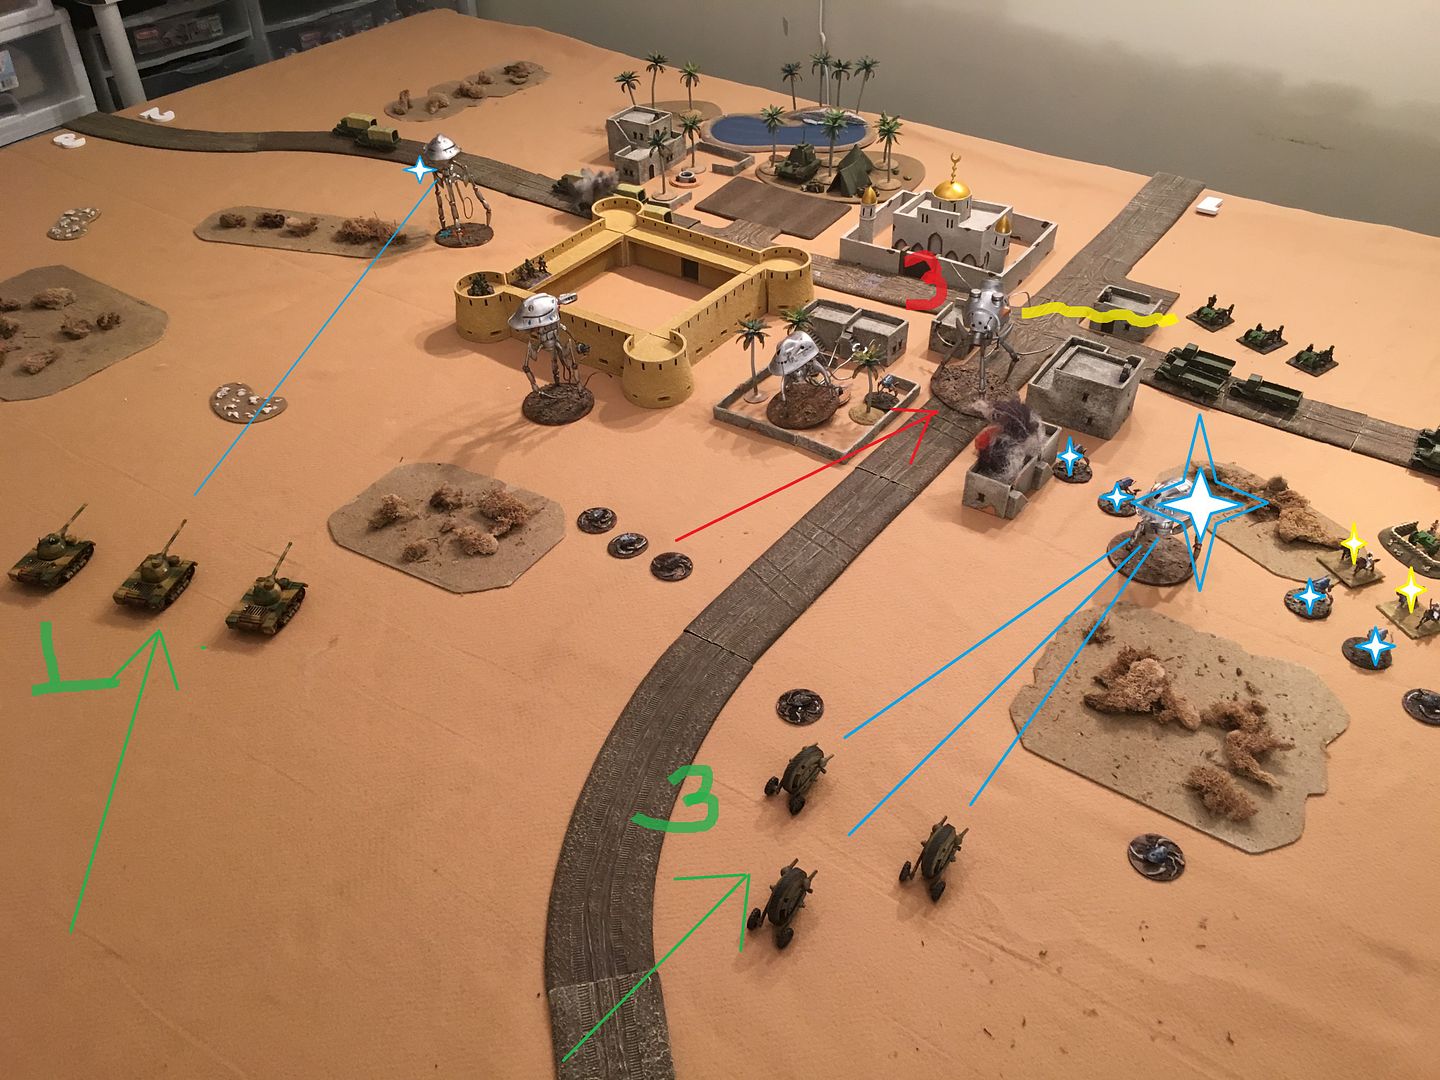
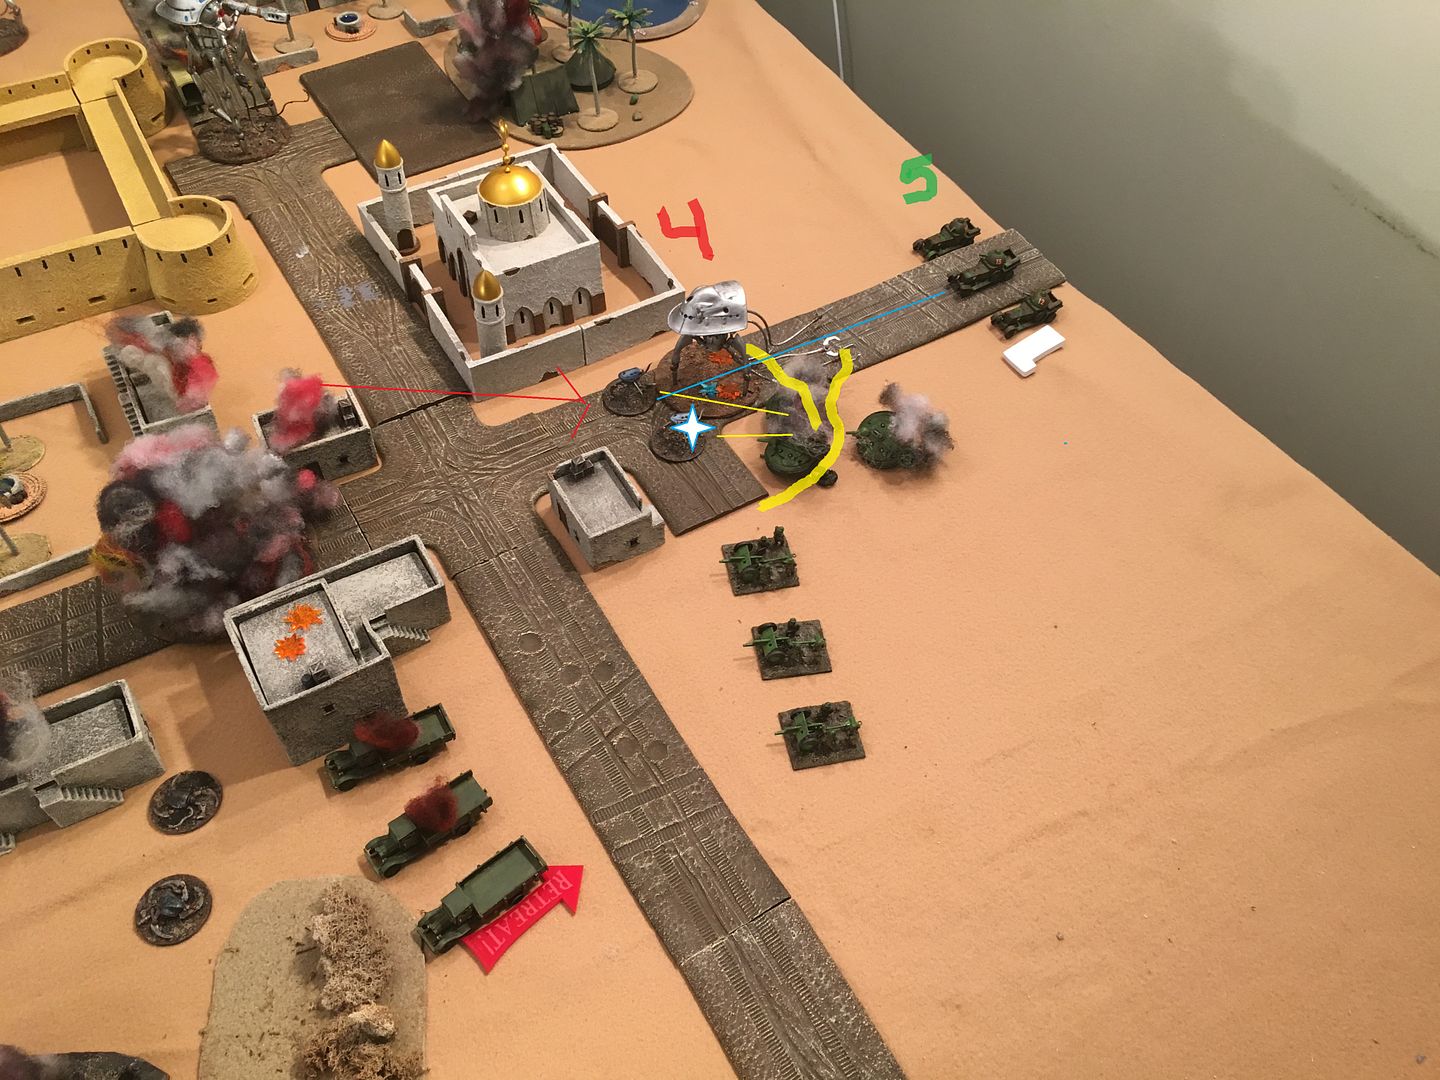
Turn 1 - Martian wins initiative die roll. - British elects not to use token for turn 1 initiative advantage.
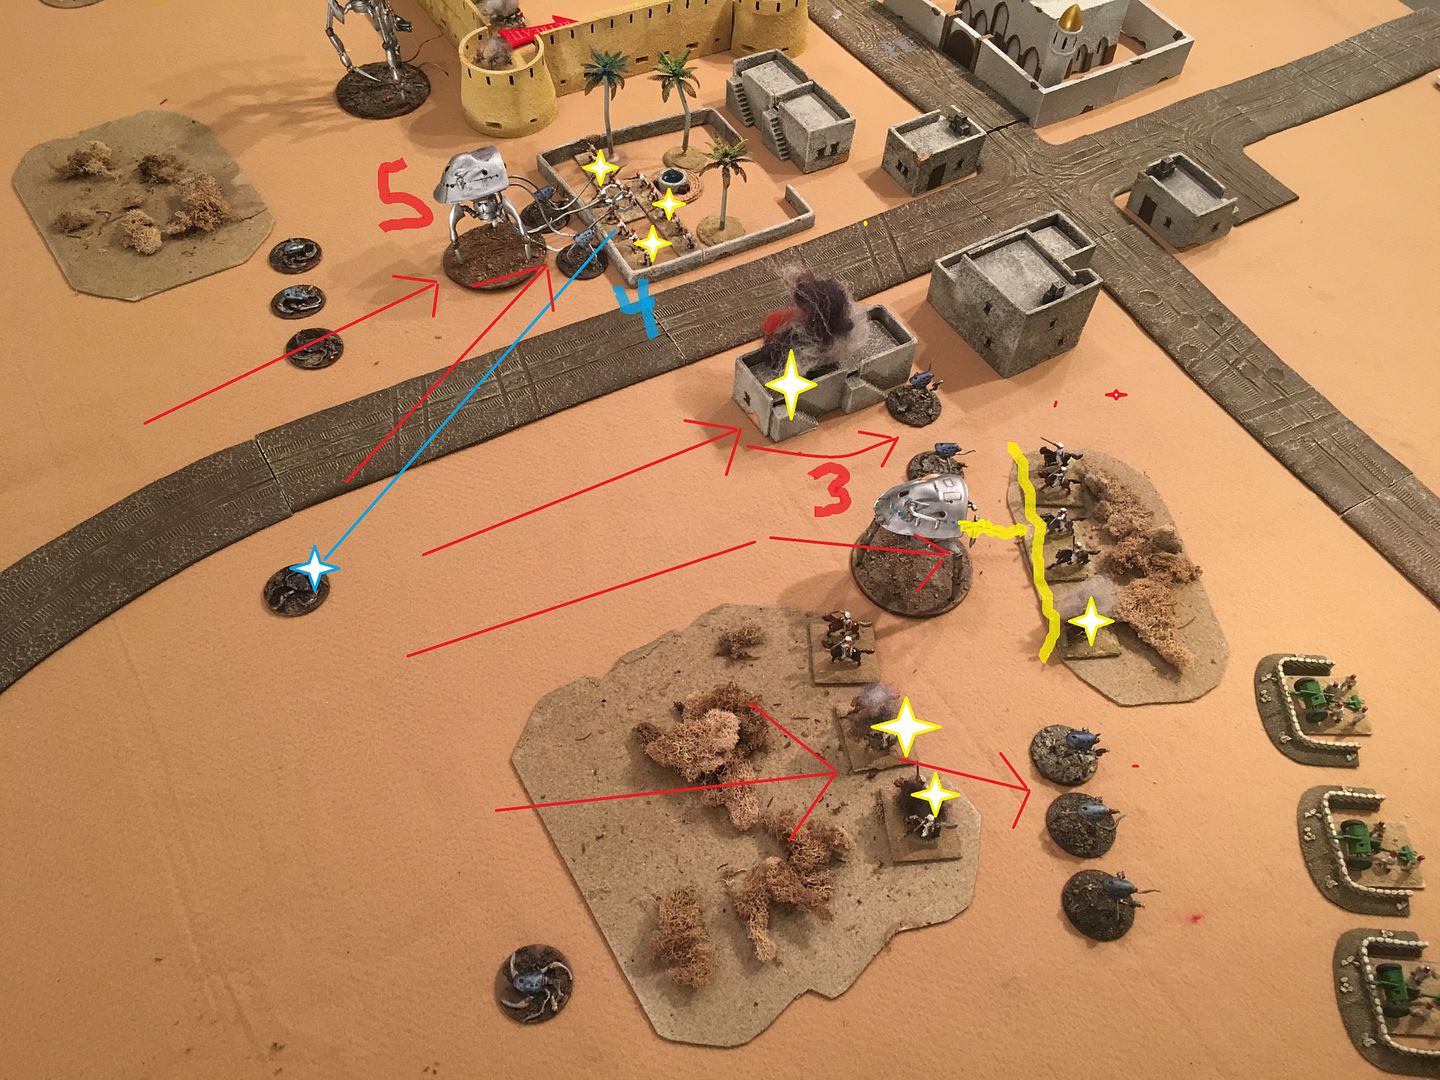
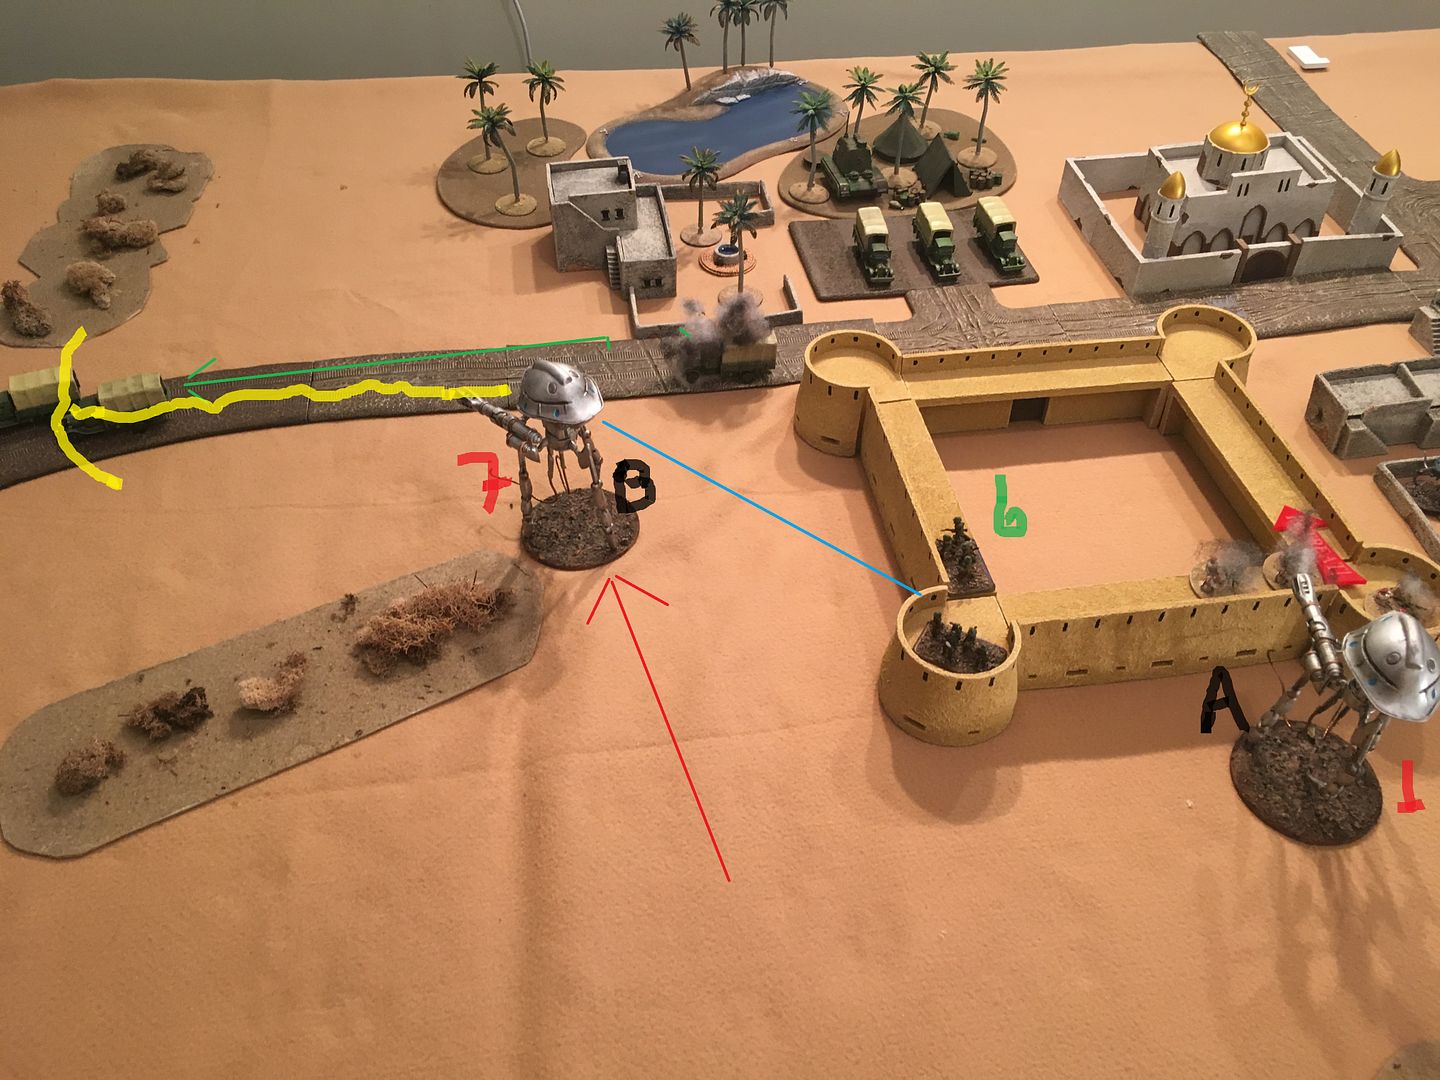
Impulse 1) Slaver and drones moved at double speed. Slaver shoots blip and no effect. Impulse 2) - Human activated truck unit in the fort - able to move second movement phase, heads north.
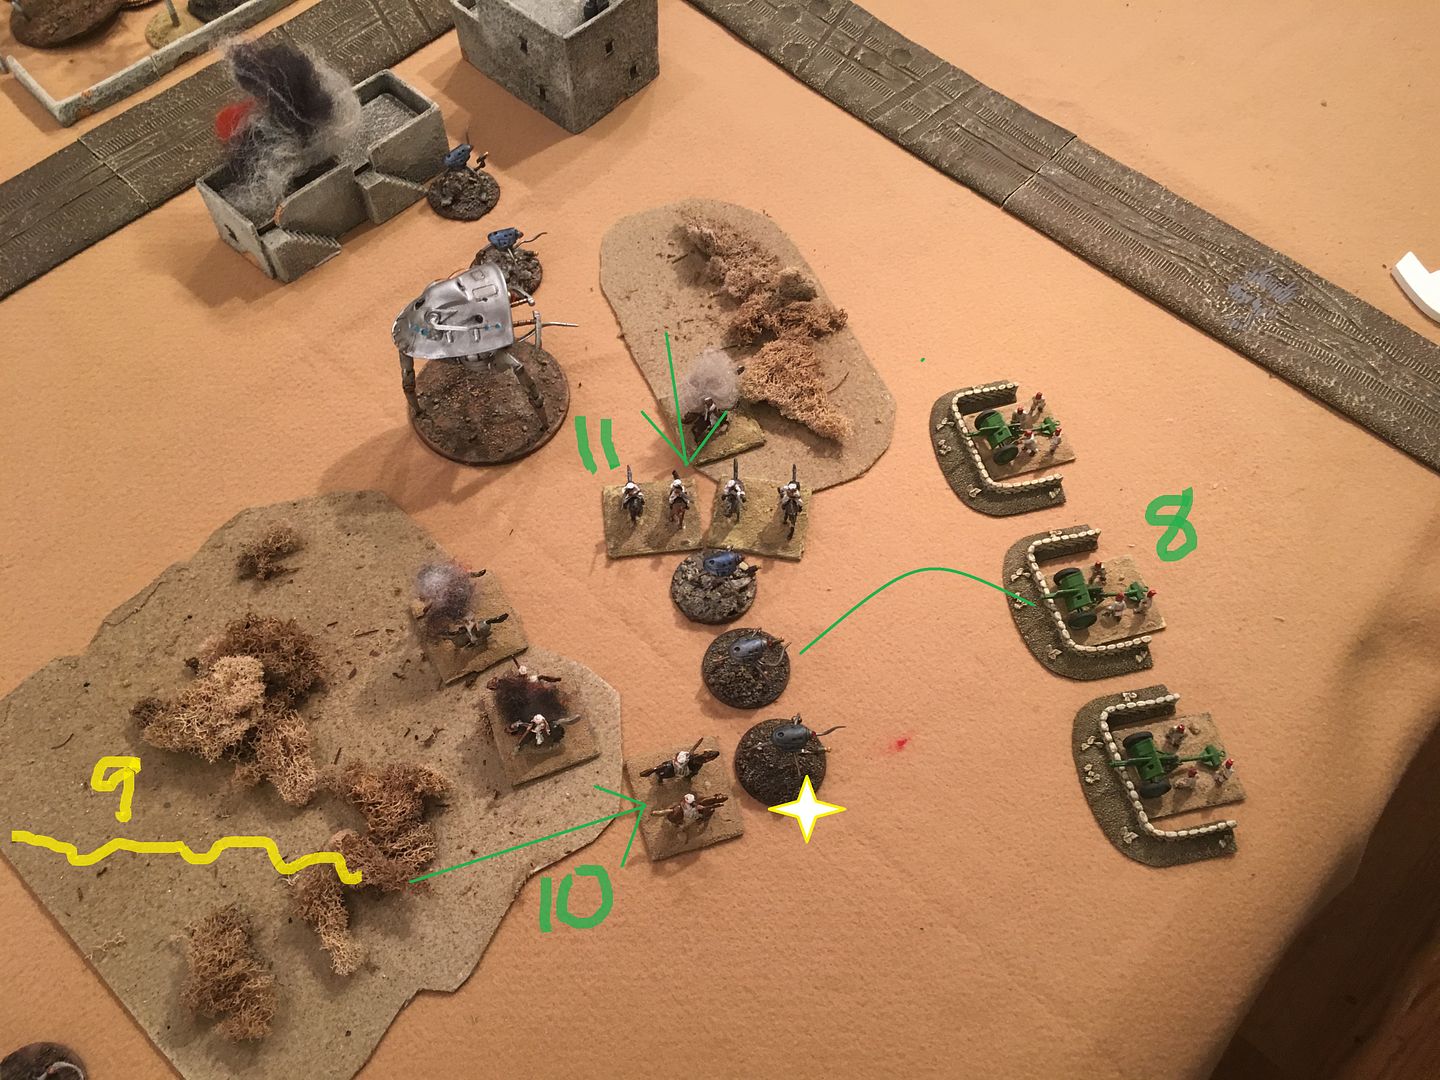
Impulse 3 ) Tripod A moves and shoots blip on fort wall - no effect. Impulse 4) - human attempts to activated truck unit B - no movement . Impulse 5) Double move Reaper and drones. Shoots blip behind wall and exposes native infantry. Impulse 6) - Native infantry shoots at drones - no damage. Impulse 7) Tripod B is doubled move and shots at escaping trucks and destroys one. Impulse 8) - Native field guns come out of hiding and drops a template on drones - no effect. 9) Harvester moves.
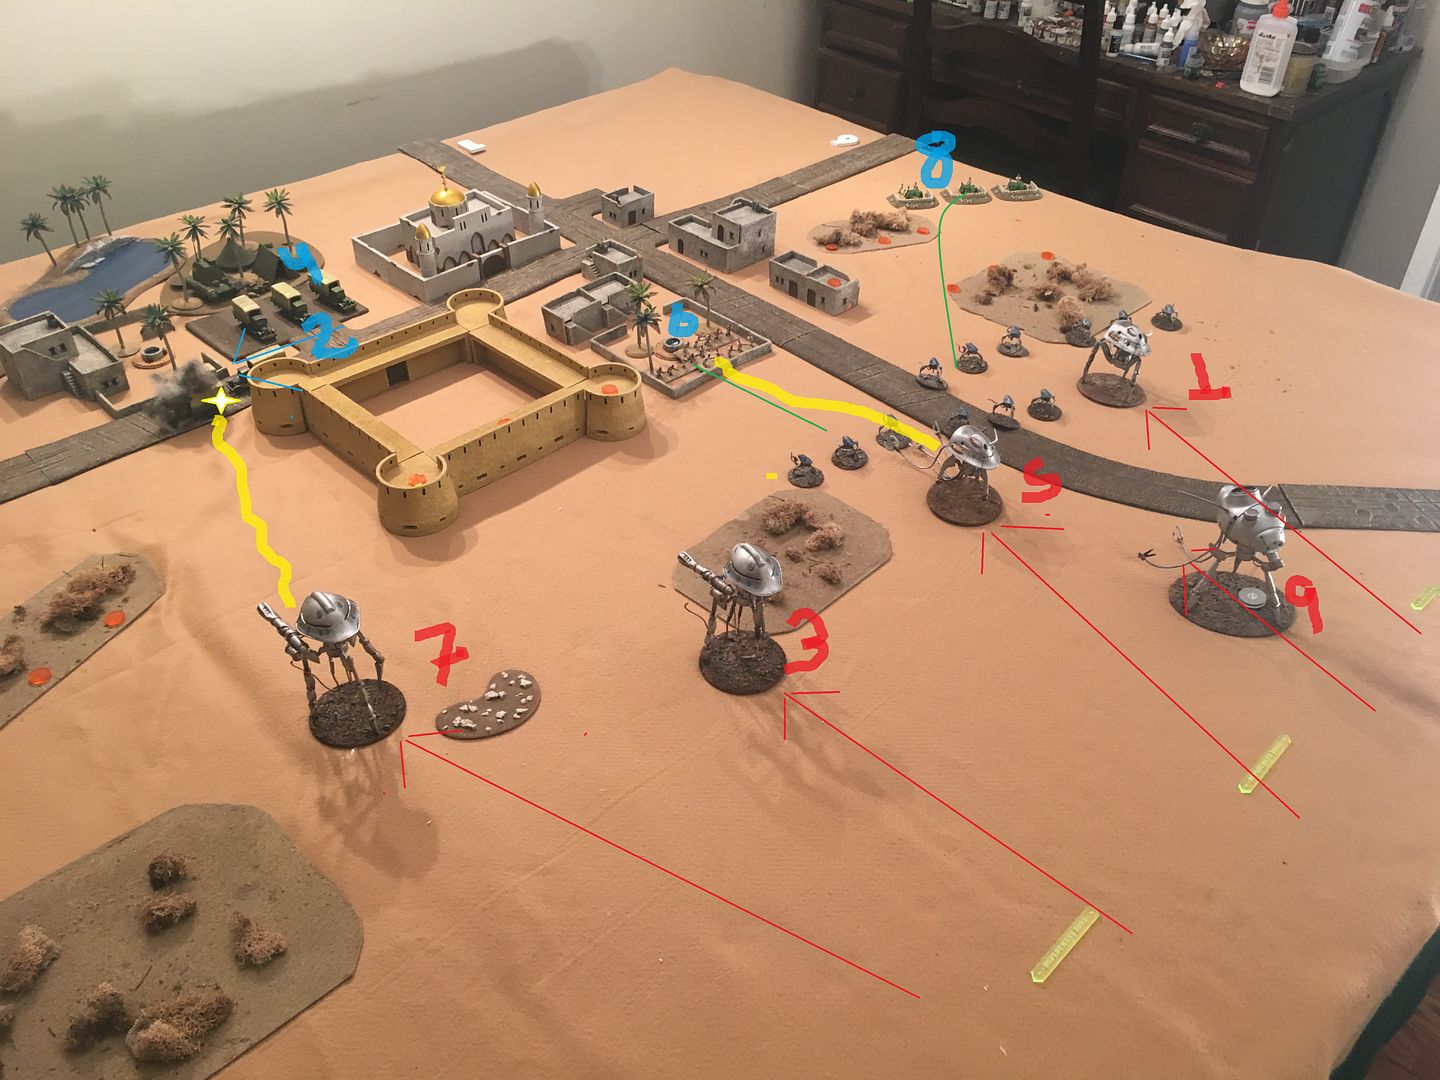
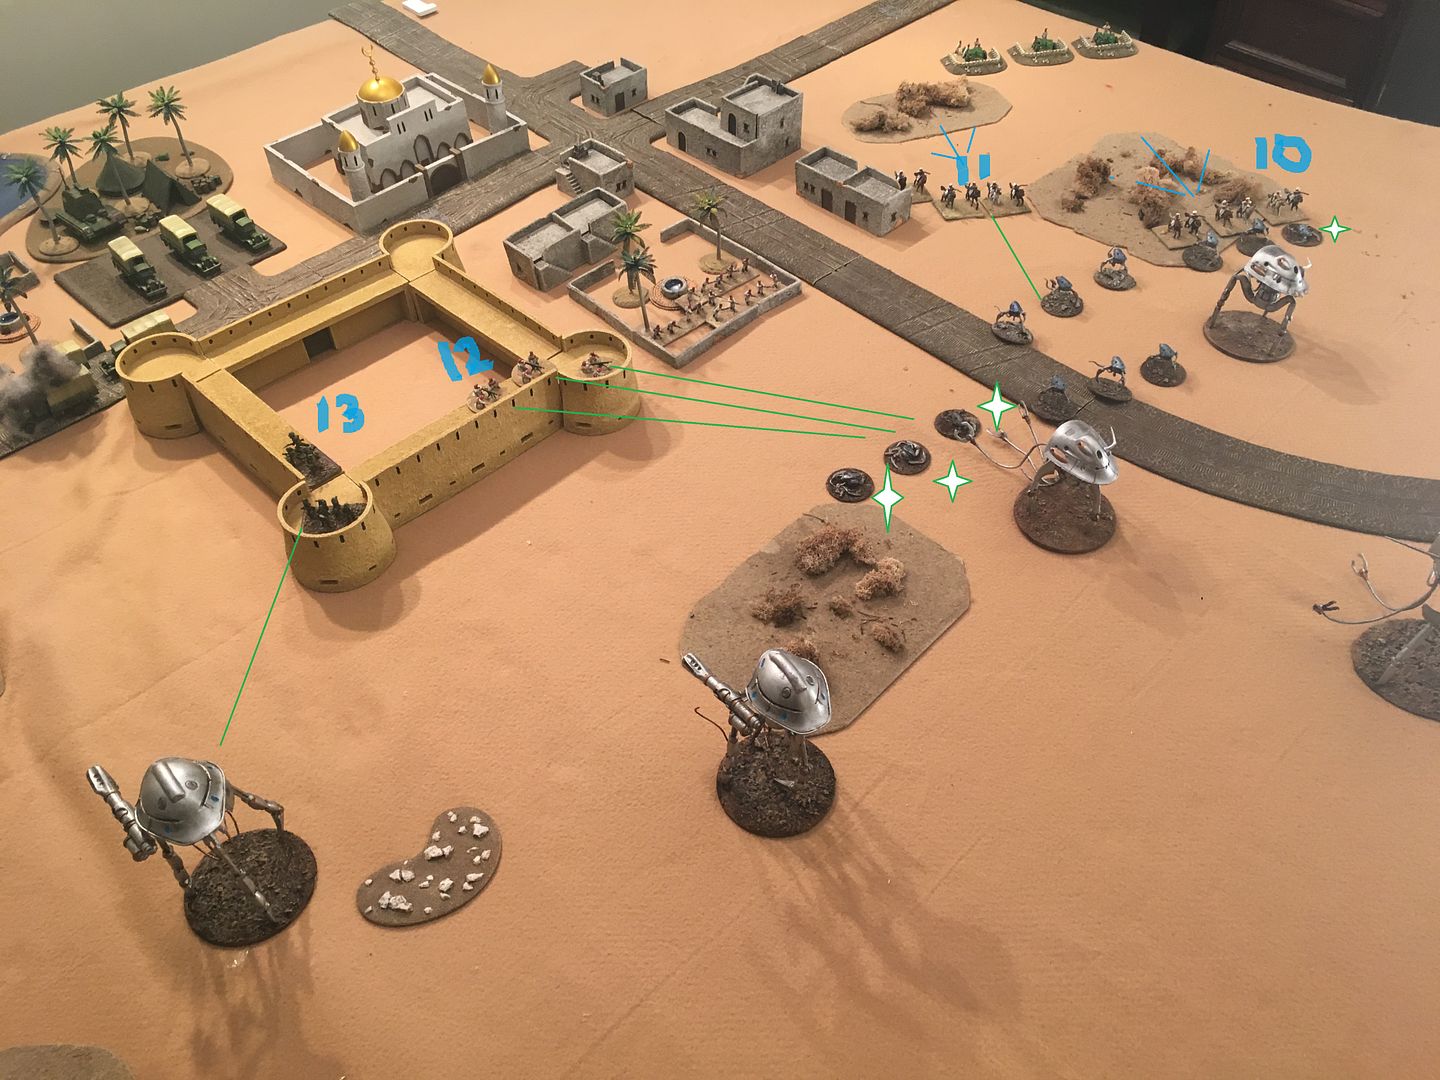
Impulse 10 and 11) - Native cavalry comes out of hiding and engages drones - only one destroyed in an assault. Impulse 12) Native HMGs reveal themselves on fort wall, fires, and destroys 3 drones. Impulse 13) British infantry shoots tripod B with mini-coil gun - no effect.
|
|
|
|
Post by madmorgan on Jan 3, 2016 13:10:07 GMT
Omgs what a great setup!! Are those portee gun trucks I see!!. Must tell me how you did those (vendor/conversion work et al). I recognize most of the terrain vendors but where'd you get the oversize numbers (great btw). I use Learning Resources from Amazon with their huge rubber dice and numbers, but yours looks more table like and cleaner somehow. Once again a great scenario; interesting to see the various rule changes you suggested in action. Did the HMG fire be resolved as 1 die or 3 (per RF change)? Also, I believe the Brit ACs are pointed as individual elements, so one cost 55 and 3 (platoon) costs 165 points. More, more, more!
|
|
|
|
Post by mikedski on Jan 3, 2016 18:43:25 GMT
Omgs what a great setup!! Are those portee gun trucks I see!!. Must tell me how you did those (vendor/conversion work et al). I recognize most of the terrain vendors but where'd you get the oversize numbers (great btw). I use Learning Resources from Amazon with their huge rubber dice and numbers, but yours looks more table like and cleaner somehow. Once again a great scenario; interesting to see the various rule changes you suggested in action. Did the HMG fire be resolved as 1 die or 3 (per RF change)? Also, I believe the Brit ACs are pointed as individual elements, so one cost 55 and 3 (platoon) costs 165 points. More, more, more! HMG are ROF against infantry targets (drones/ lobos) - ROF 1 against other targets.
Controller tripod and drones move all as one unit.
The trucks are not portee - just guns stacked on top for space. The Lloyd Command vehicle is an own unit - I under pointed at 125.
Numbers from Hobby Lobby.
I figured the humans are trying to protect something (a supply line, people, places) , Martians are just hungry and destructive.
|
|
|
|
Post by mikedski on Jan 3, 2016 19:00:04 GMT
turn 2
British reinforcements due to arrive
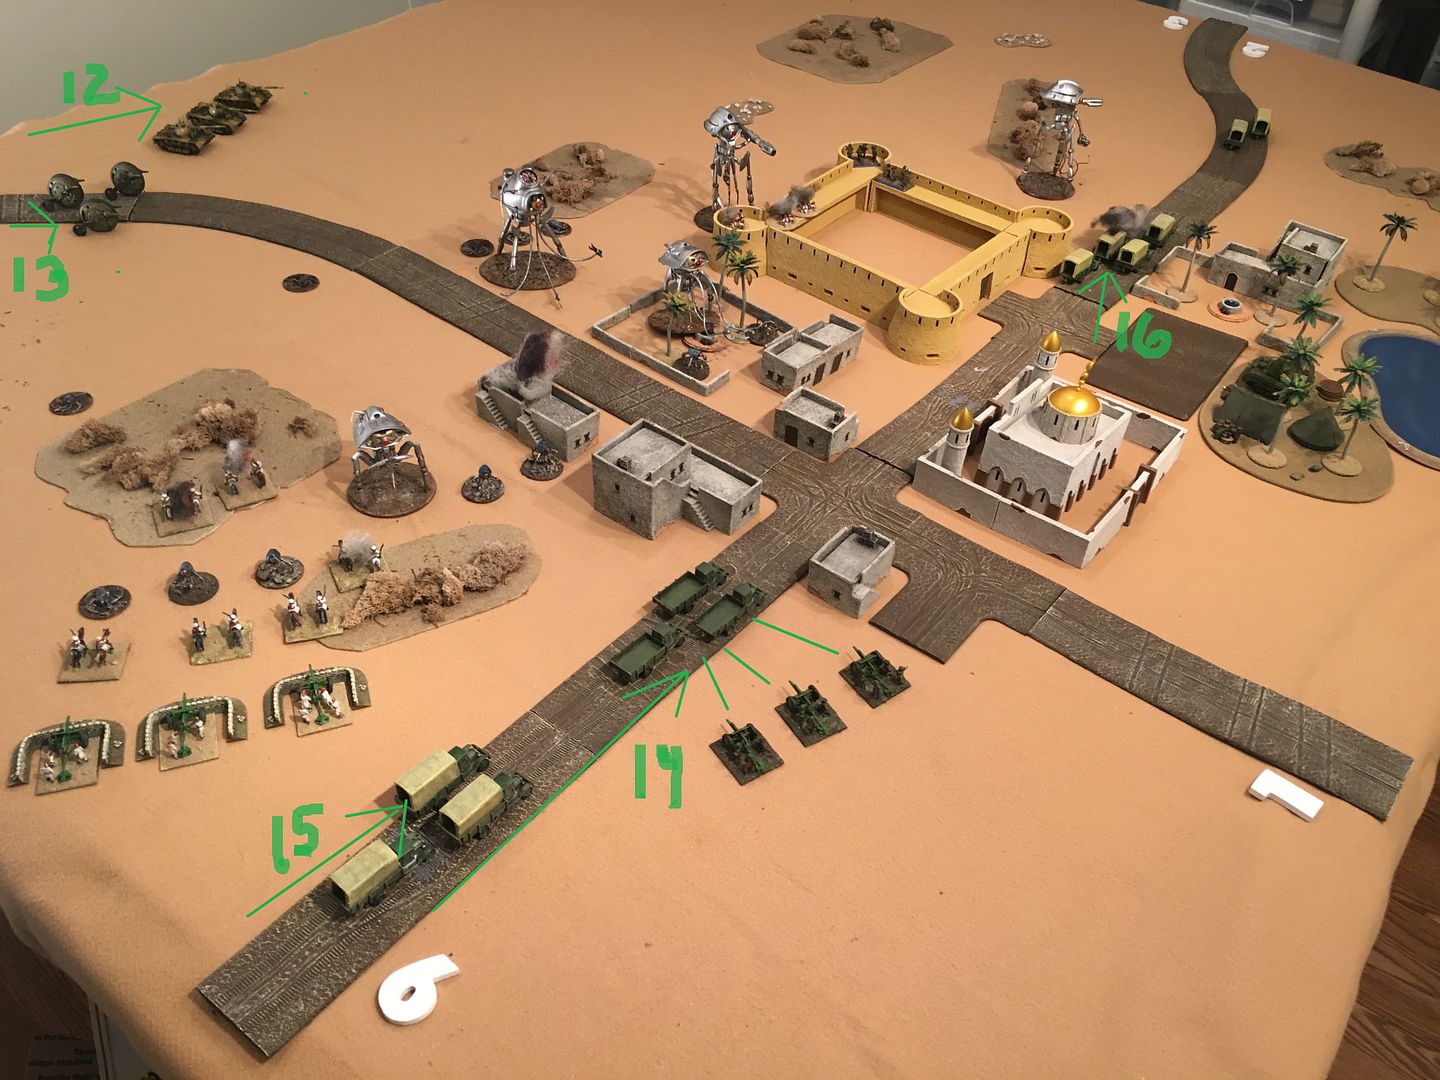
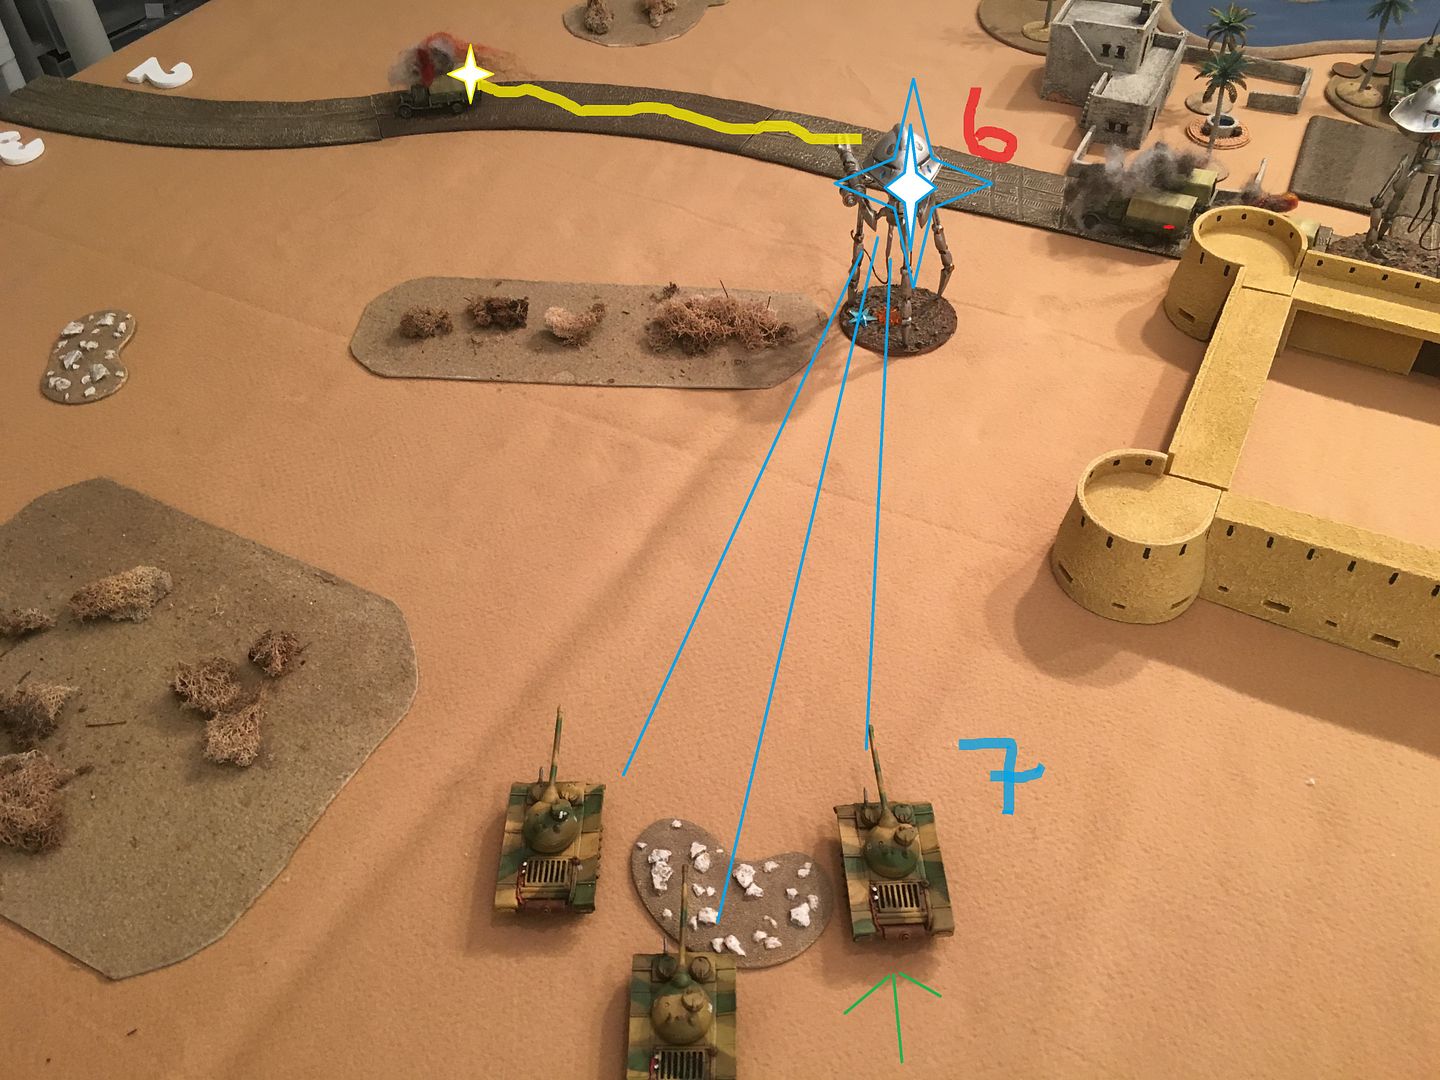
Imperial tanks move, no shoot at point 4
Mono Wheelies move , no shot at point 4
Flivvers with field guns at point 1
Evac truck platoon - move only one phase.
Martians easily win initiative
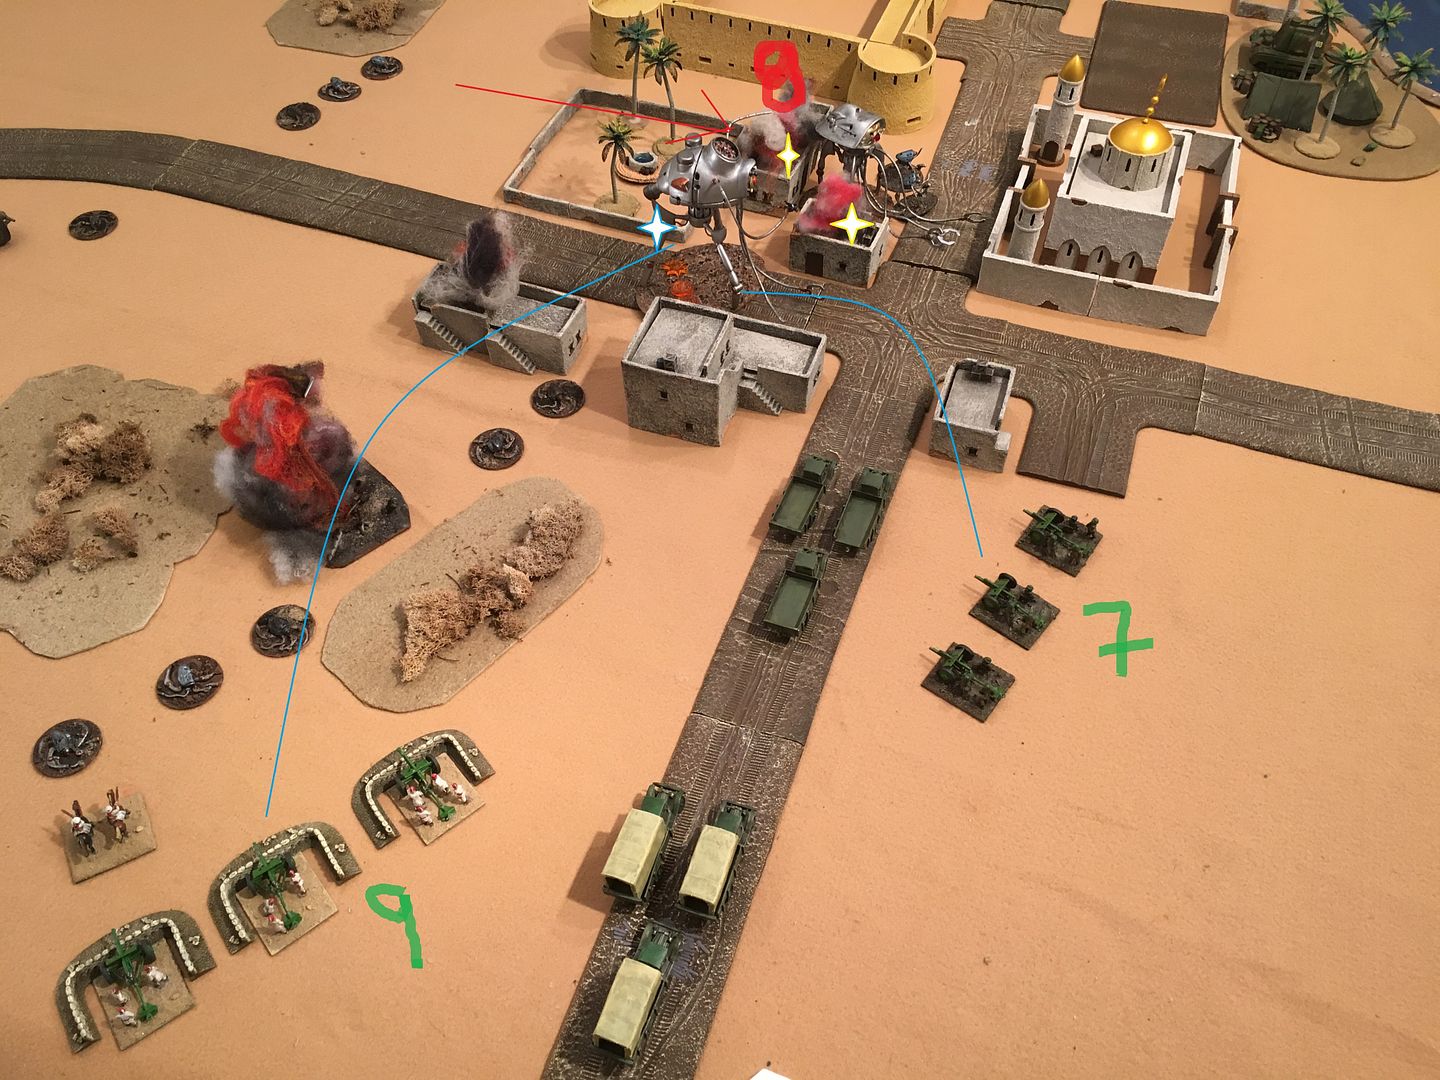
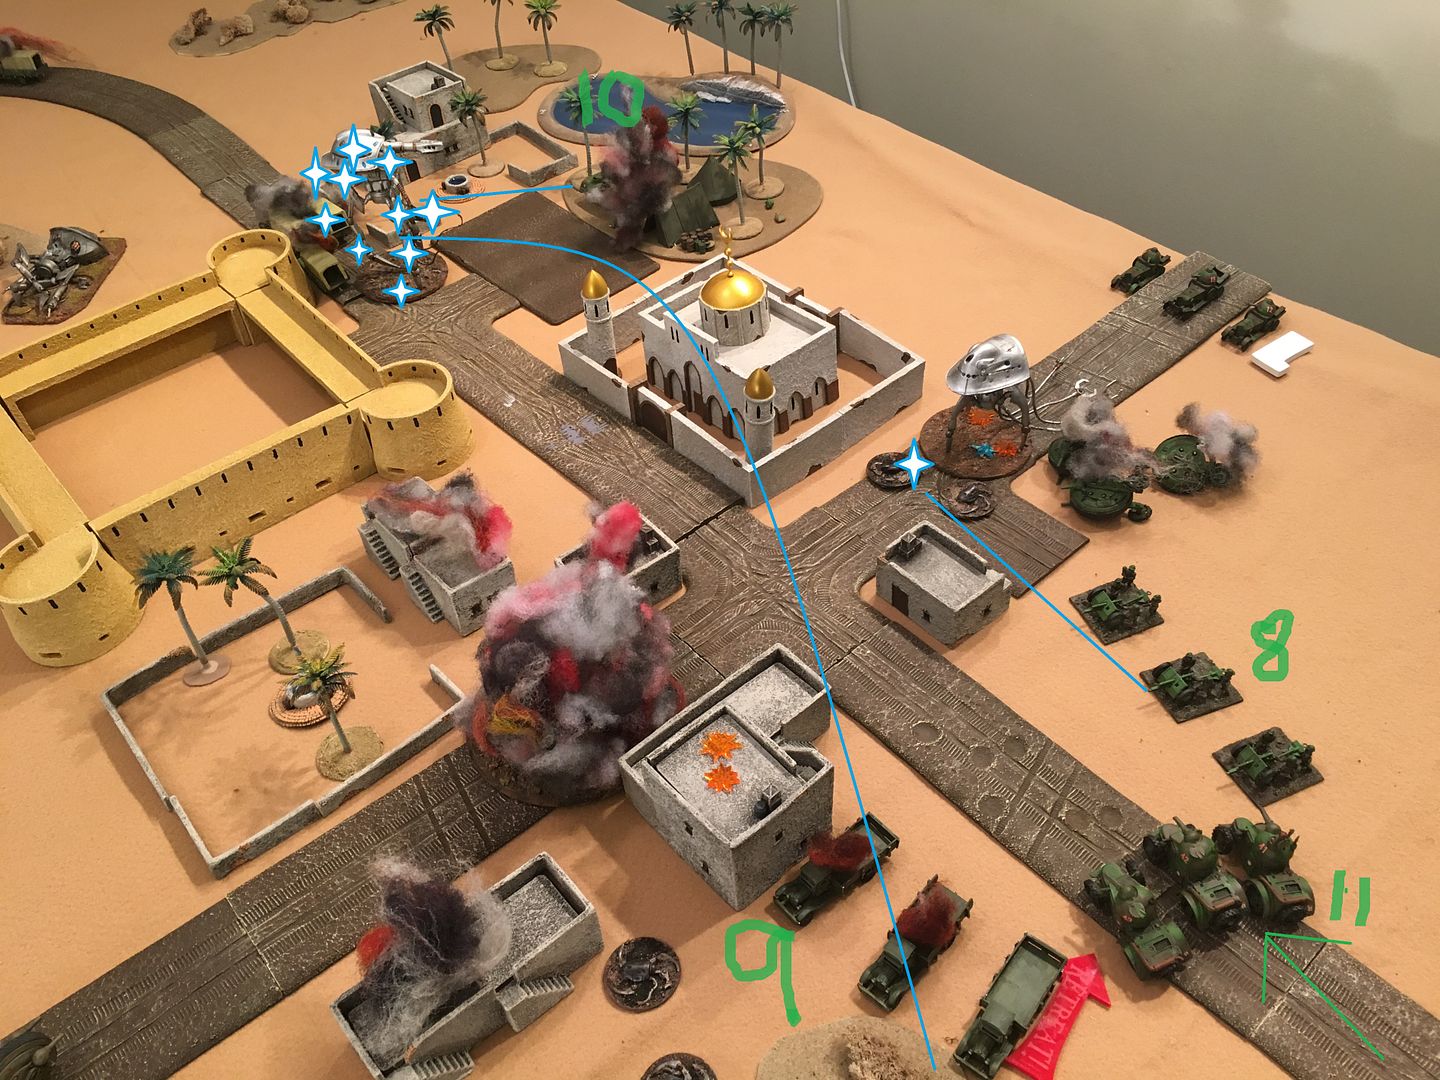
Impulse 1) Tripod A moves towards for and sprays black dust on HMG teams. One team dies the others route and are scattered by the tripod's second move. Impulse 2) truck platoon moves further north.
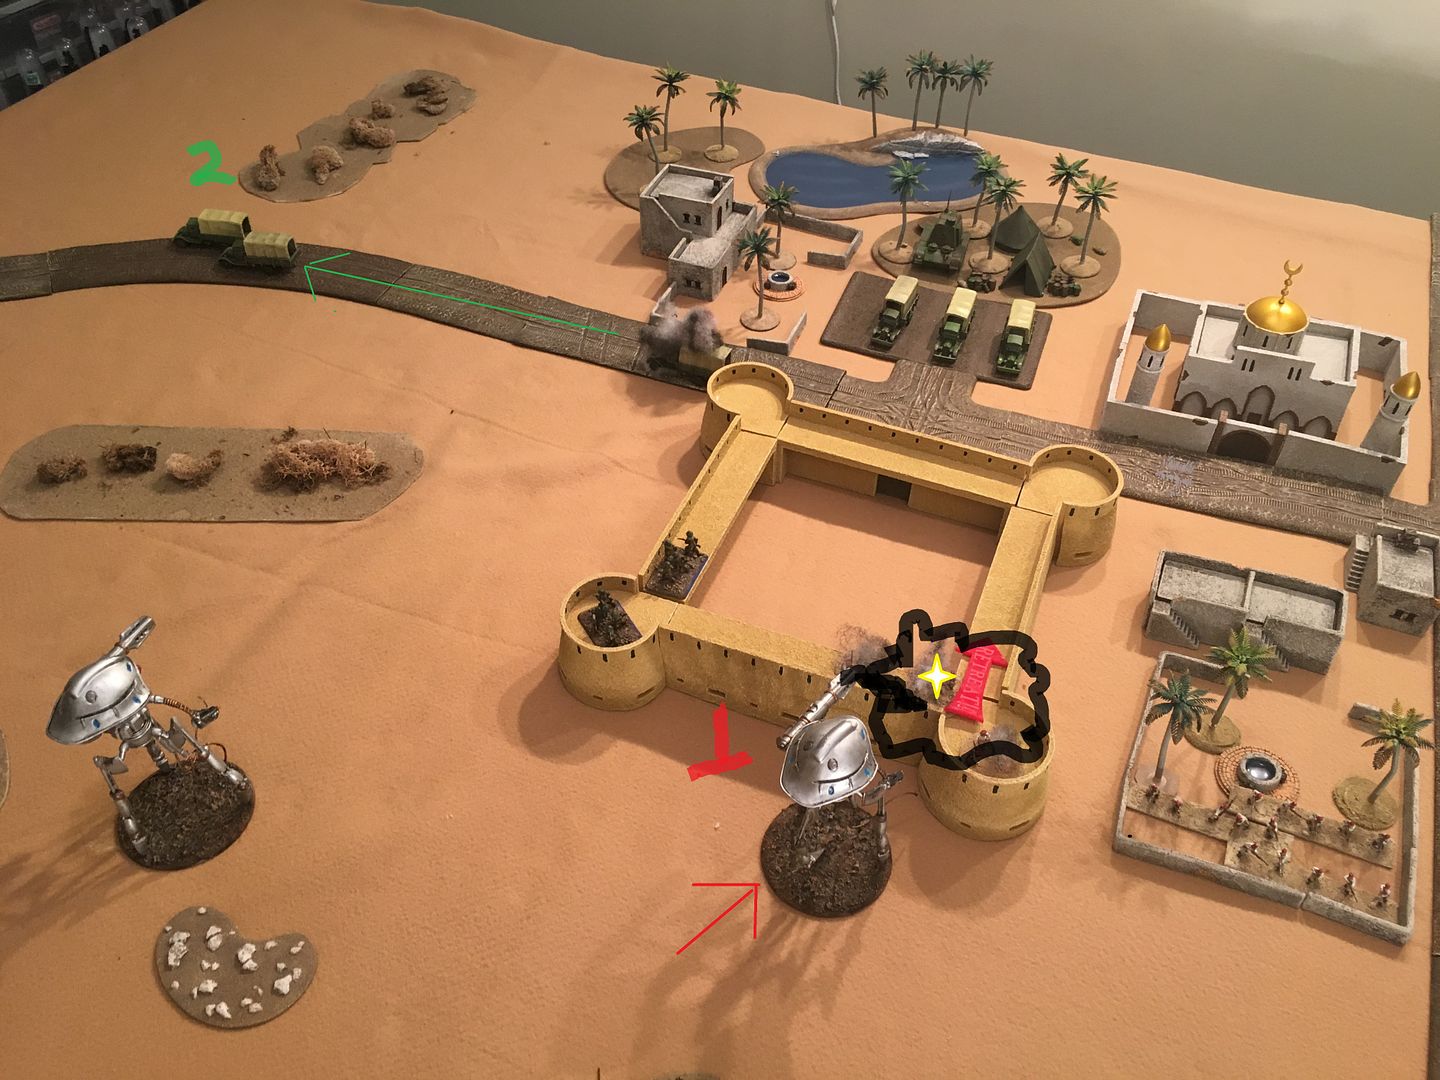
Impulse 3) slaver double moves - 2 drones assault building (destroyed) and 2 drones assault cavalry (two elements destroyed). Slaver sweeps native cavalry and one team destroyed. Impulse 4) Native infantry shoots and destroys a drone. Impulse 5) Reaper double moves with remaining two drones and assaults native infantry and destroys the infantry - moves further into court yard.
Impulse 6) British infantry fires mini-coil gun at Tripod B no effect. Impulse 7 ) Tripod B moves and sweep escaping trucks - both are missed!
Impulse 8) native field guns fire template on drone but no damage. Impulse 9) Harvester moves and shots at cavalry but misses. Impulse 10) - single native cavalry element assaults drones and destroys one. Impulse 11) Native cavalry unit assaults drones - no damage
Impulse 12 - 15) - imperial tanks arrive and double move with intent to fire on Tripod B next turn if so lucky. Wheelies arrive at point 4. Flivvers arrive from the south and field guns deploy. Evac truck arrive from south.
Impulse 16) - truck platoon at Oasis activates and moves one movement phase.
|
|
|
|
Post by mikedski on Jan 4, 2016 1:06:48 GMT
Turn 3
British reinforcements
Mono Wheelie Tanks at entry point 1
British win initiative
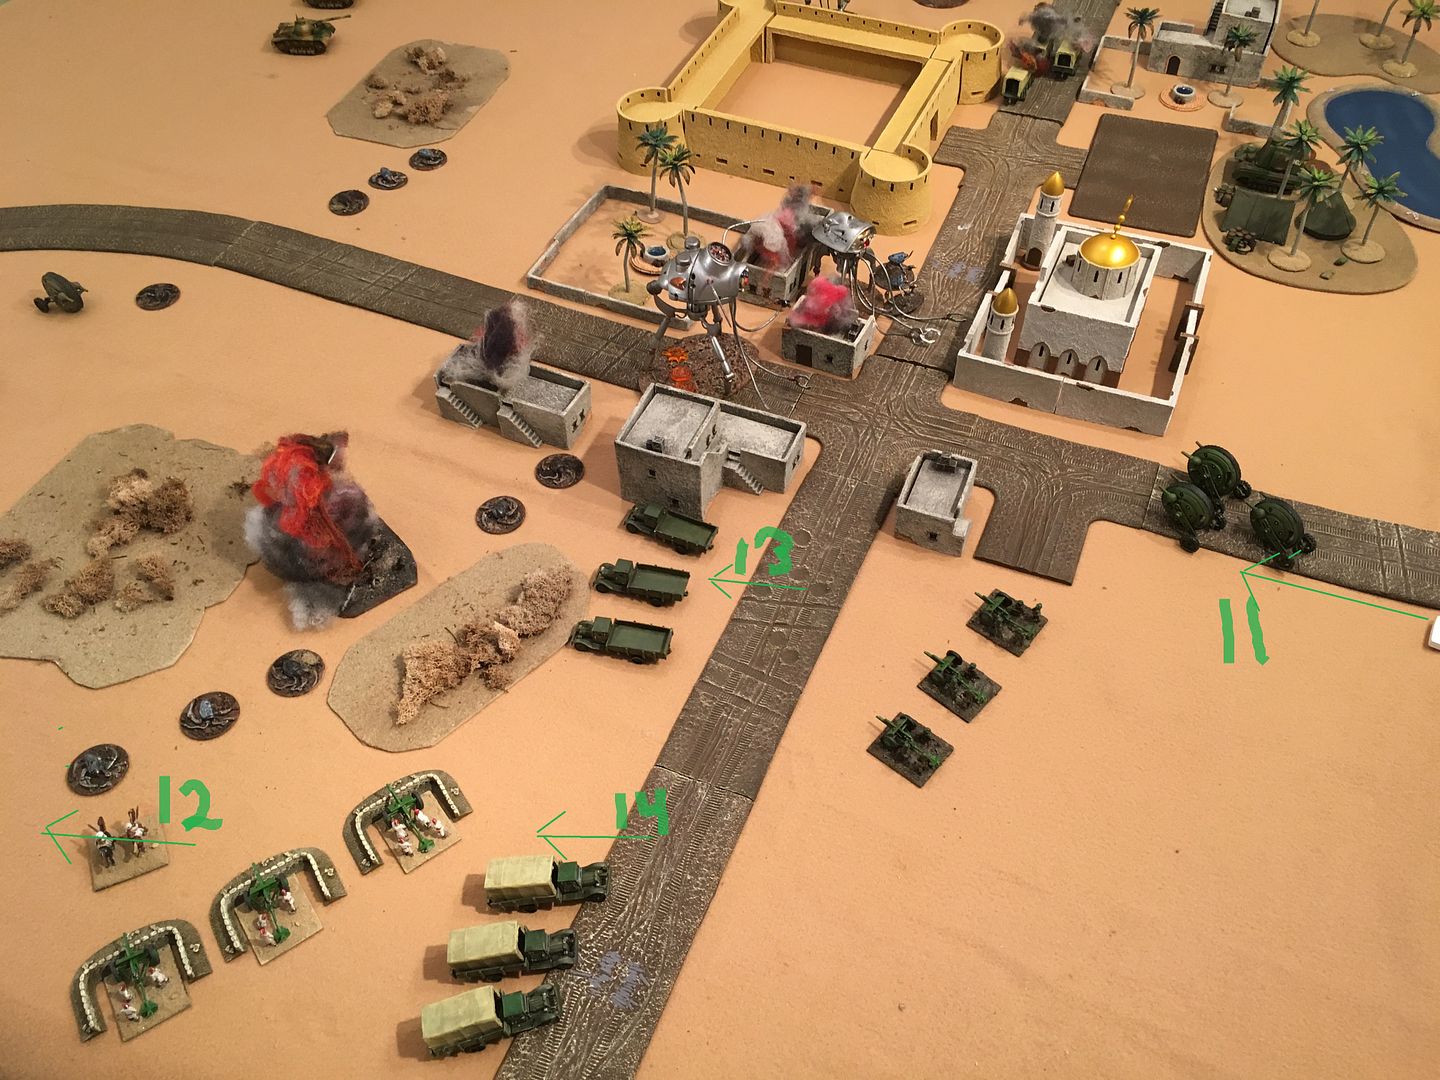
1) Imperial tanks double move and shoot at Tripod B - cause damage and mobility critical hit 2) Harvester moves into village and take shot at BEF field guns - miss 3) Wheelie tanks move and fire on the slaver - two hits penetrate - rolls 9 on damage table +1 bonus - "Boom" - down goes slaver along with all its remaining drones and the unlucky Bedouin cavalry unit.
4) Tripod A moves and fires black dust at BEF infantry squad with one team killed - the other routes and is subsequently scattered. 5) Two evac tracks exit the north road 6) Tripod B elects not to move - sweeps evac trucks and destroys 2. The remaining evac truck will move further north later in turn.

7) British Field guns fire at Harvester and miss. 8) Reaper and drones assault buildings, destroy them and transfer capture to the harvester and move to just outside mosque. 9) Native field guns fire and score a damage point on the harvester.
10 - 15 pulses) - Mono tanks arrive at entry point 1. The flivvers and evac trucks south of village get off the road and line of fire. The remaining Bedouin cavalry element is moved out of combat to avoid further loss.
|
|
|
|
Post by madmorgan on Jan 4, 2016 1:39:47 GMT
Omgs what a great setup!! Are those portee gun trucks I see!!. Must tell me how you did those (vendor/conversion work et al). I recognize most of the terrain vendors but where'd you get the oversize numbers (great btw). I use Learning Resources from Amazon with their huge rubber dice and numbers, but yours looks more table like and cleaner somehow. Once again a great scenario; interesting to see the various rule changes you suggested in action. Did the HMG fire be resolved as 1 die or 3 (per RF change)? Also, I believe the Brit ACs are pointed as individual elements, so one cost 55 and 3 (platoon) costs 165 points. More, more, more! HMG are ROF against infantry targets (drones/ lobos) - ROF 1 against other targets.
Controller tripod and drones move all as one unit.
The trucks are not portee - just guns stacked on top for space. The Lloyd Command vehicle is an own unit - I under pointed at 125.
Numbers from Hobby Lobby.
I figured the humans are trying to protect something (a supply line, people, places) , Martians are just hungry and destructive.
Ah, thanks for the tip on the large numbers from Hobby Lobby. I see that those are already based guns, my mistake. As for the Lloyd Command you actually overpointed if if using the official errata: 90 for the Lloyd + 30 for the FC = 120pts. Good show all around! |
|
|
|
Post by mikedski on Jan 4, 2016 11:32:17 GMT
Turn 4 - Forever Known as the Miracle Minute to the British Army
British reinforcement:
Spector cars can move and shoot arrival point #1
Defiant cars can move from point 6
British Win Initiative
Impulse - 1 - Mono tanks unload 12 shots on harvester - 9 hit - 4 penetrate - die roll 7 on damage table and +3 for multiple shots - BOOM - adjacent reaper takes a point of damage and a weapons critical hit. Two flivvers are destroyed and the third routes. Adjacent building takes damage. Impulse 2; Tripod A sweeps the Lloyd command carrier and rest station hoping to disrupt human command and force a break - misses the Lloyd but destroys the station. Impulse 3 - Mono tanks fire at the obscured reaper and achieve a single damage point
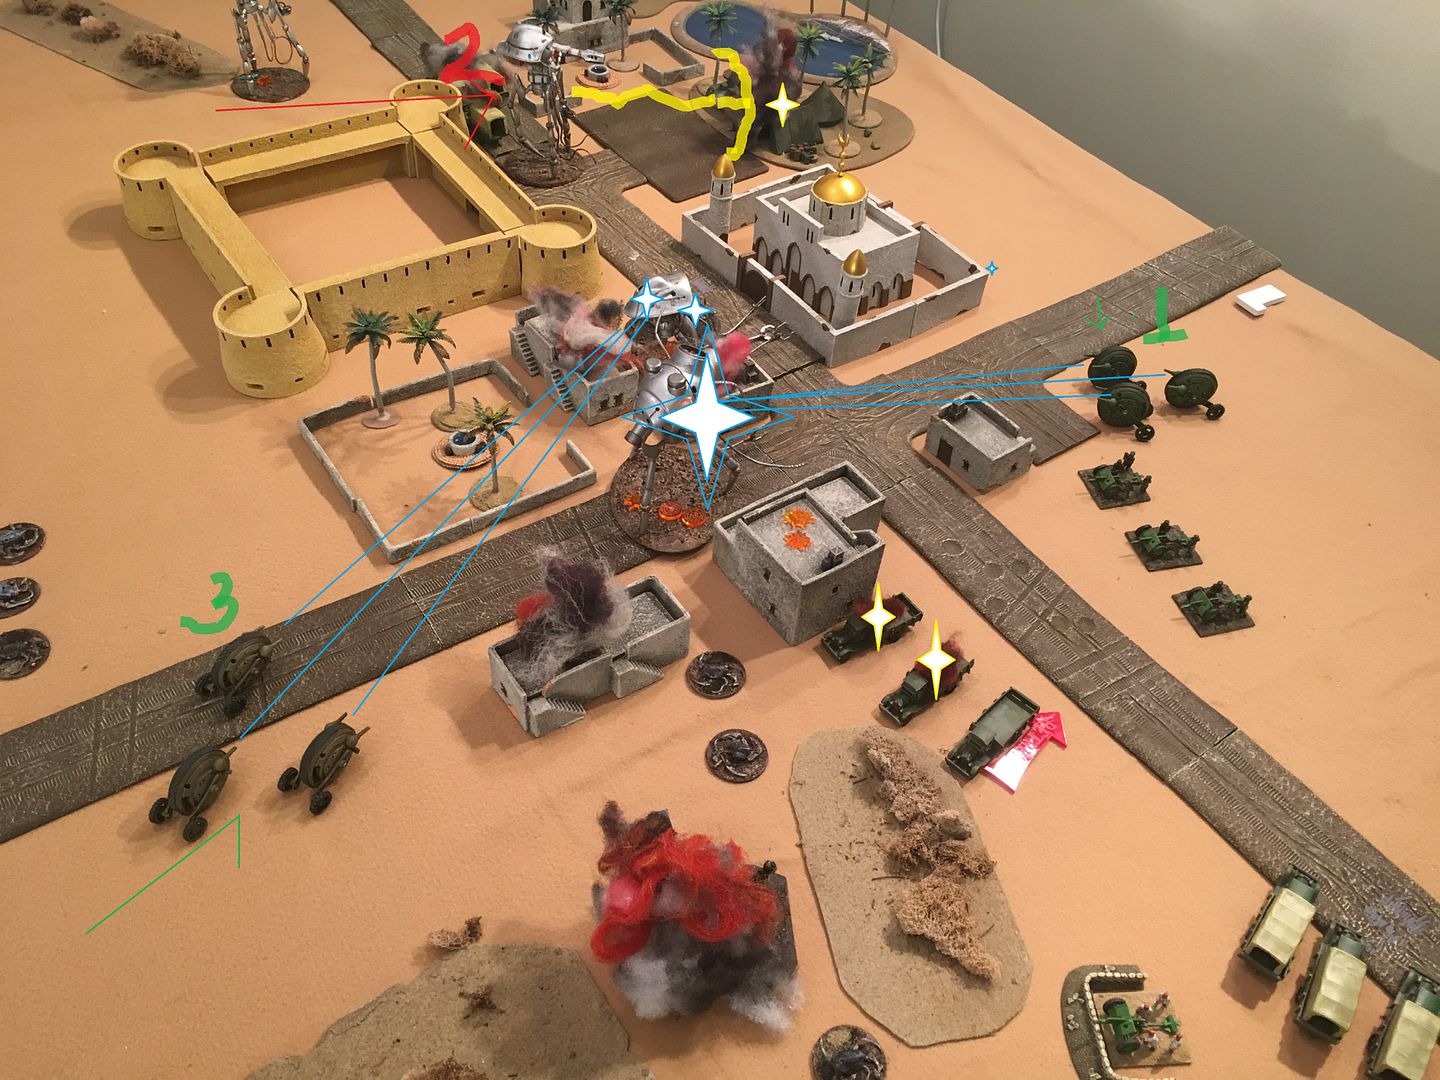
Impulse 4 - Reaper advances with drones and fires at mono tanks - unit is destroyed. Impulse 5 - Spectors arrive and attack the drones - destroying one.
Impulse 6 - Tripod B shoots and destroys the escaping truck and destroys it. Impulse 7 - The imperial tanks are doubled move to be able to shoot main guns and HMGs - multiple hits bring down the tripod.
Impulse 8 - British field guns shoot at drones and reaper - kills the last drone.
Impulse 9) Native field guns shoot at the obscured tripod near the rest/ refuel point - hits with a 10 - power roll 9 - rolls an 8 on damage table - rolls 9 for damage for nine damage points.
Impulse 10) Lloyd command carrier shoots with HMG (ROF 1) - hits and penetrates - tripod topples to ground. Impulse 11) - Defiant armored cars arrive
Martian force breaks due to greater than 50% losses and only one damaged reaper on board
|
|
|
|
Post by madmorgan on Jan 4, 2016 13:39:01 GMT
Wow what a miracle moment. The lack of the Martian reinforcements was felt. Not sure how I'll ever top your displays with all the markings on the movement/fire/etc. How do you overlay those pinned in stuff?? Excellent write up as always and wonderfully great setup and battle!  |
|
|
|
Post by Quendil on Jan 4, 2016 13:56:47 GMT
Love all the touches and what a great battle. Did you make the downed drone markers yourself? Also are the truck the actual fliver models?
|
|
|
|
Post by mikedski on Jan 4, 2016 14:08:05 GMT
Wow what a miracle moment. The lack of the Martian reinforcements was felt. Not sure how I'll ever top your displays with all the markings on the movement/fire/etc. How do you overlay those pinned in stuff?? Excellent write up as always and wonderfully great setup and battle! There is a paint tool with my photo editor. I mark them up and load into photobucket. In this scenario I had all the Martian points on board to give the Martians the edge given the scenario. |
|
|
|
Post by mikedski on Jan 4, 2016 14:12:18 GMT
Love all the touches and what a great battle. Did you make the downed drone markers yourself? Also are the truck the actual fliver models? I made the destroyed drones using a resin molding kit I bought at the local big box craft store Hobby Lobby. I have some for my scorpions, too. The flivvers are from Alien Dungeon. |
|
|
|
Post by madmorgan on Jan 4, 2016 16:29:19 GMT
aaah I was looking at resin modeling and foam casting kits - held off as didn't want to upset AD with 'copies'. But what a good thought, there are lots of companies with molding products of various materials. Look at these folks (at Historicon & Fall In) smooth-on.com - cool stuff
|
|


