|
|
Post by mikedski on Dec 25, 2015 17:20:05 GMT
Merry Christmas! Playing with my toys. Wanted to try a battle with different rules:
1) different turn sequence as proposed by americanelm on the rules forum. Sides do not alternate turns but alternate moving units. Side with initiative moves first. Just playing two turns so far makes it a different game of punch, counter punch.
2) HMGs ROF 1 versus noninfantry targets. 3) All template weapons use a 4 inch template. 3 guns add one to the hit die roll, 2 gun no modification. 1 gun subtract 1 from to hit die roll.
Edit - I originally linked to Photobucket but that was not working as well as hoped.
I hope you can follow my diagrams! Each photo has a caption that I hope helps explain the action.
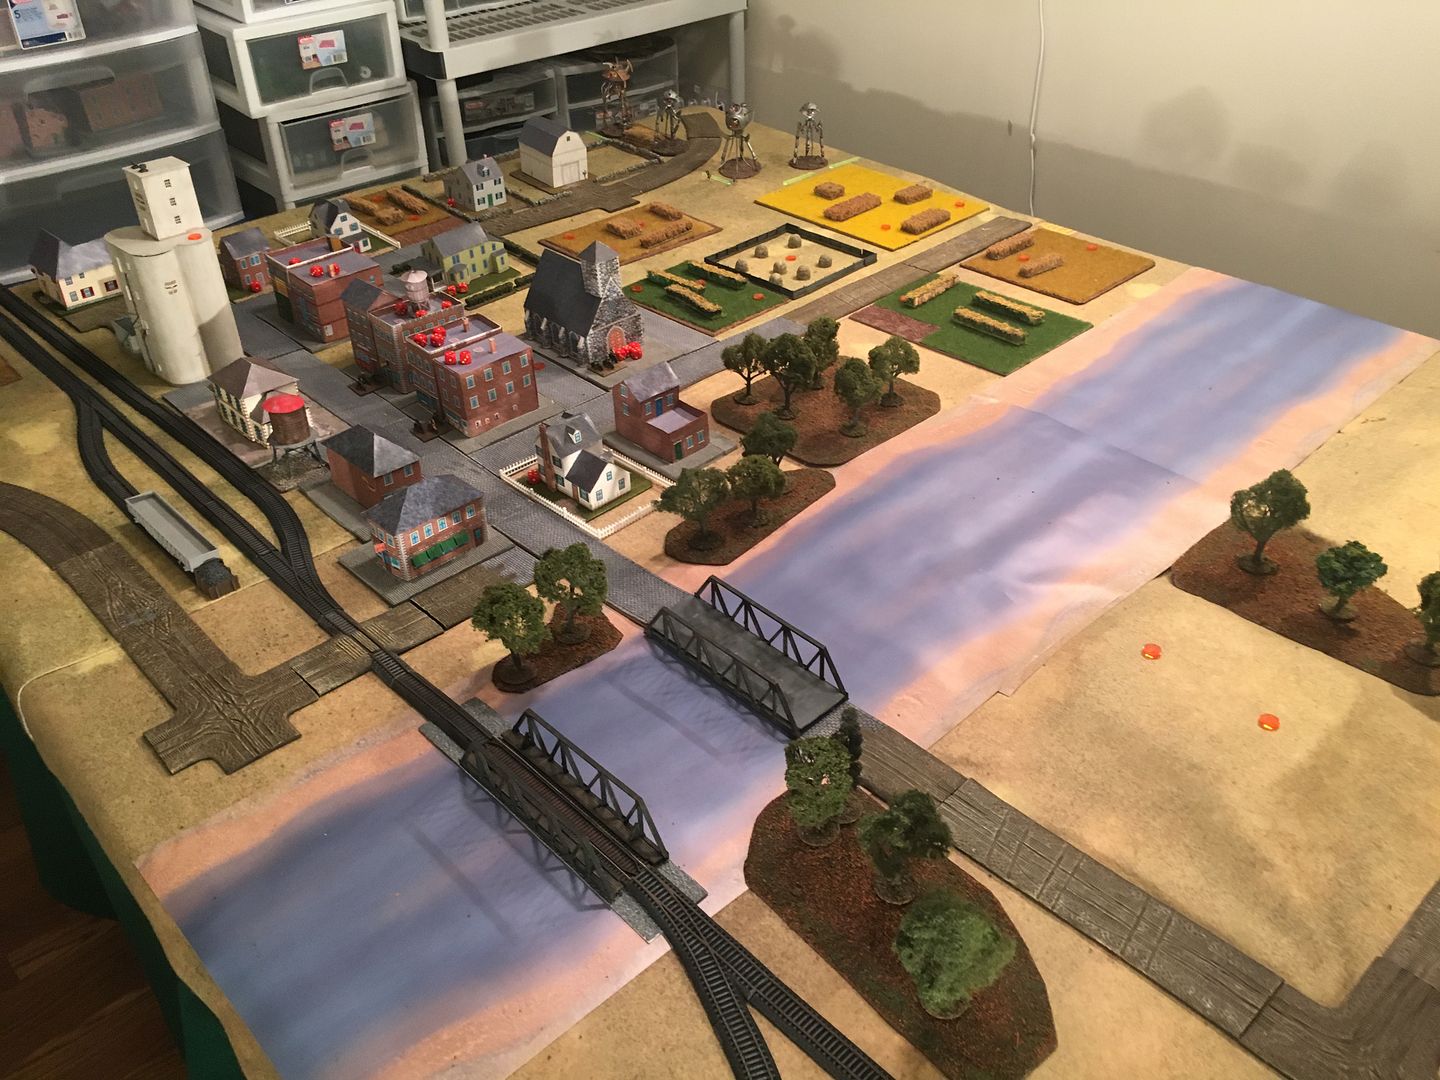
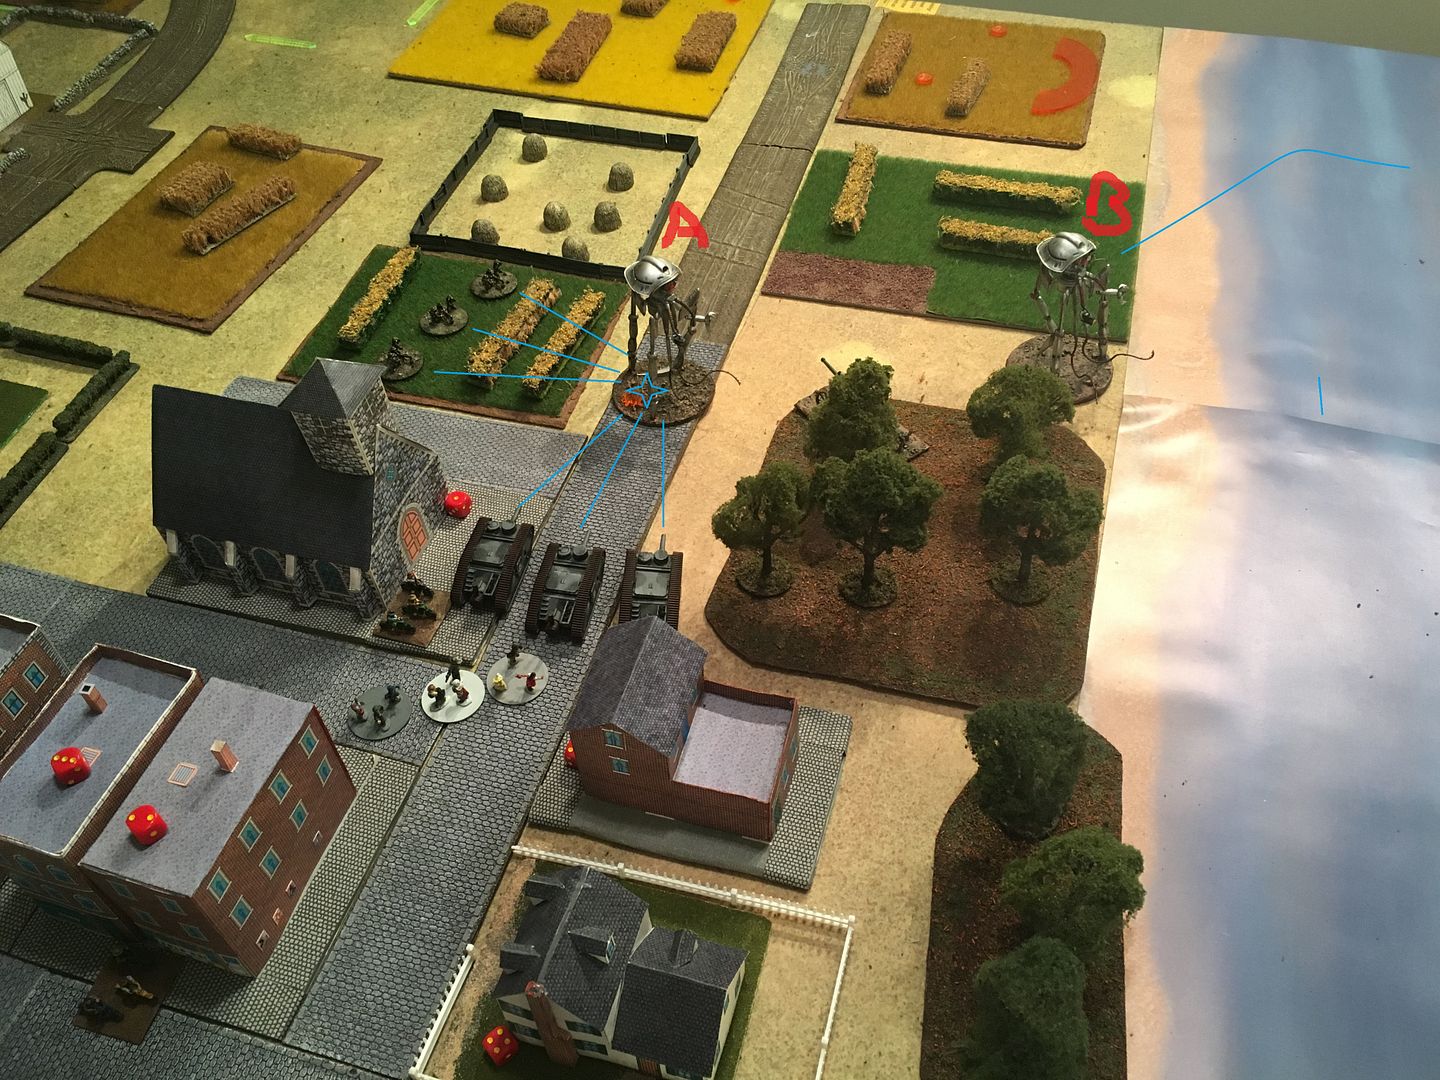
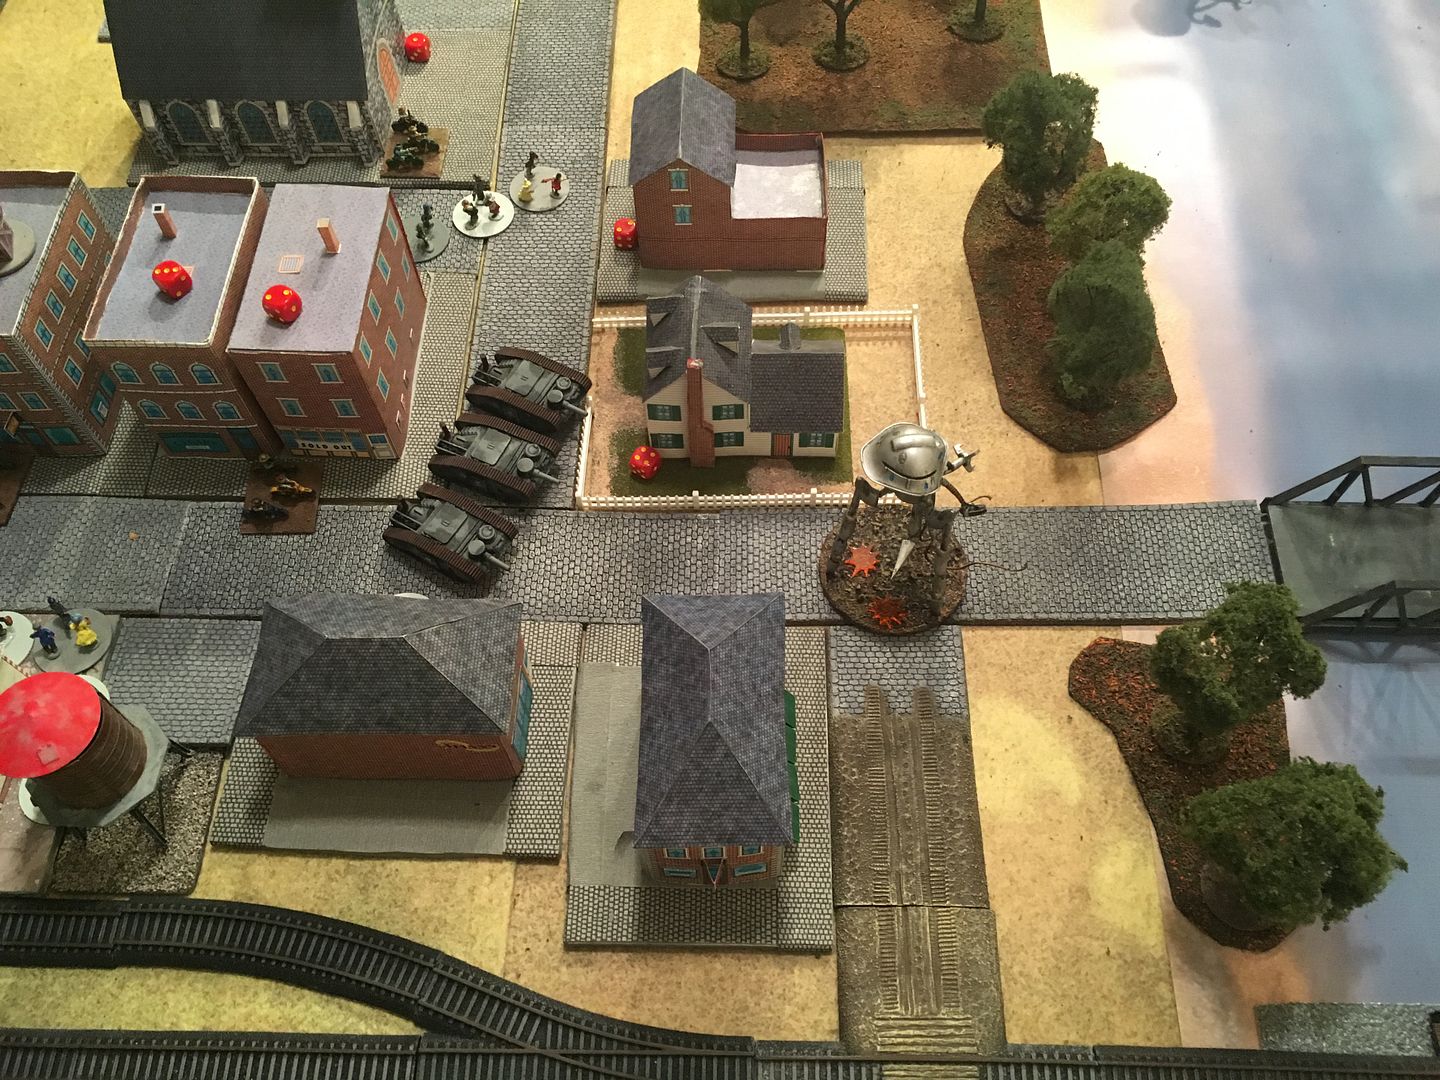
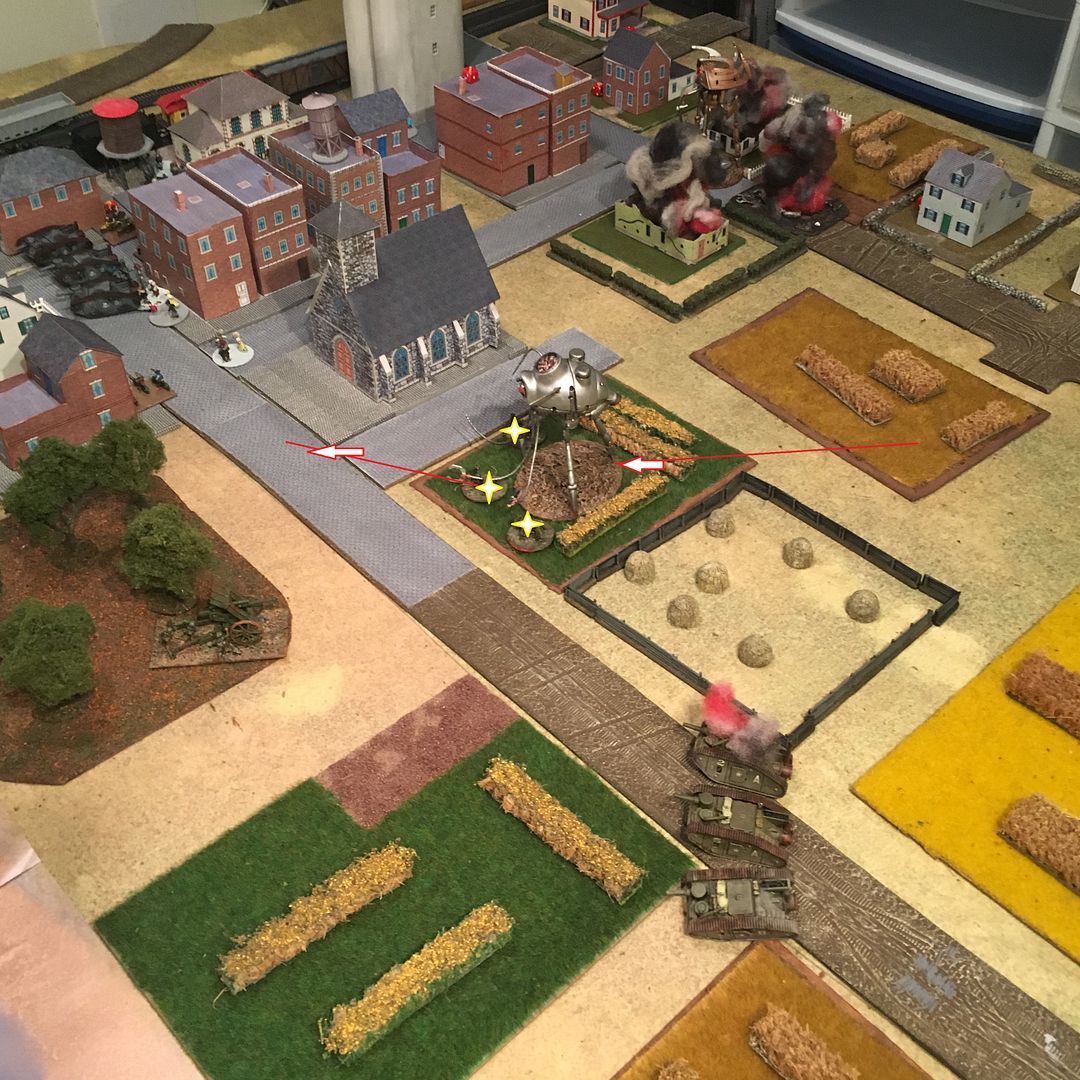
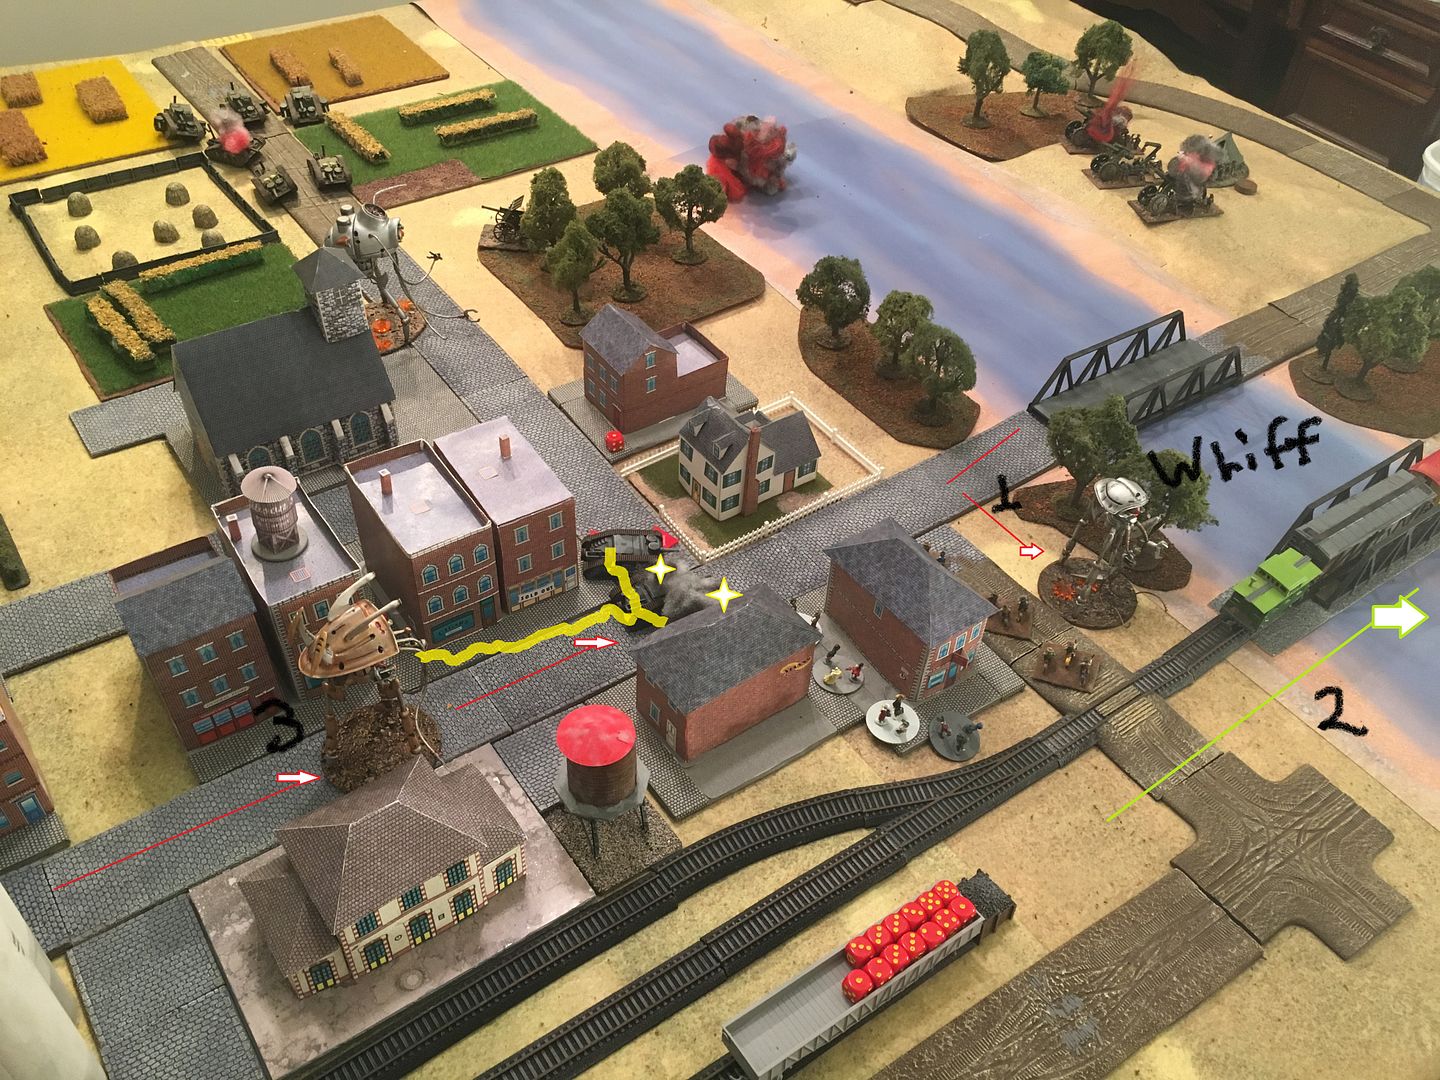
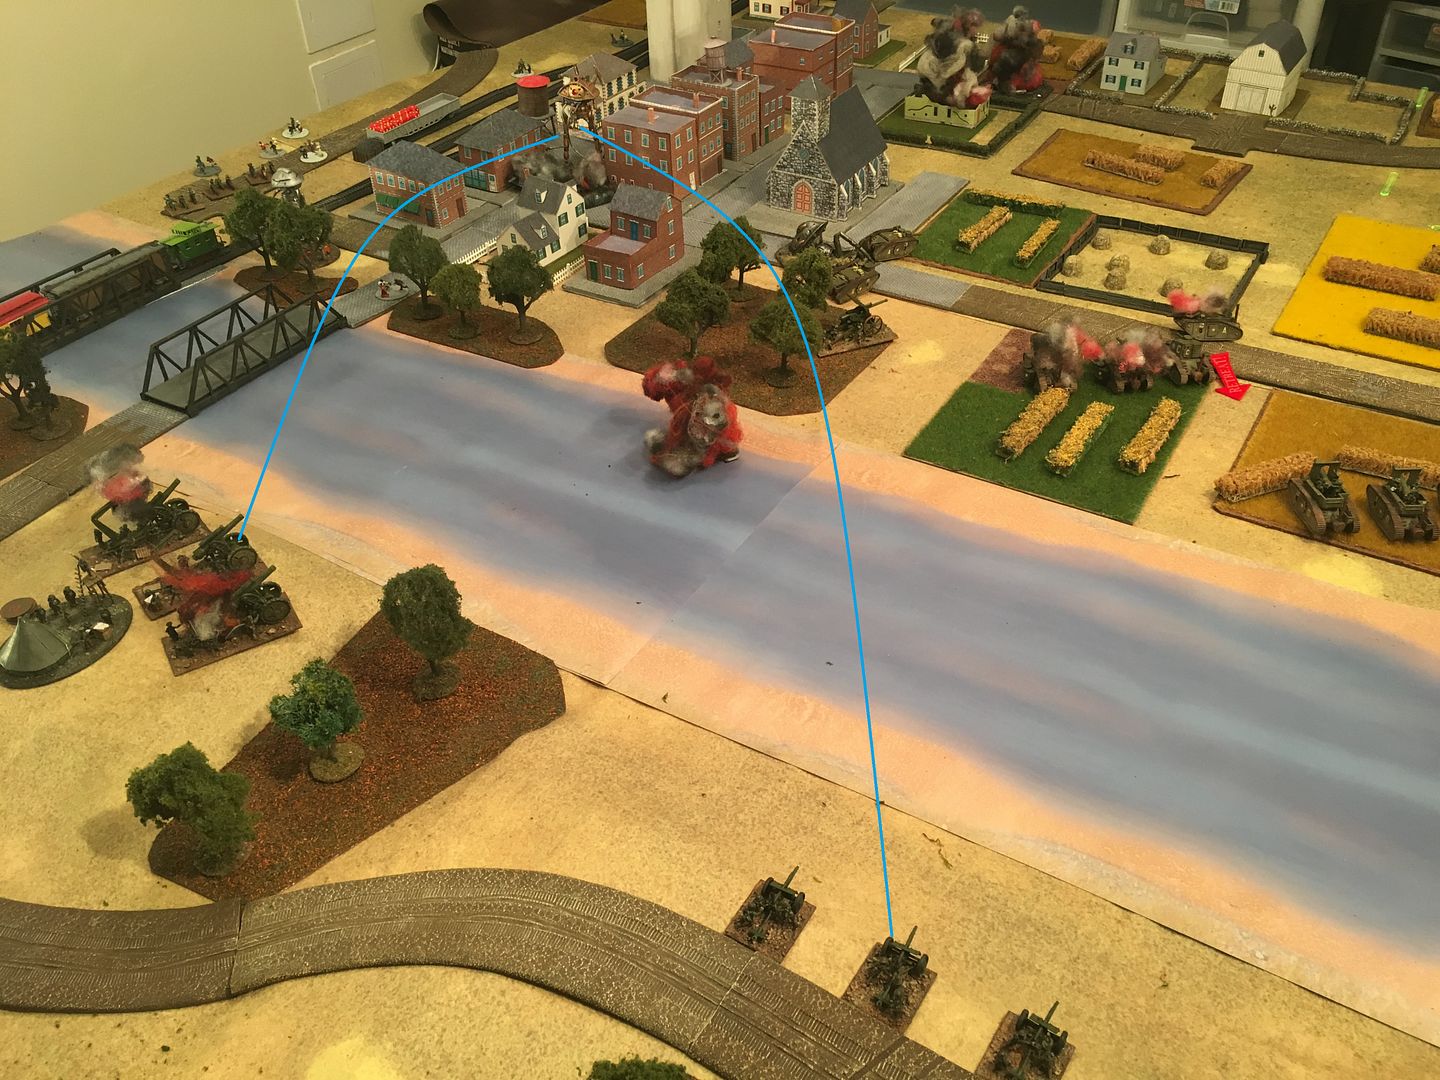
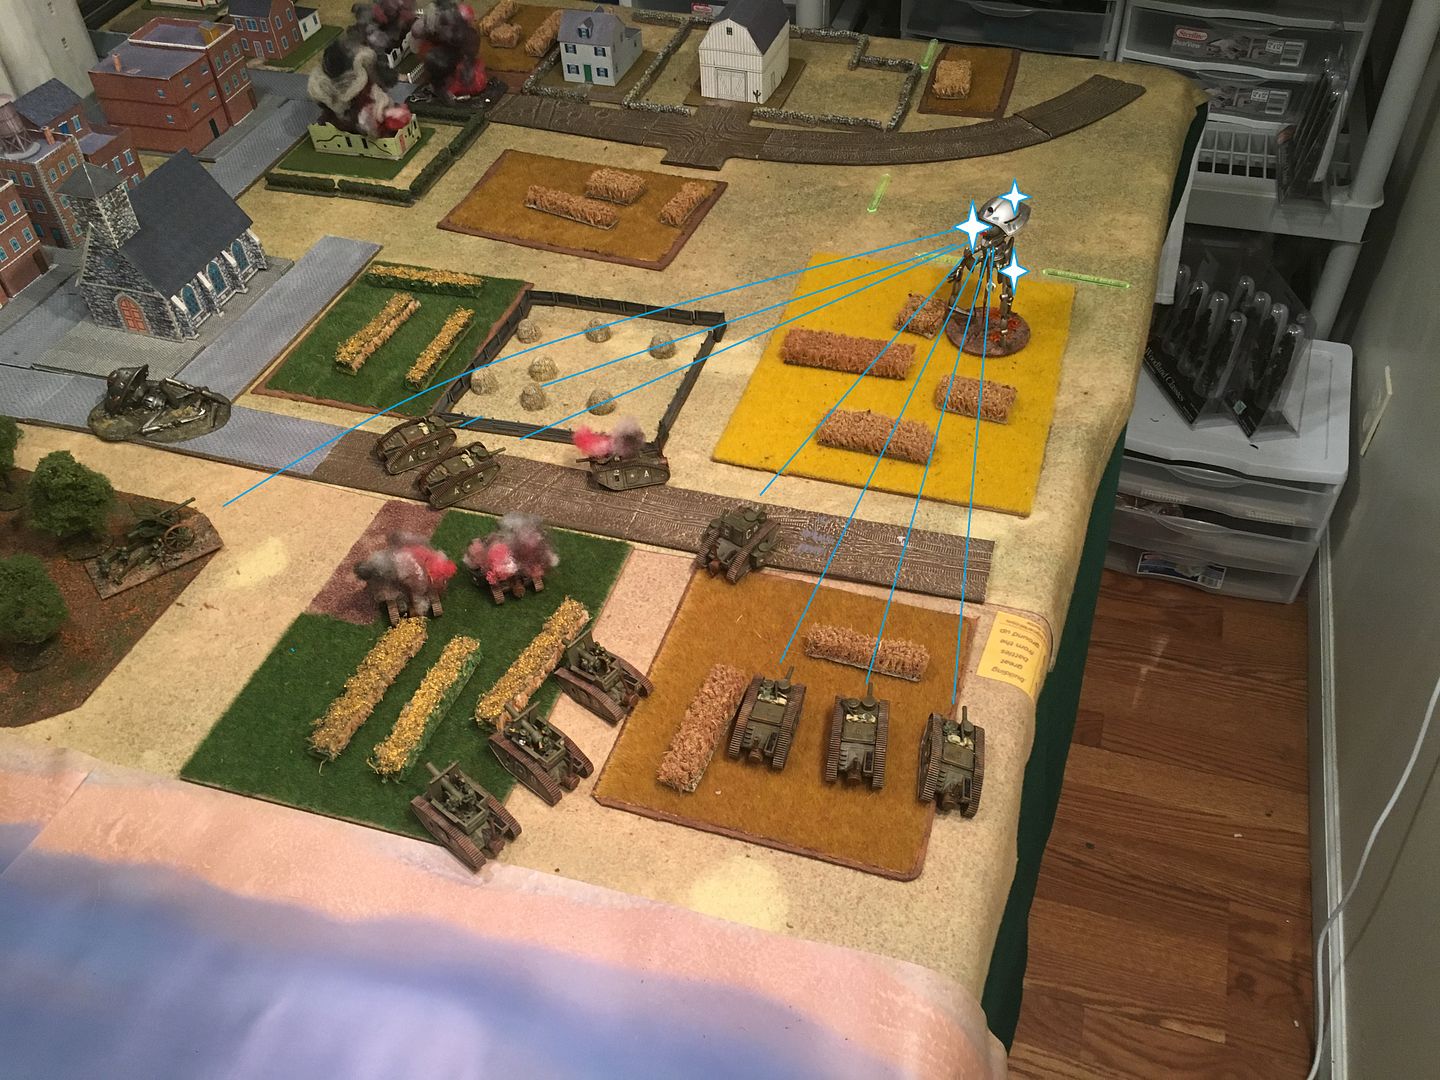
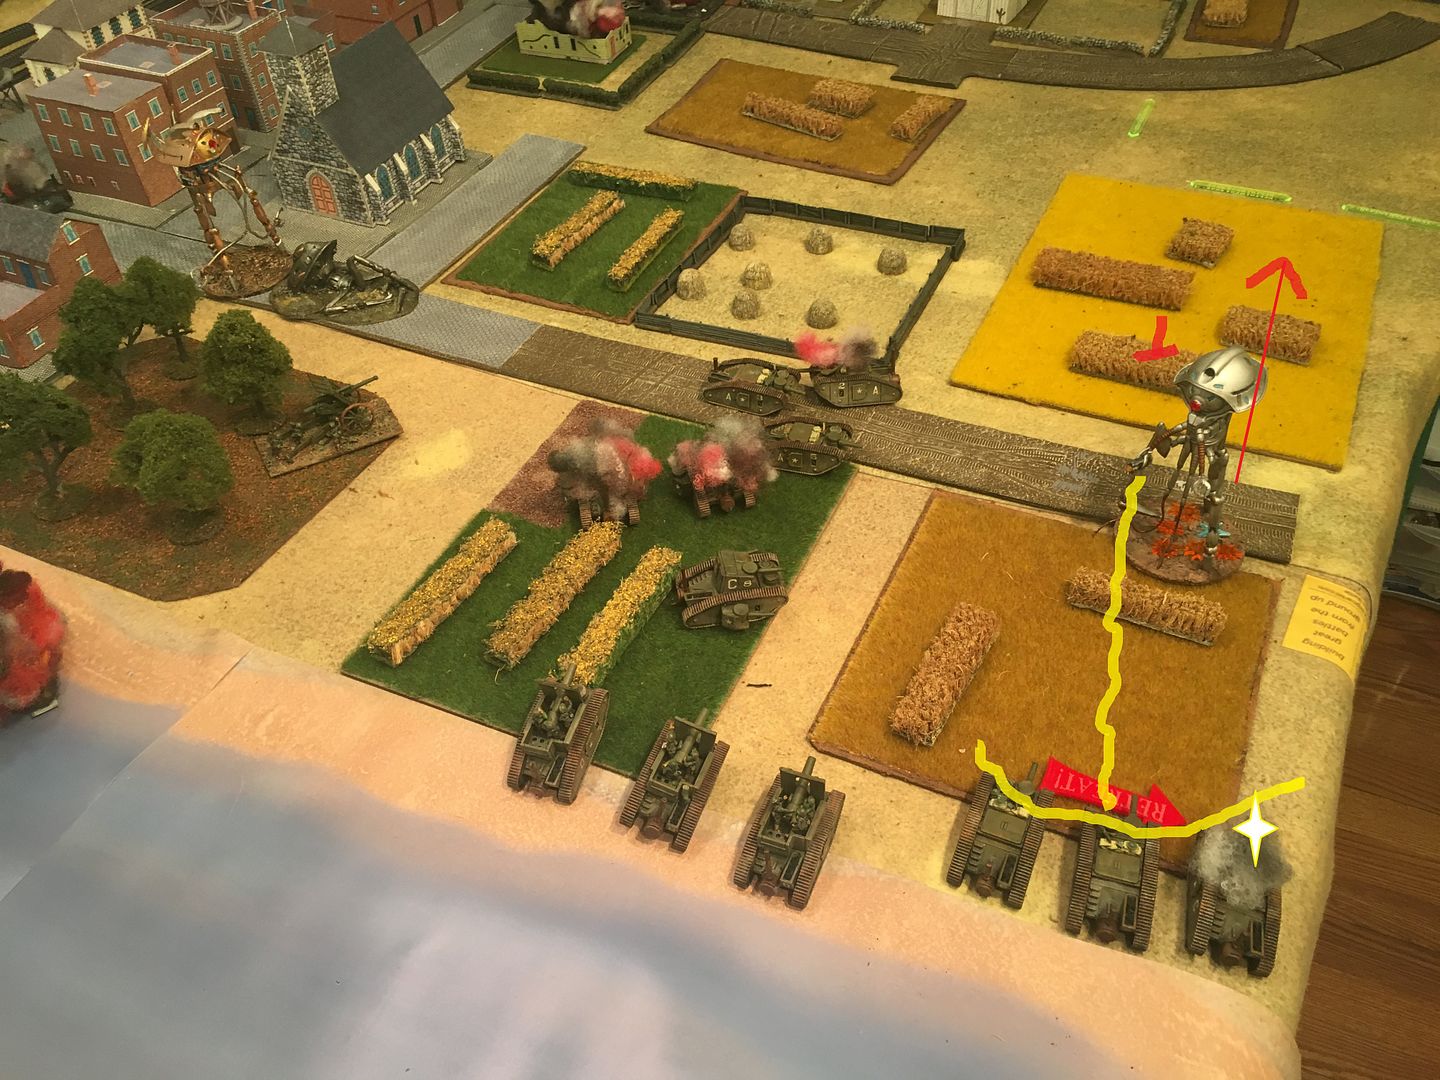
Looking from southwest to northeast. Humans hidden. Martian hunting cell and Royal command tripod approaches. Two assault tripods and harvester as reinforcements.
Edit: Martian Forces:
Command/ Scientist Tripod: my stats: armor 11, Speed 8, heavy heat ray , heat saw (range 4 sweep, + 6 power), two reaper claws, no virus bomb, no experimental options, no lobo conversion Light Hunting cell: Two scouts and one harvester
Reinforcement: Heavy Hunting Cell: Two assault tripods, one harvester.
US Forces:
Local defense to keep the bridge open and cover the evac center Field Commander two infantry one HMG one HQ one field battery one heavy battery ATG gun local police
reinforcements ( retreating elements from north of river trying to make the river crossing before being cut off)
HQ platoon: Command tank with fuel tender and ammo tender Mark II platoon Mark II platoon Mark III platoon
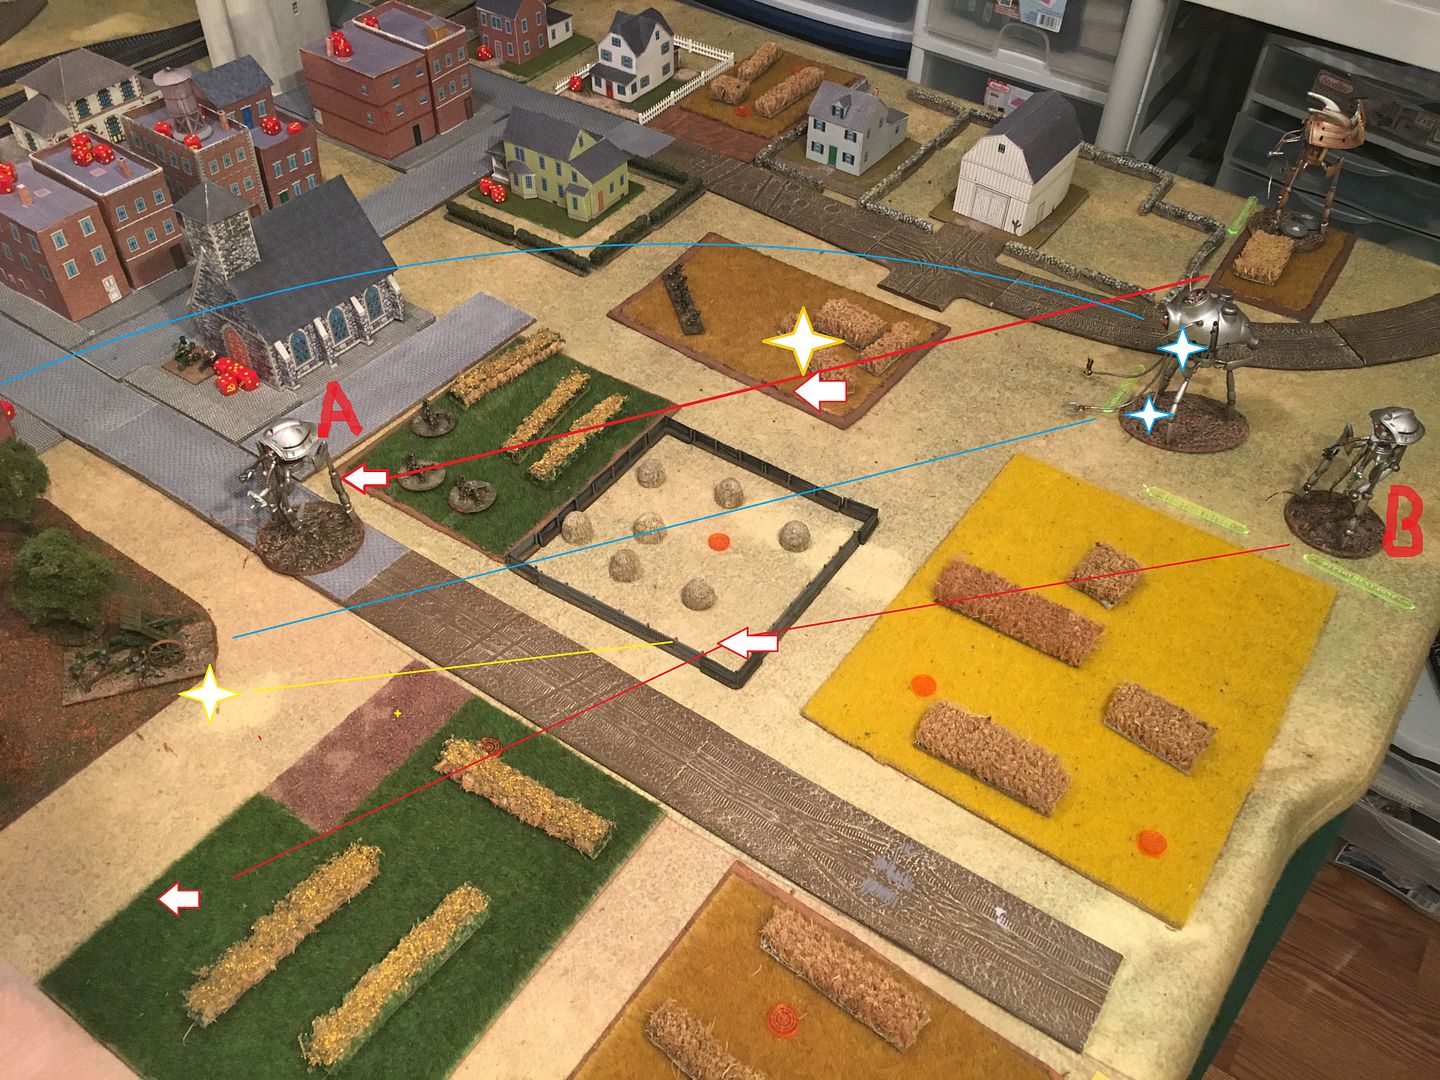
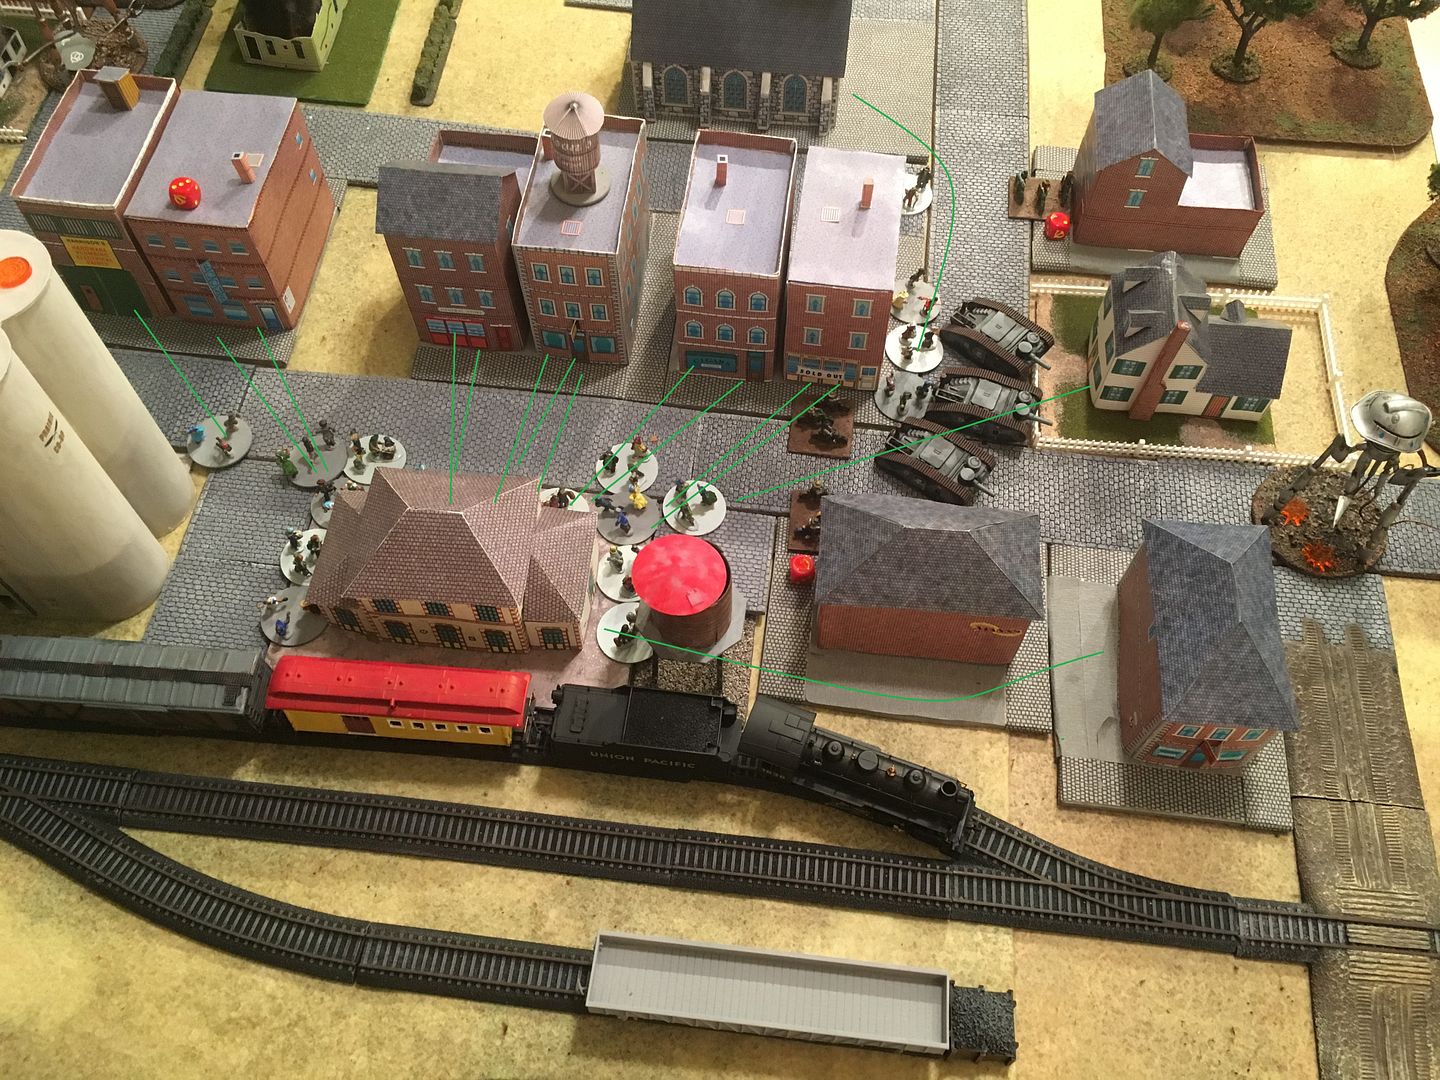
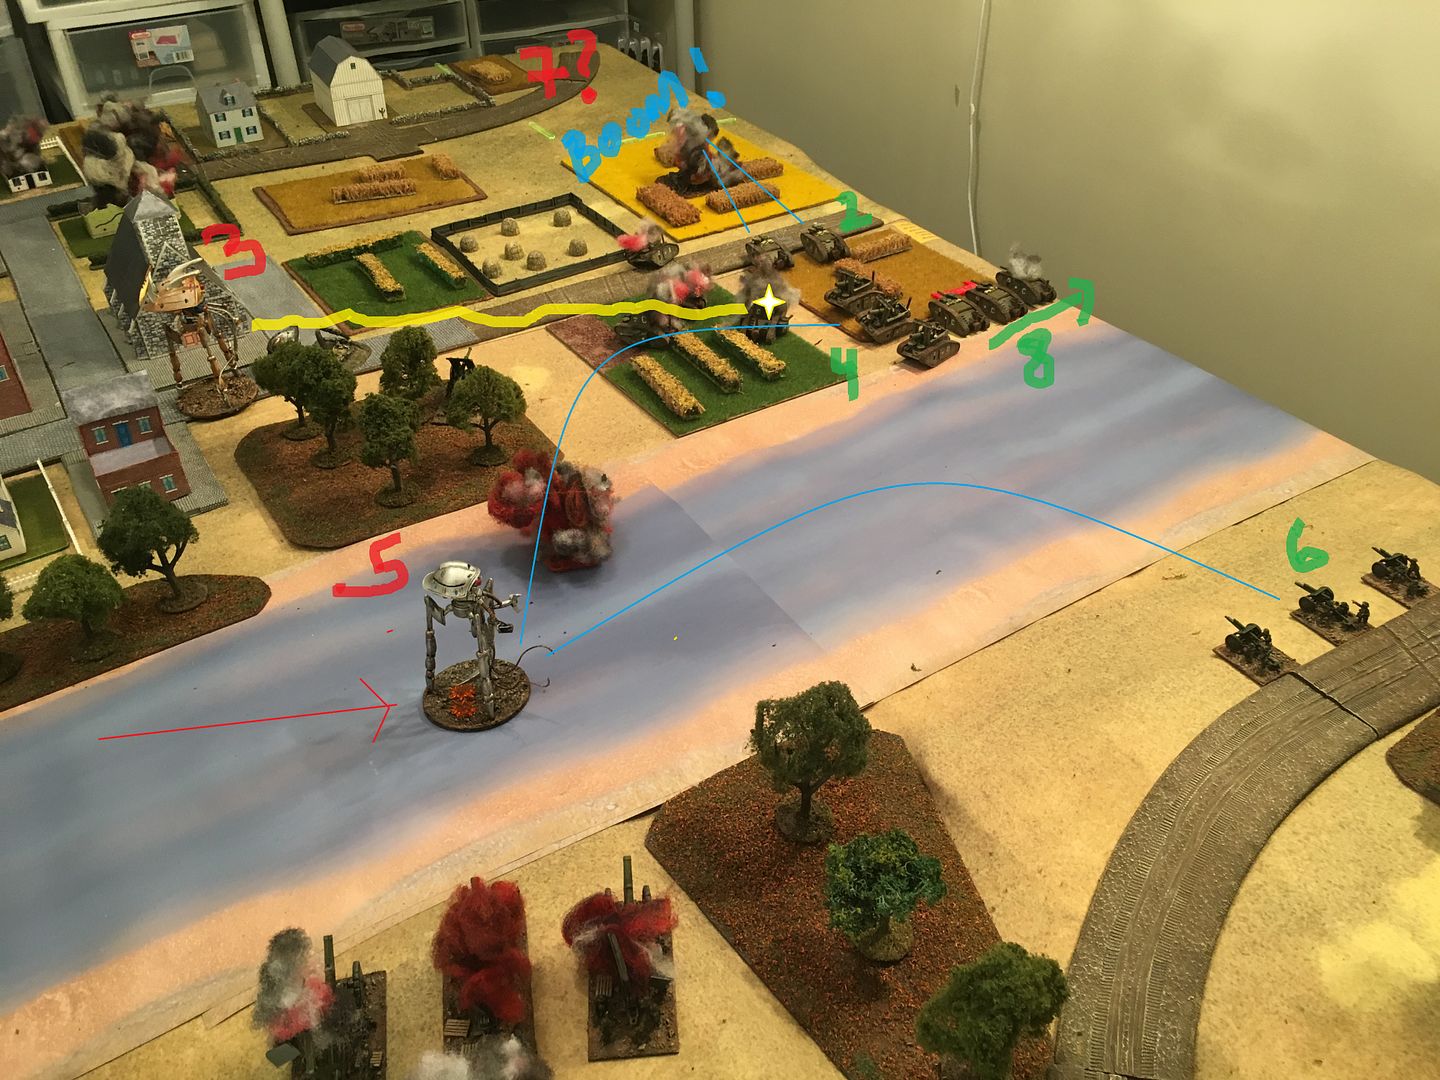
Turn 1 ; Martians have initiative. 1) Scout A double moves and exposes hidden infantry and destroys two elements. Moves again and exposes AT gun and HMG unit. 2) AT gun now fires at harvester/ 1 hit. 3) Scout B double moves, fires and misses AT gun, moves again. 4) Hvy Arty from across the Platte River fires and damages Harvester.
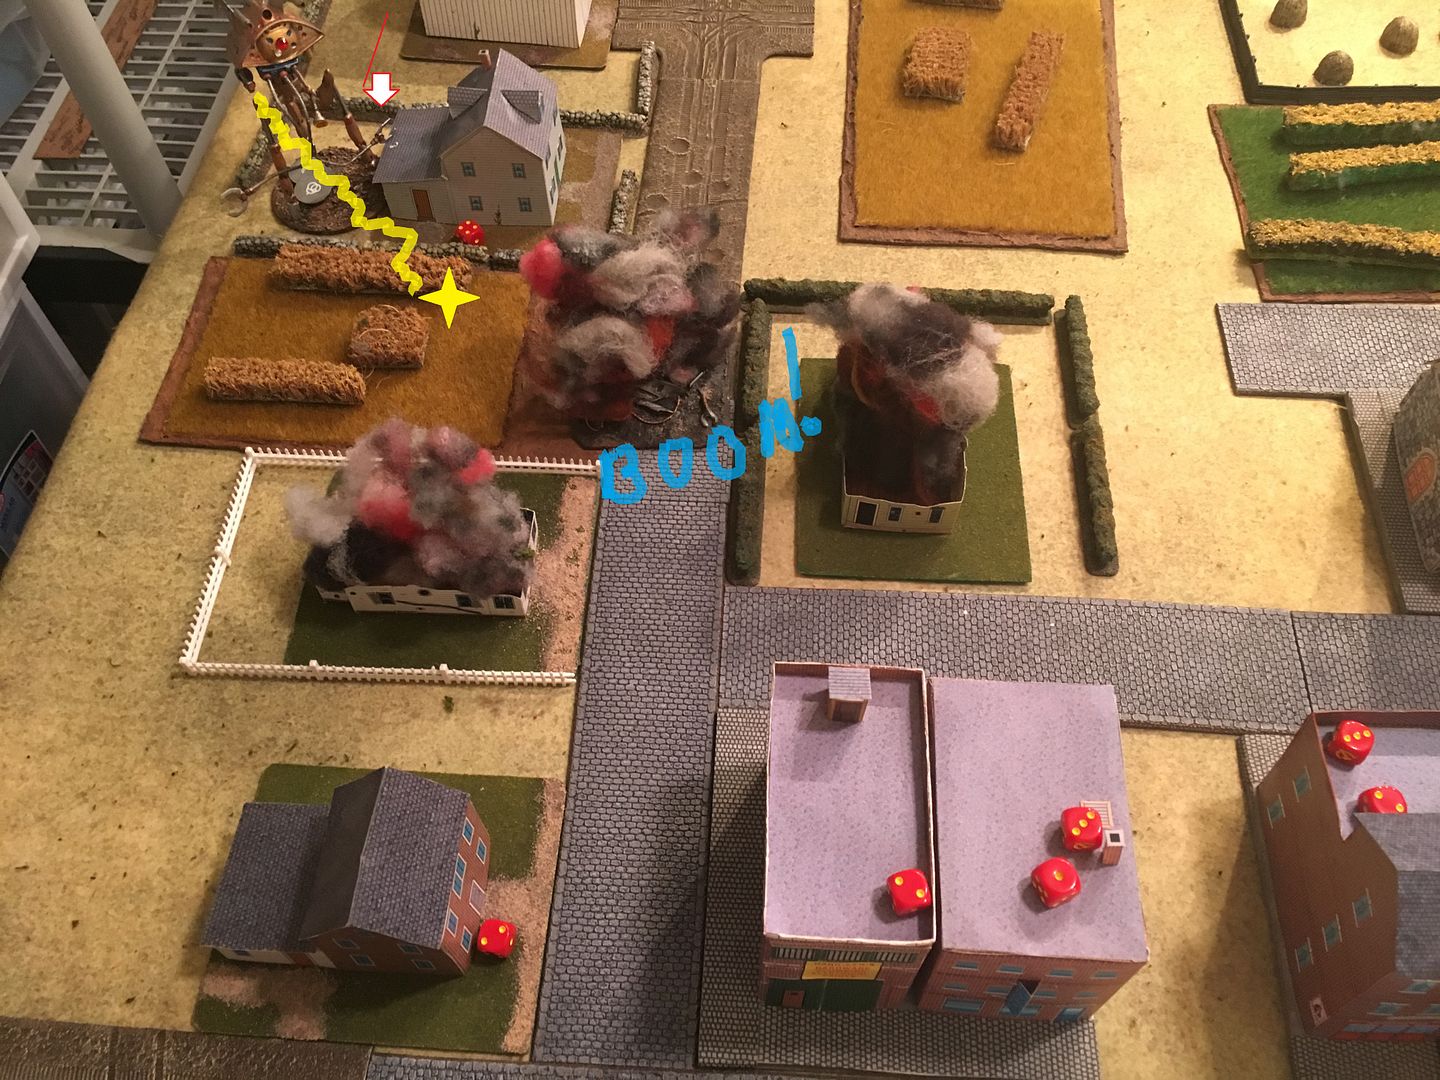
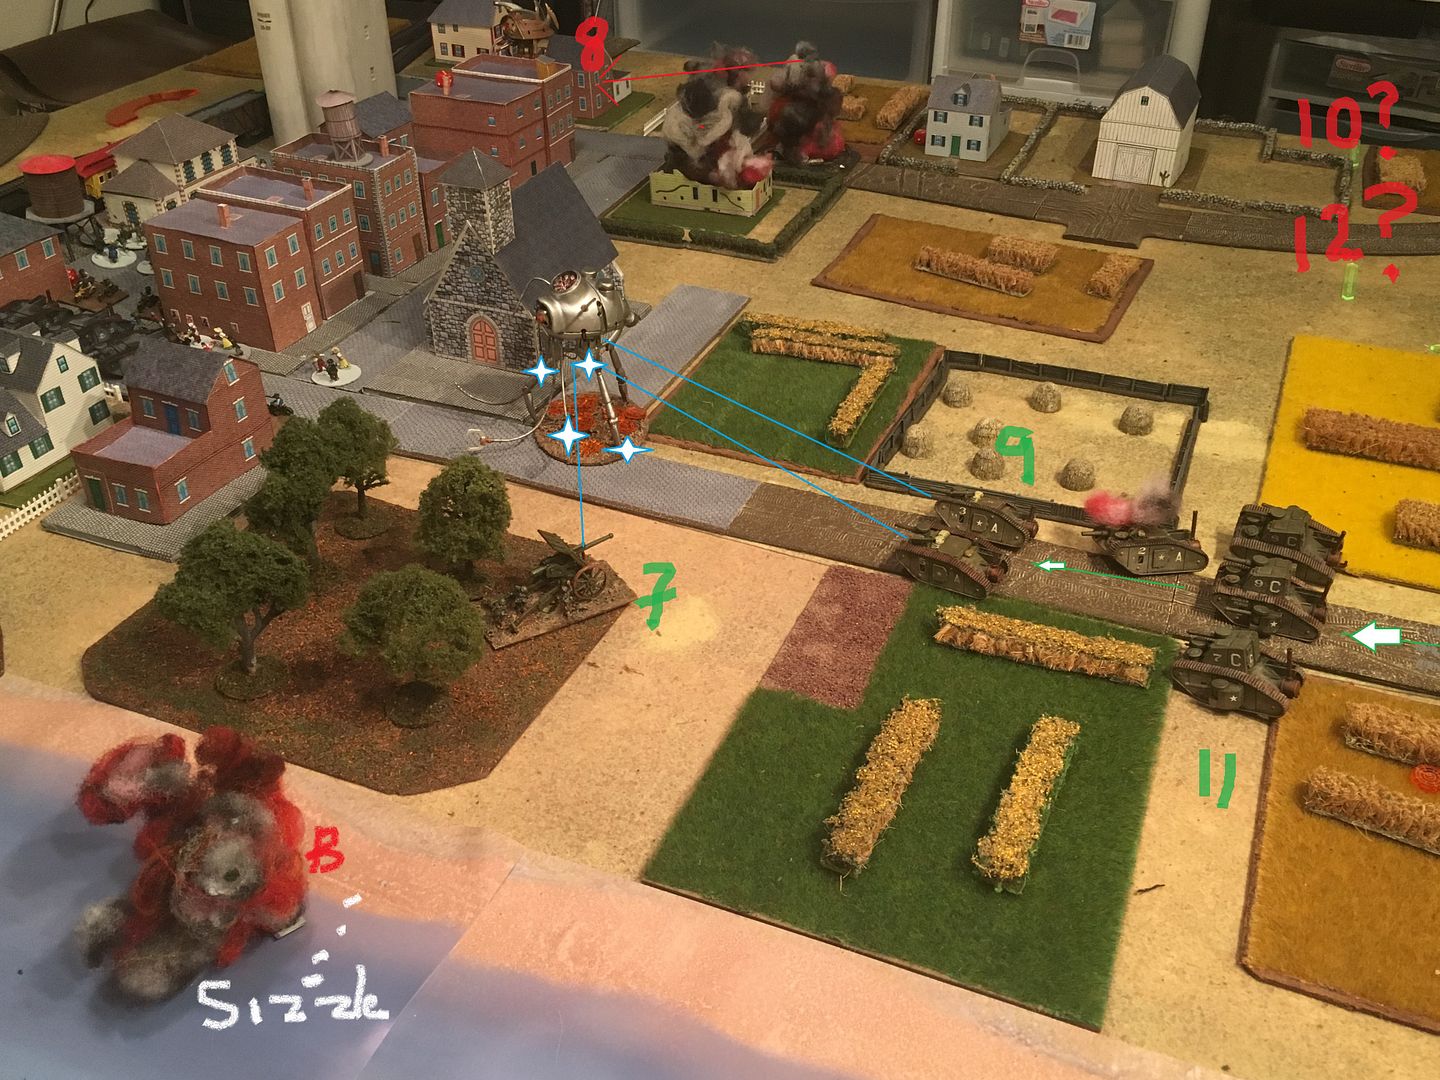
1st Turn Martian Third Move: Harvester double moves and destroys remaining infantry element. Moves again and exposed another hidden infantry unit (blue circle)
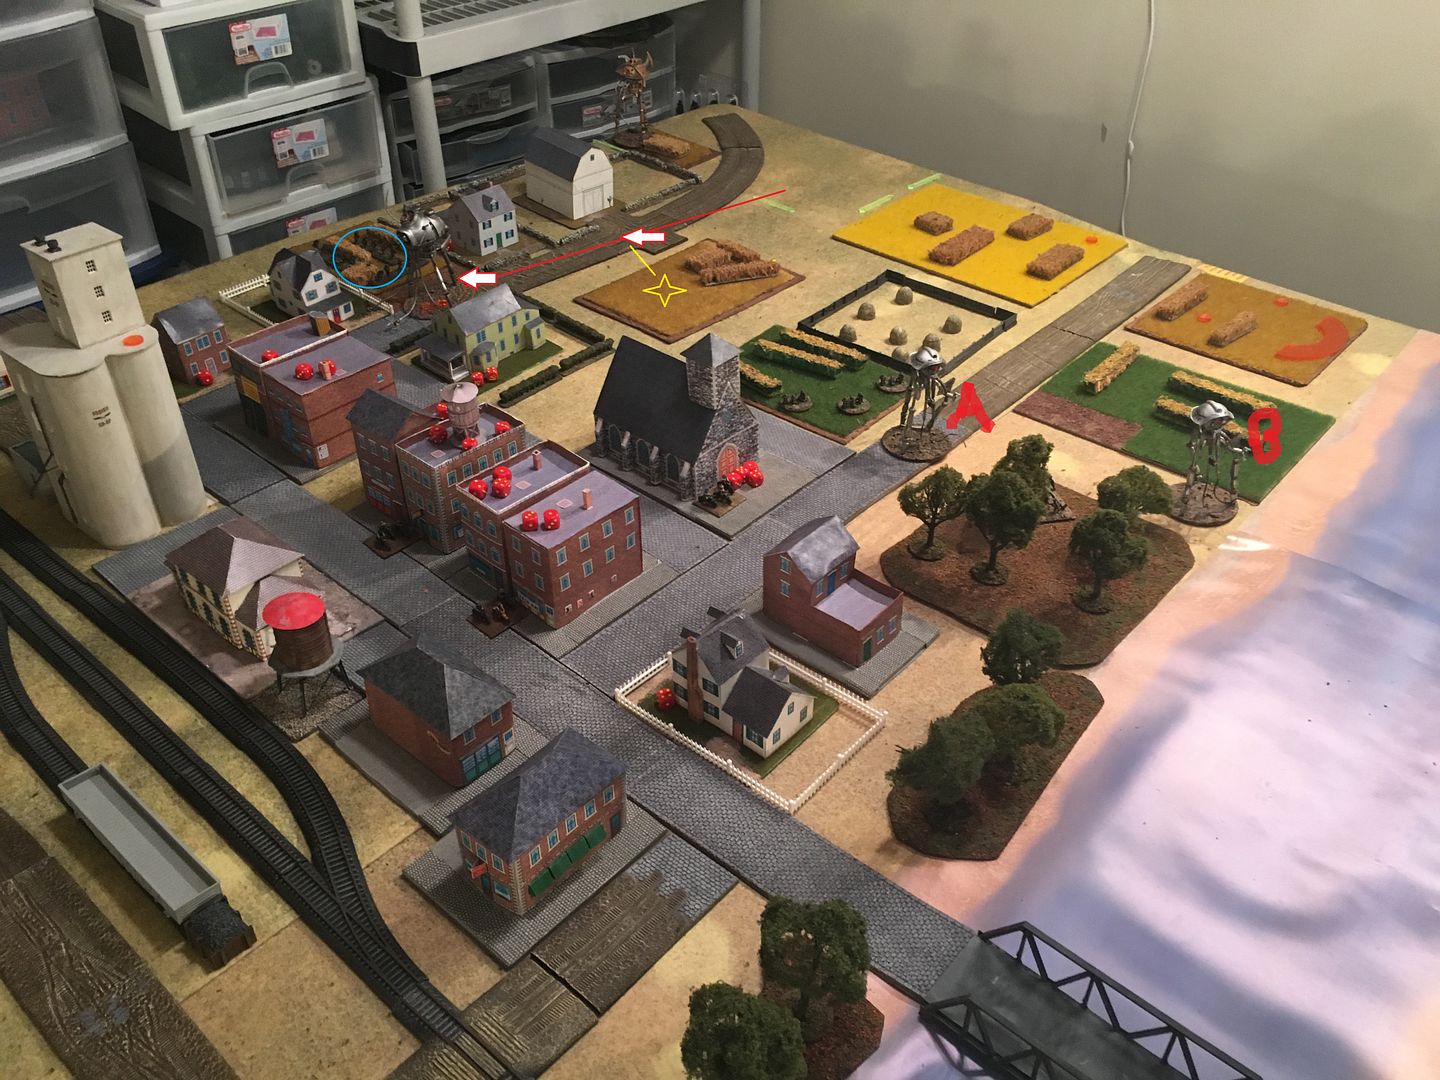
1st Turn: Human Third Move - the exposed infantry unit immediately assaults the harvester and scores a hit.
Turn 1: The harvester explodes with two infantry elements lost as well as houses and civilians. During Martian 4th move the Royal tripod destroys remaining infantry element.
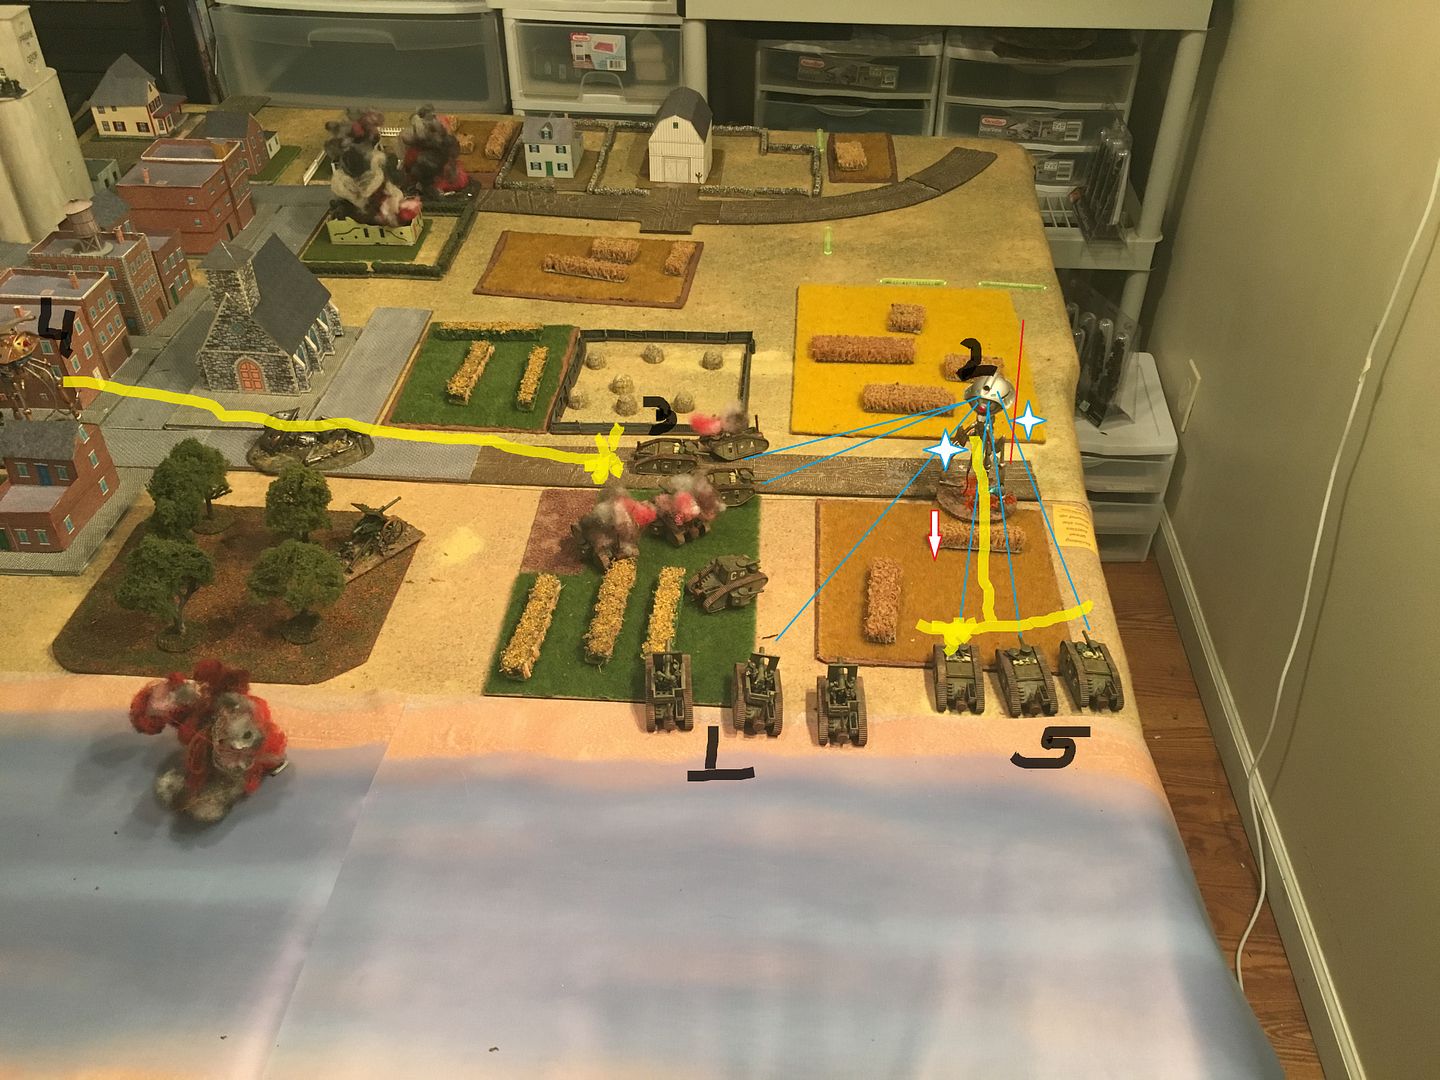
1st Turn Human 4th & 5th move - militia tanks come out of hiding and cause a hit on scout A. Then. HMGs fire but no damage. Field guns across the river come out of hiding fire on scout B but no damage. Refugees begin to come out of buildings with police aid.
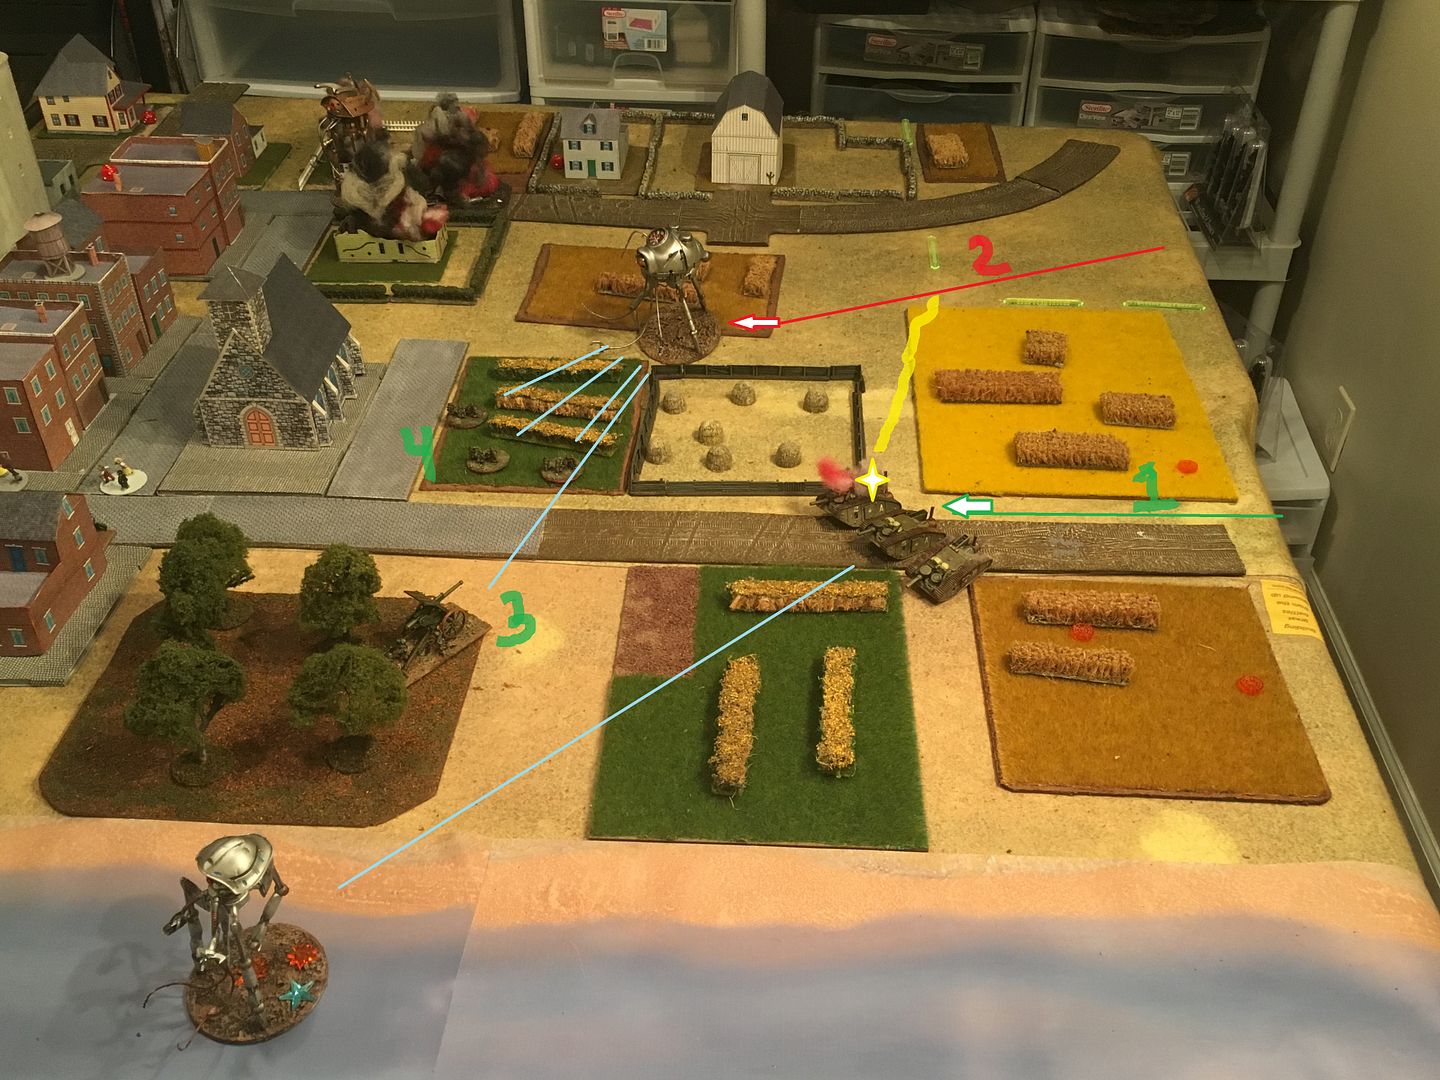
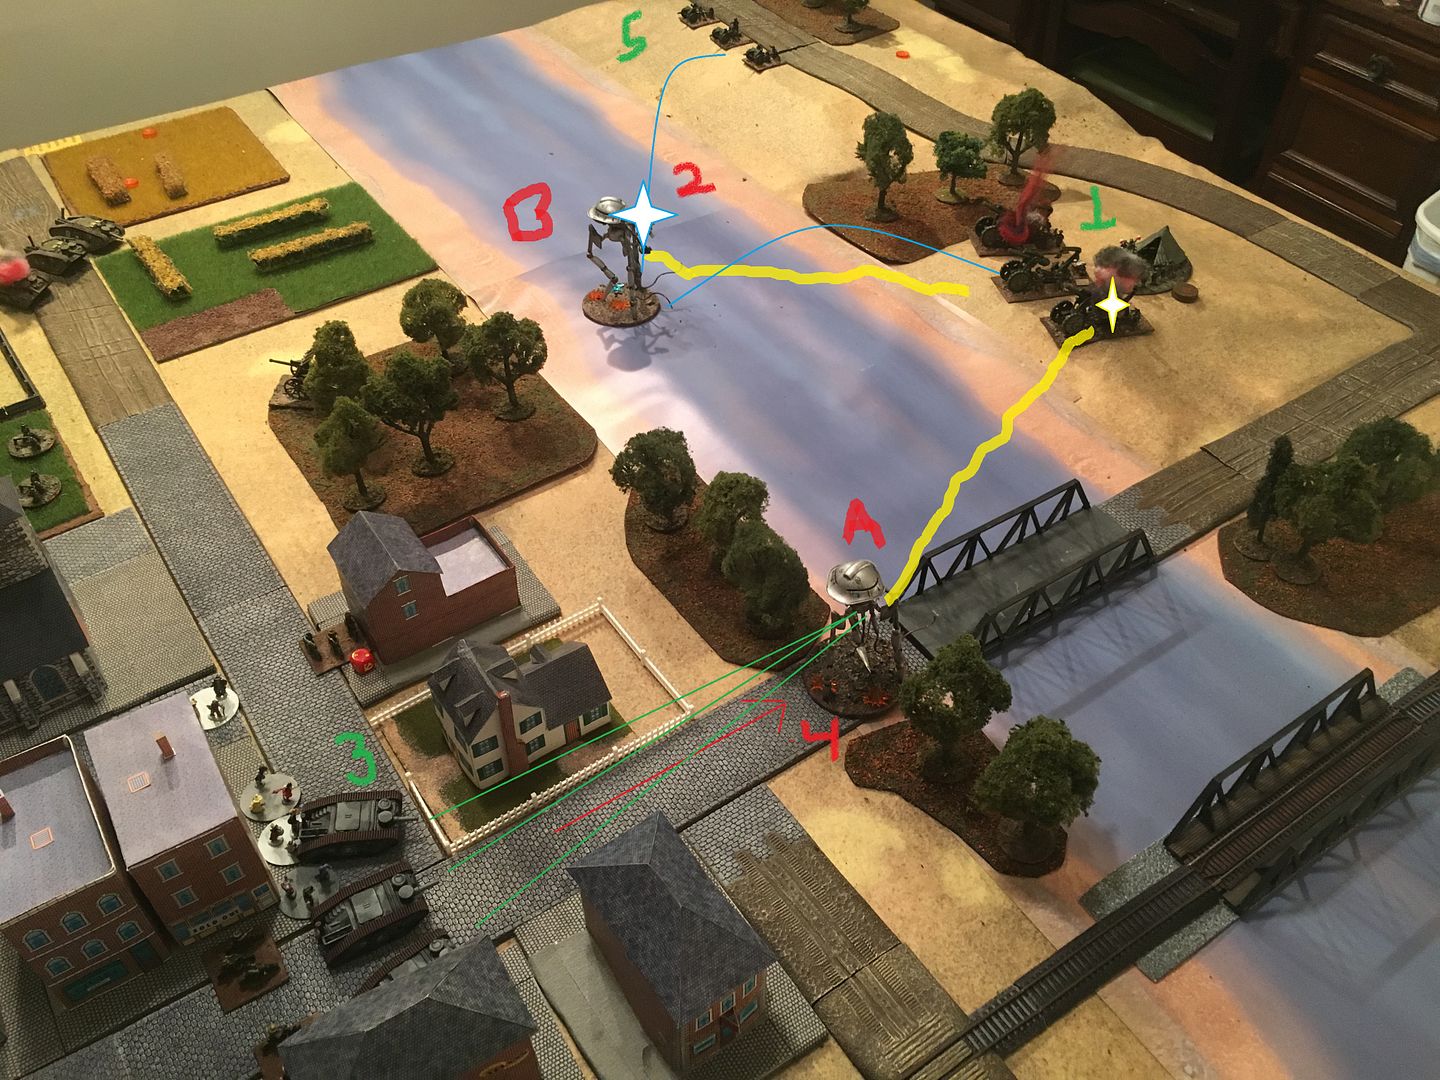
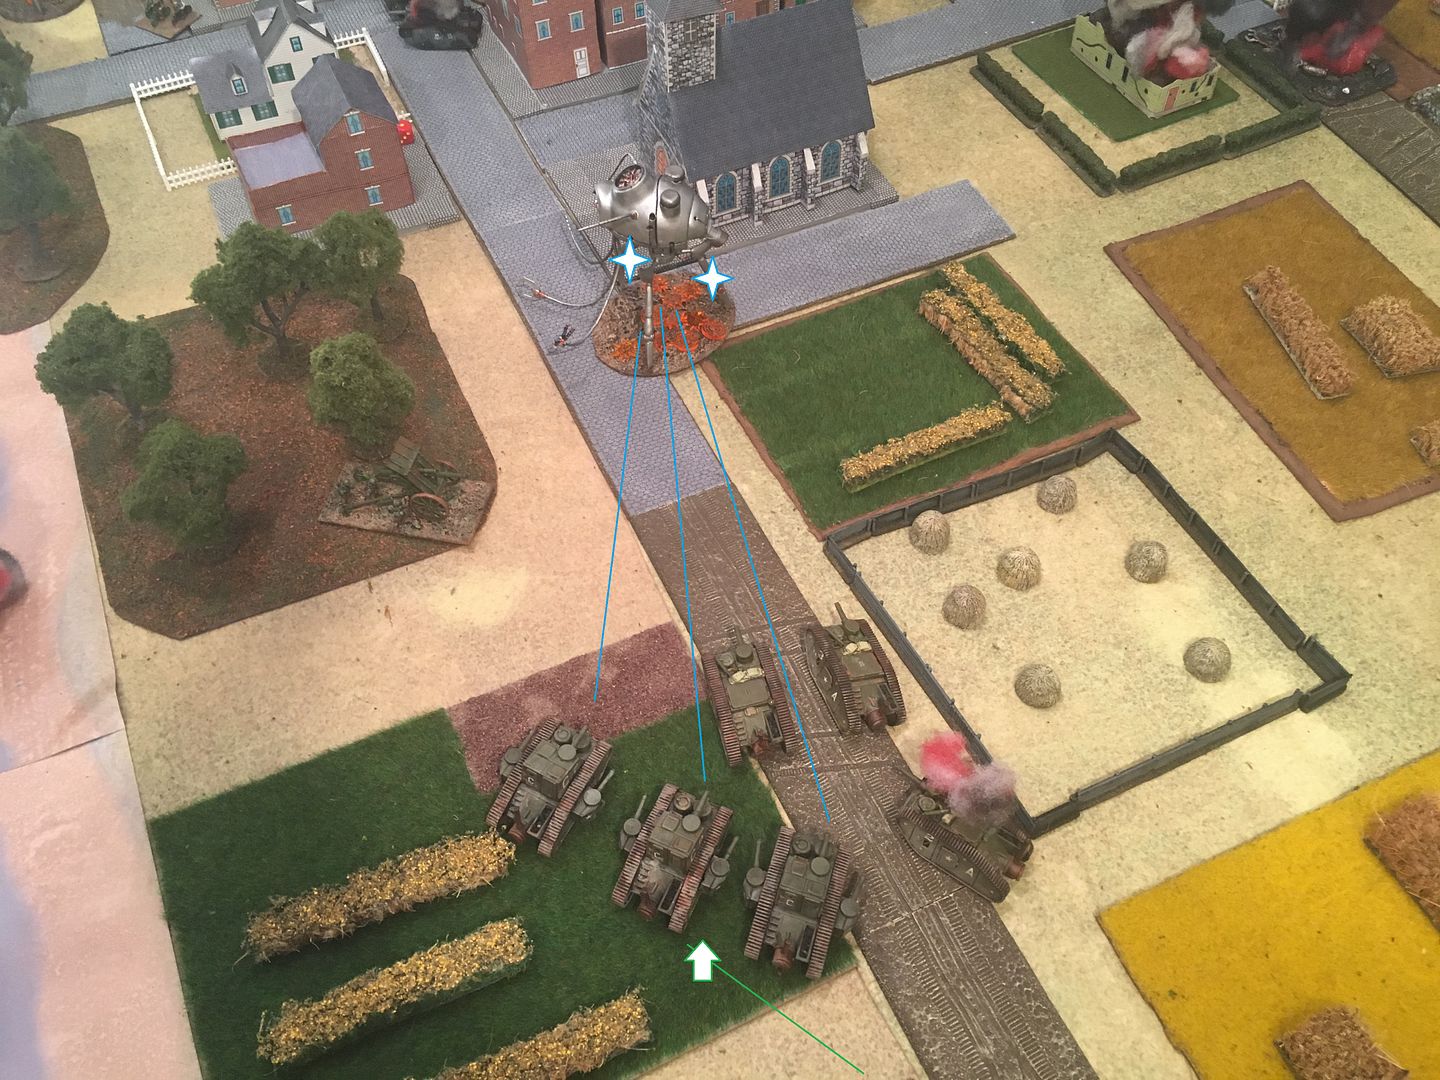
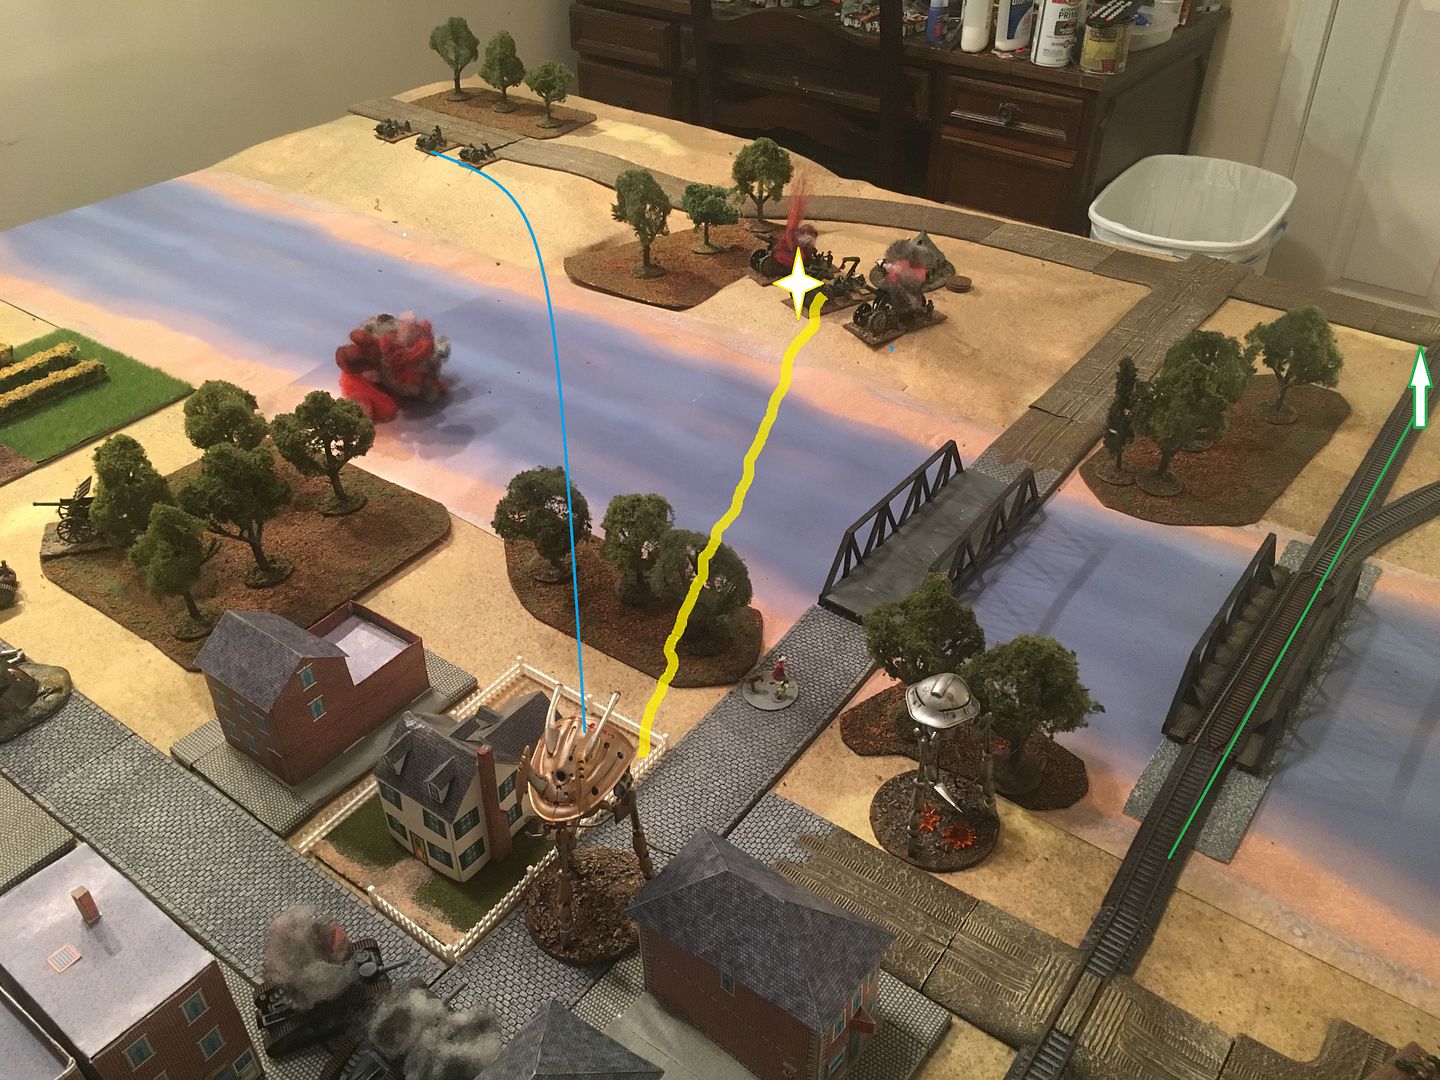
Turn 2. Human Wins initiative 1)Hvy arty fires cripples scout B, 2) martian scout A moves into town causes no damage (see next photo), 3) field guns off to right fire and cause additional damage 4) scout B wins movement rolloff, destroys heavy gun. 5) militia tanks move and fire on scout A (see next photo)
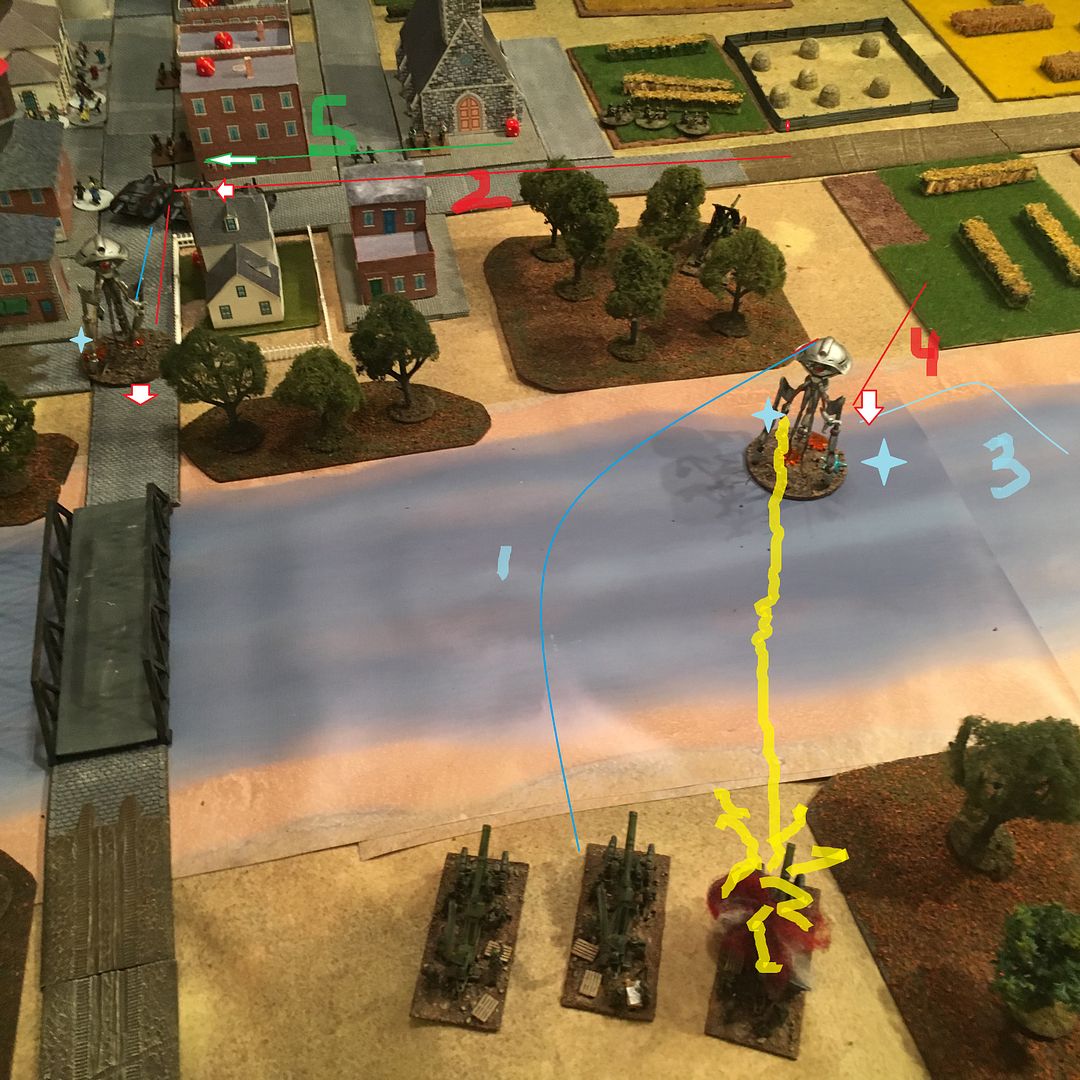
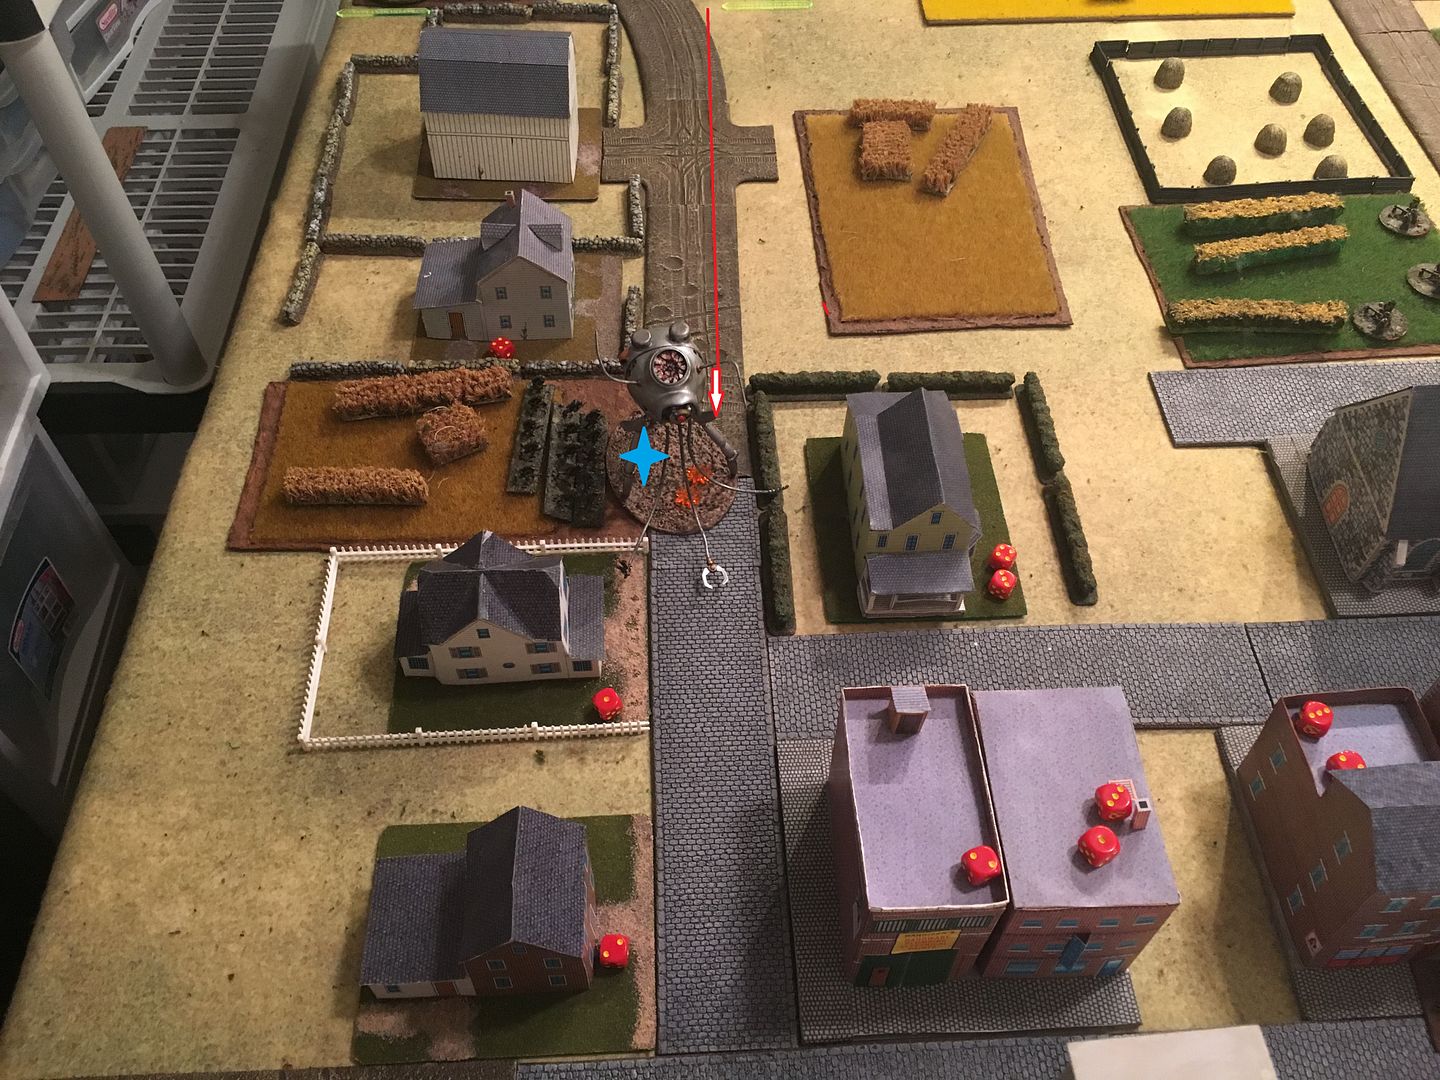
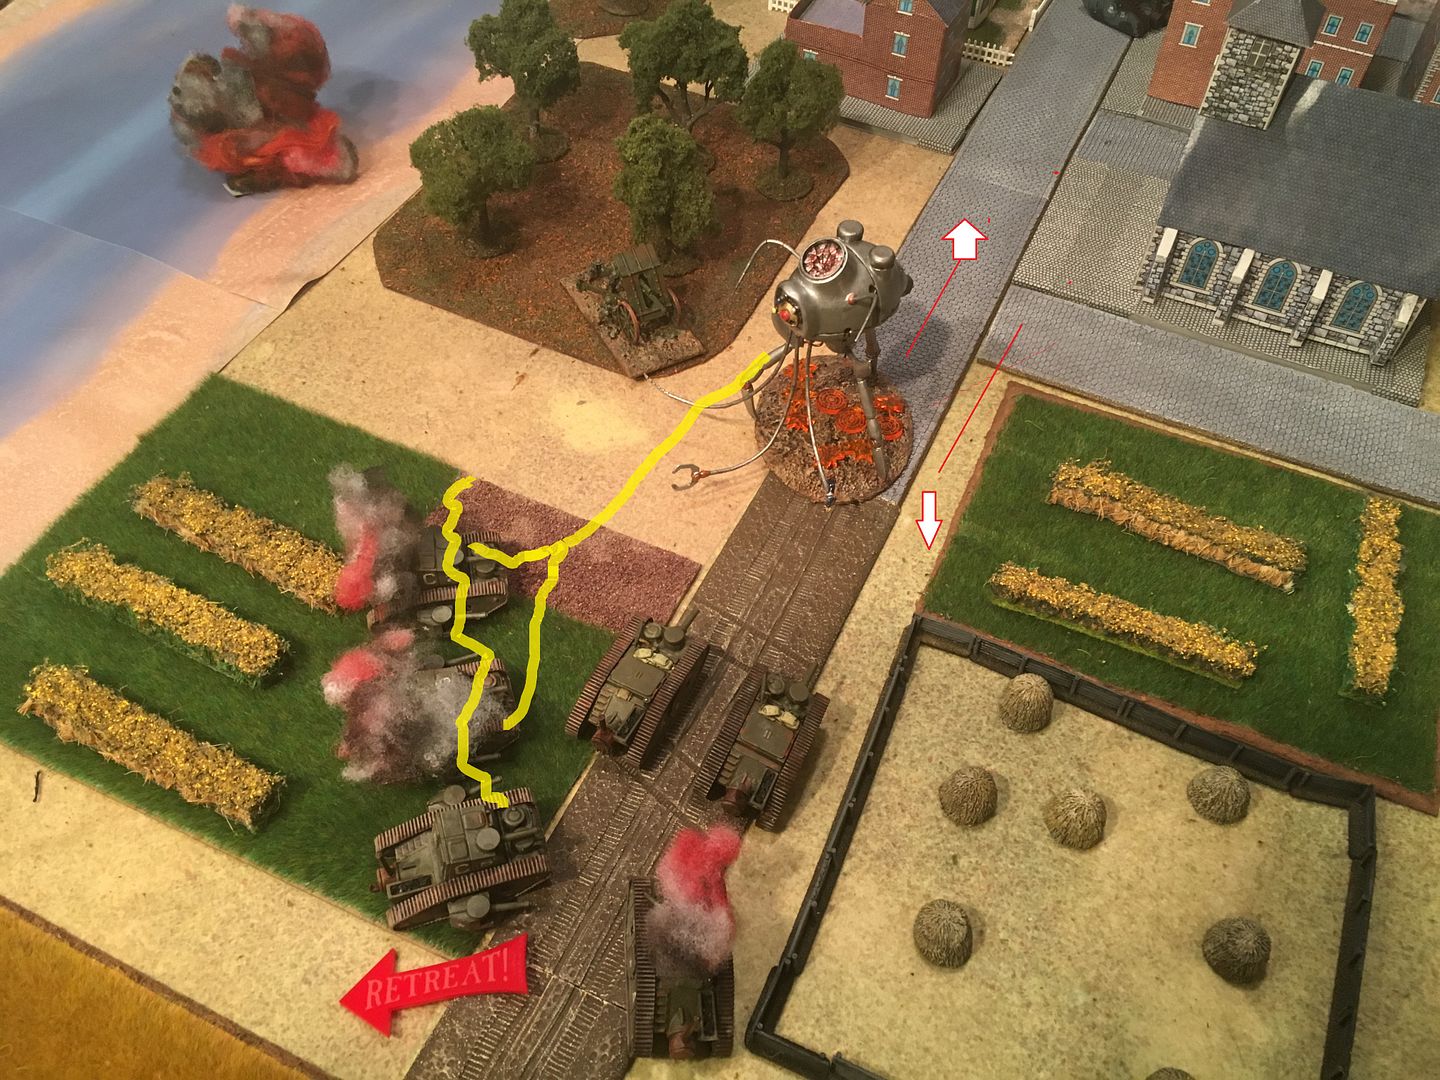
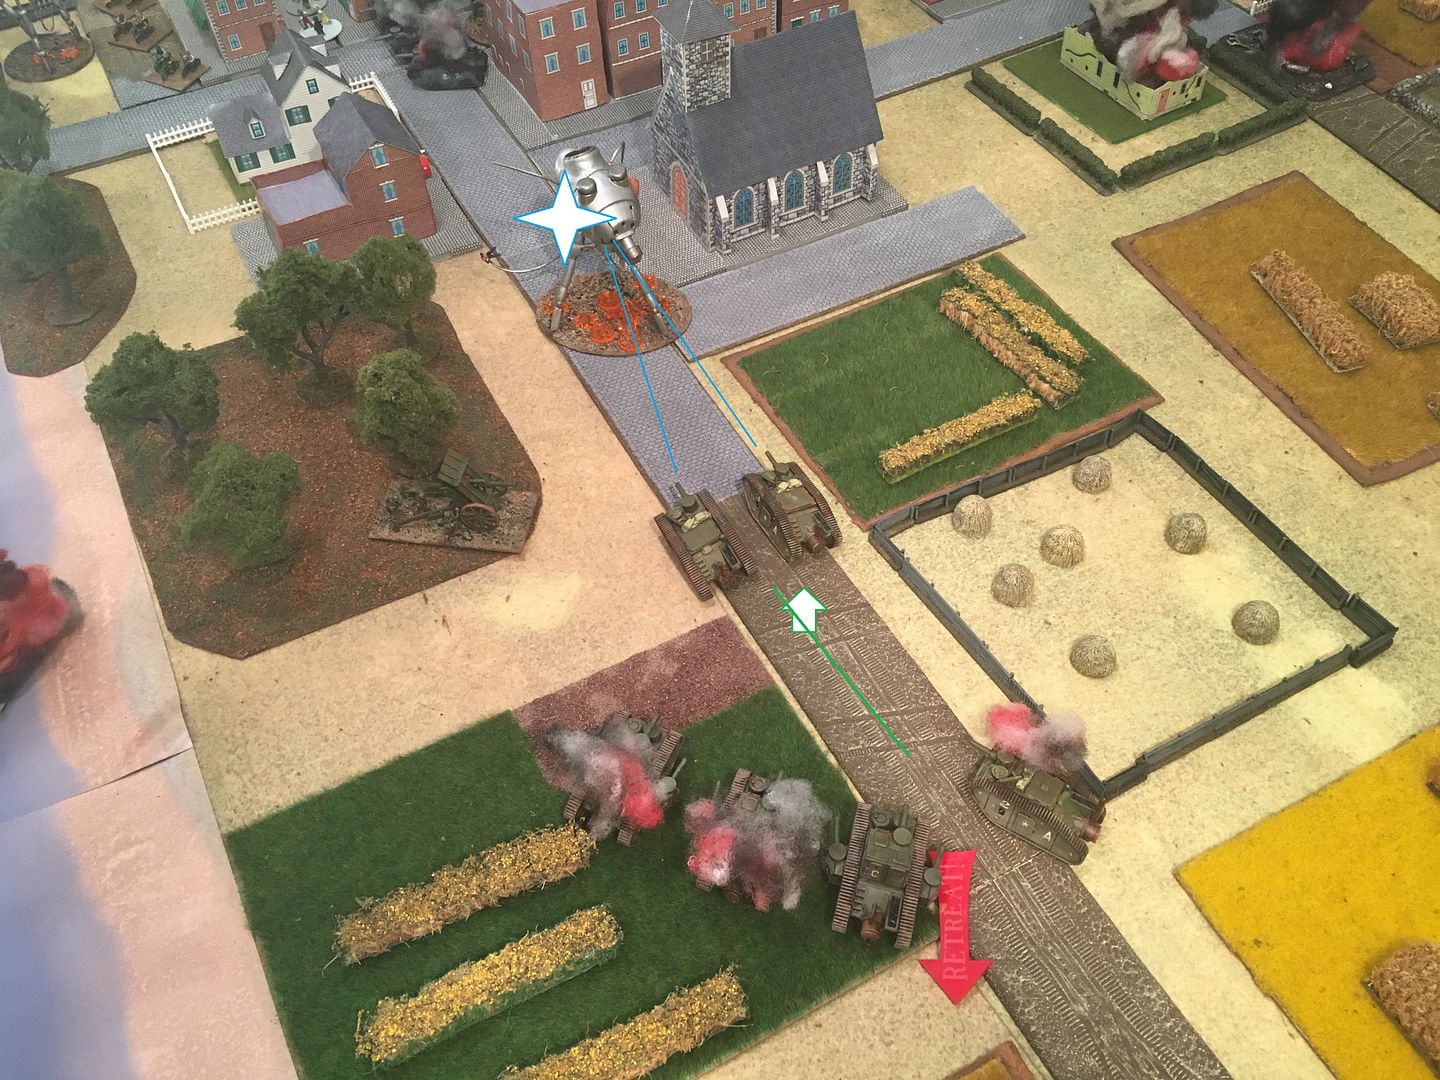
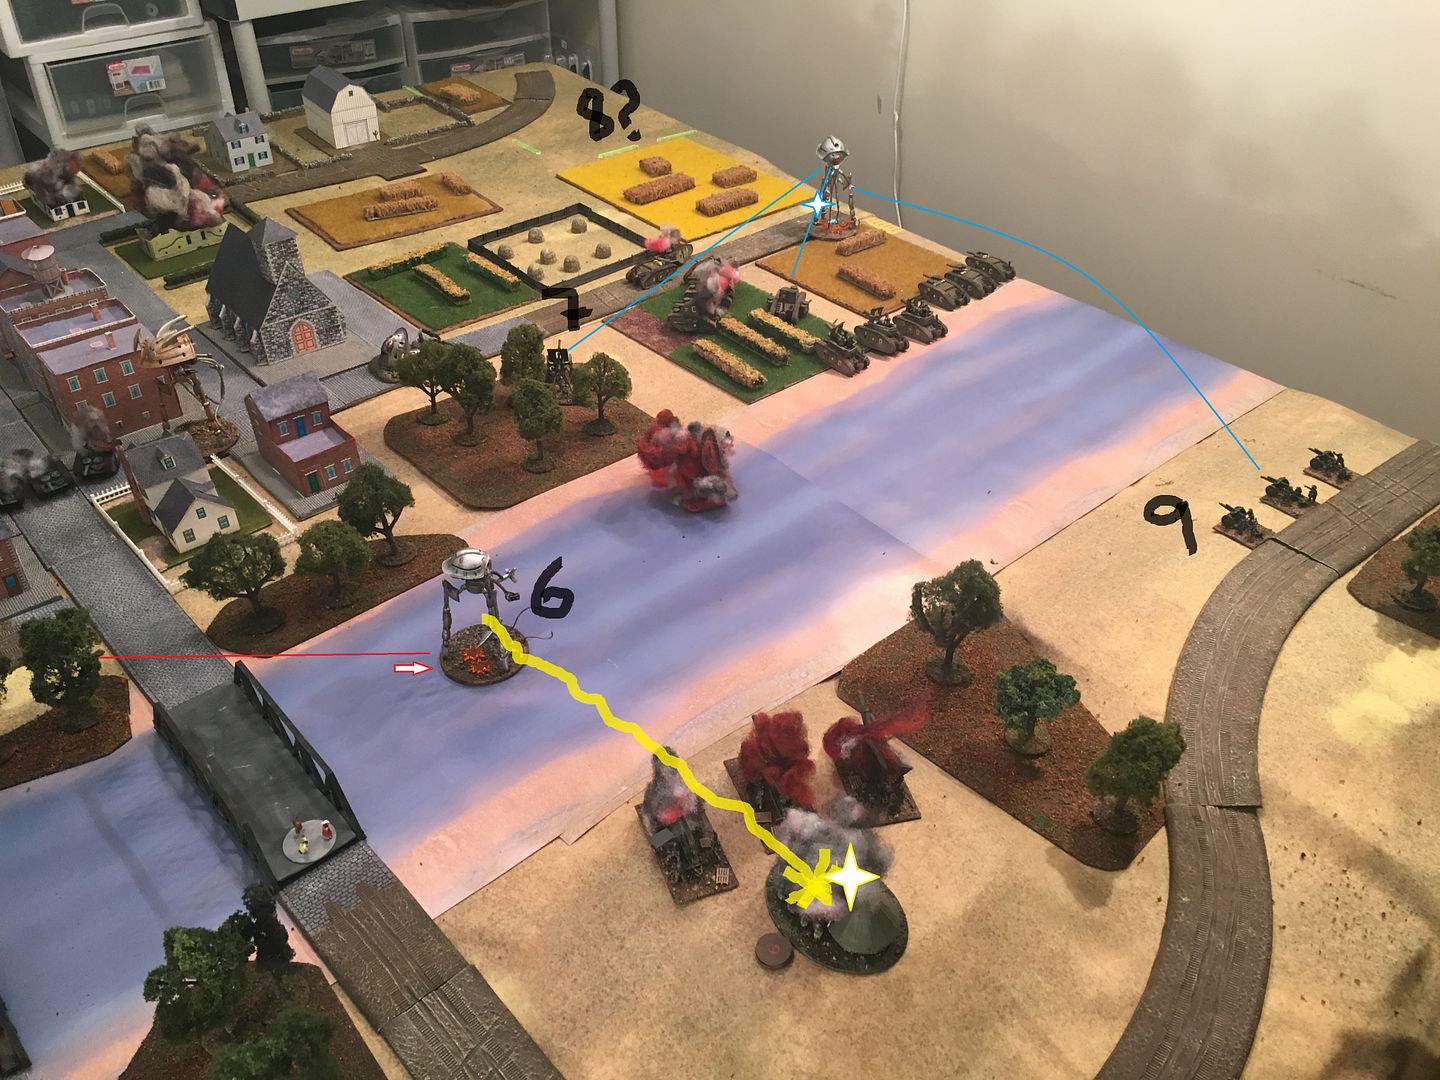
Turn 2 - - Scout A doubles over tanks - uses sweep ray and not a single hit!. Moves again towards bridges.
Militia tanks chase scout A fires and causes another damage point.
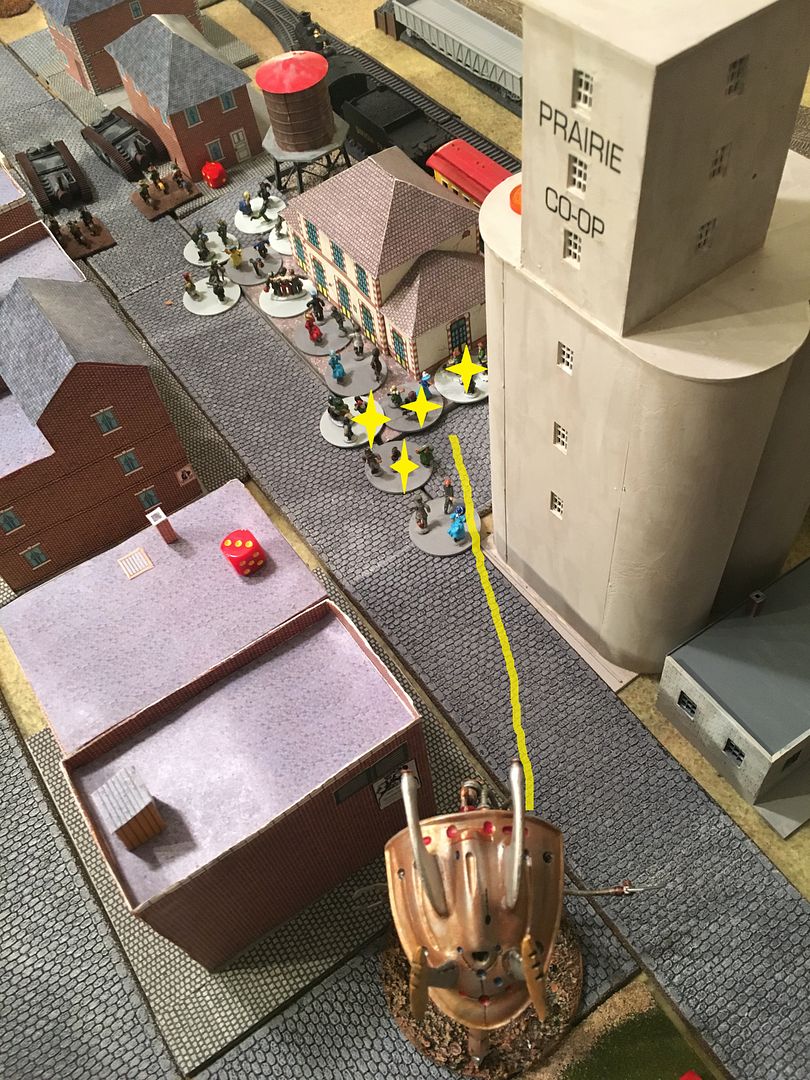
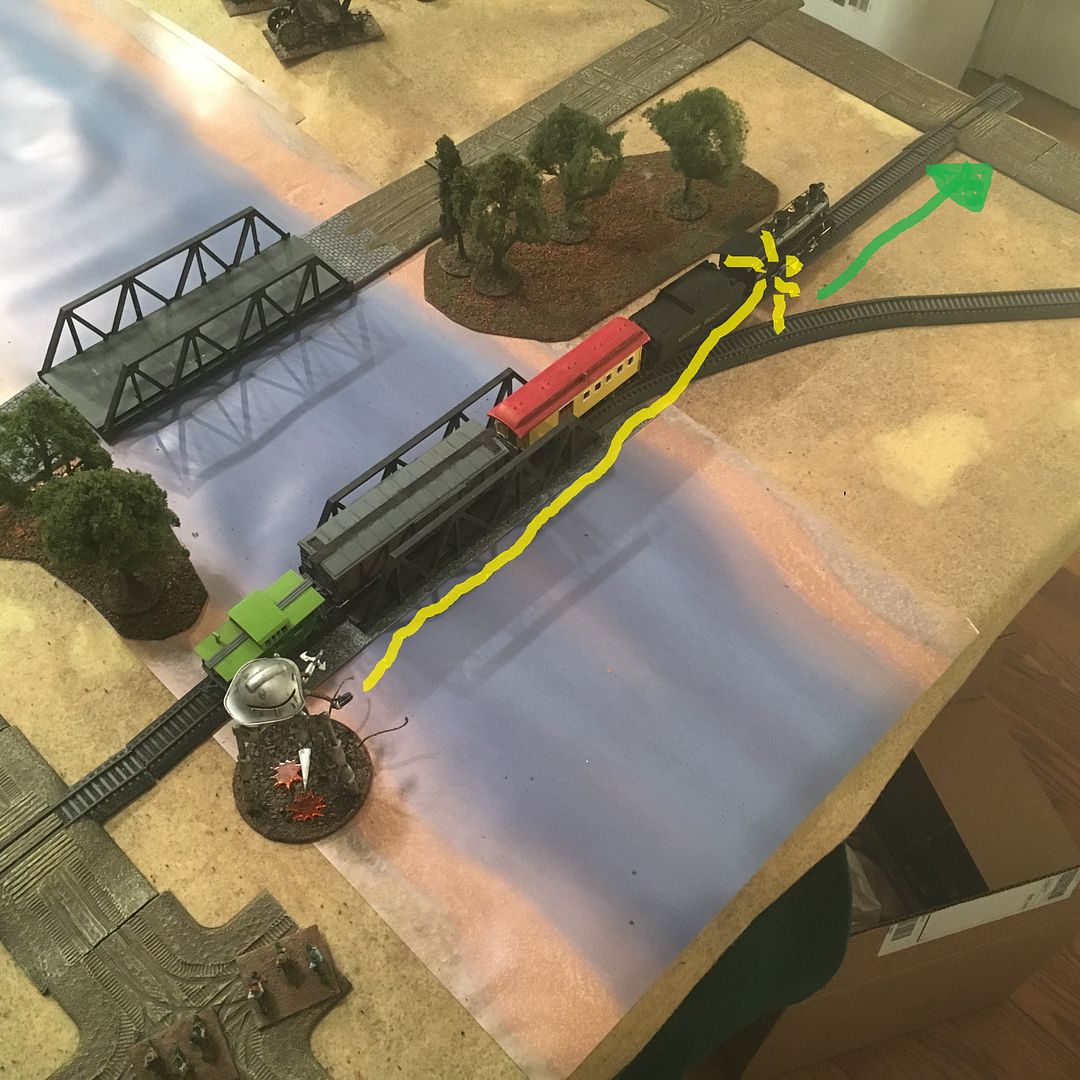
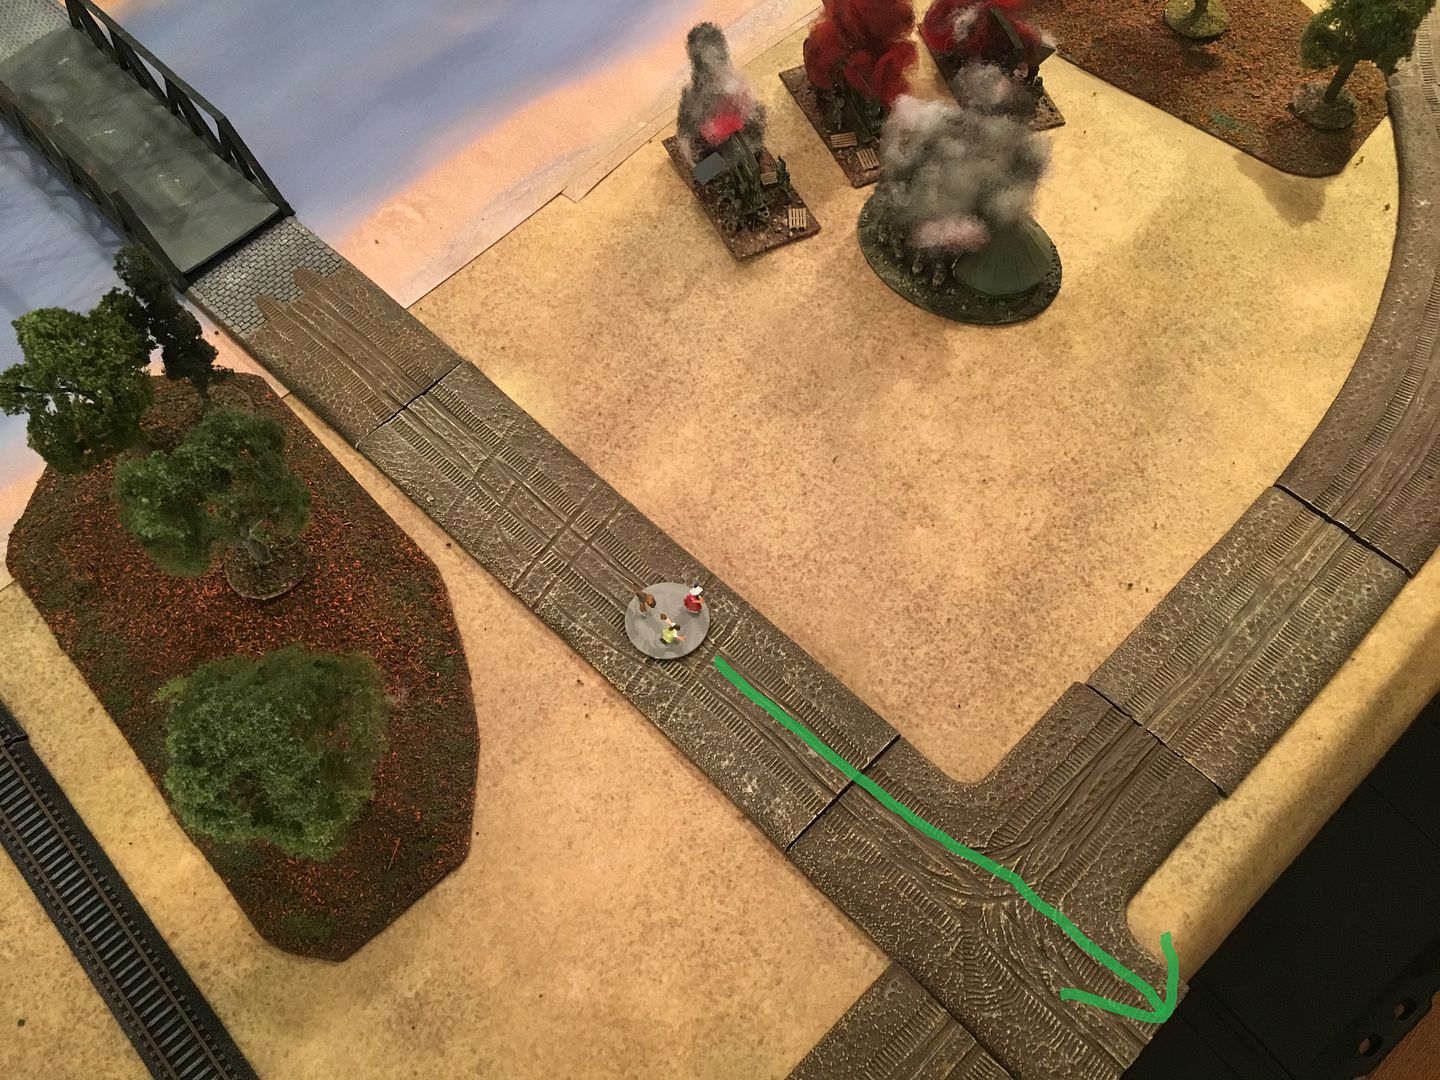
Turn 2 - Train arrives at station (reinforcement roll - cannot load this turn) - fleeing civilian move from buildings to station with scout tripod one block away.
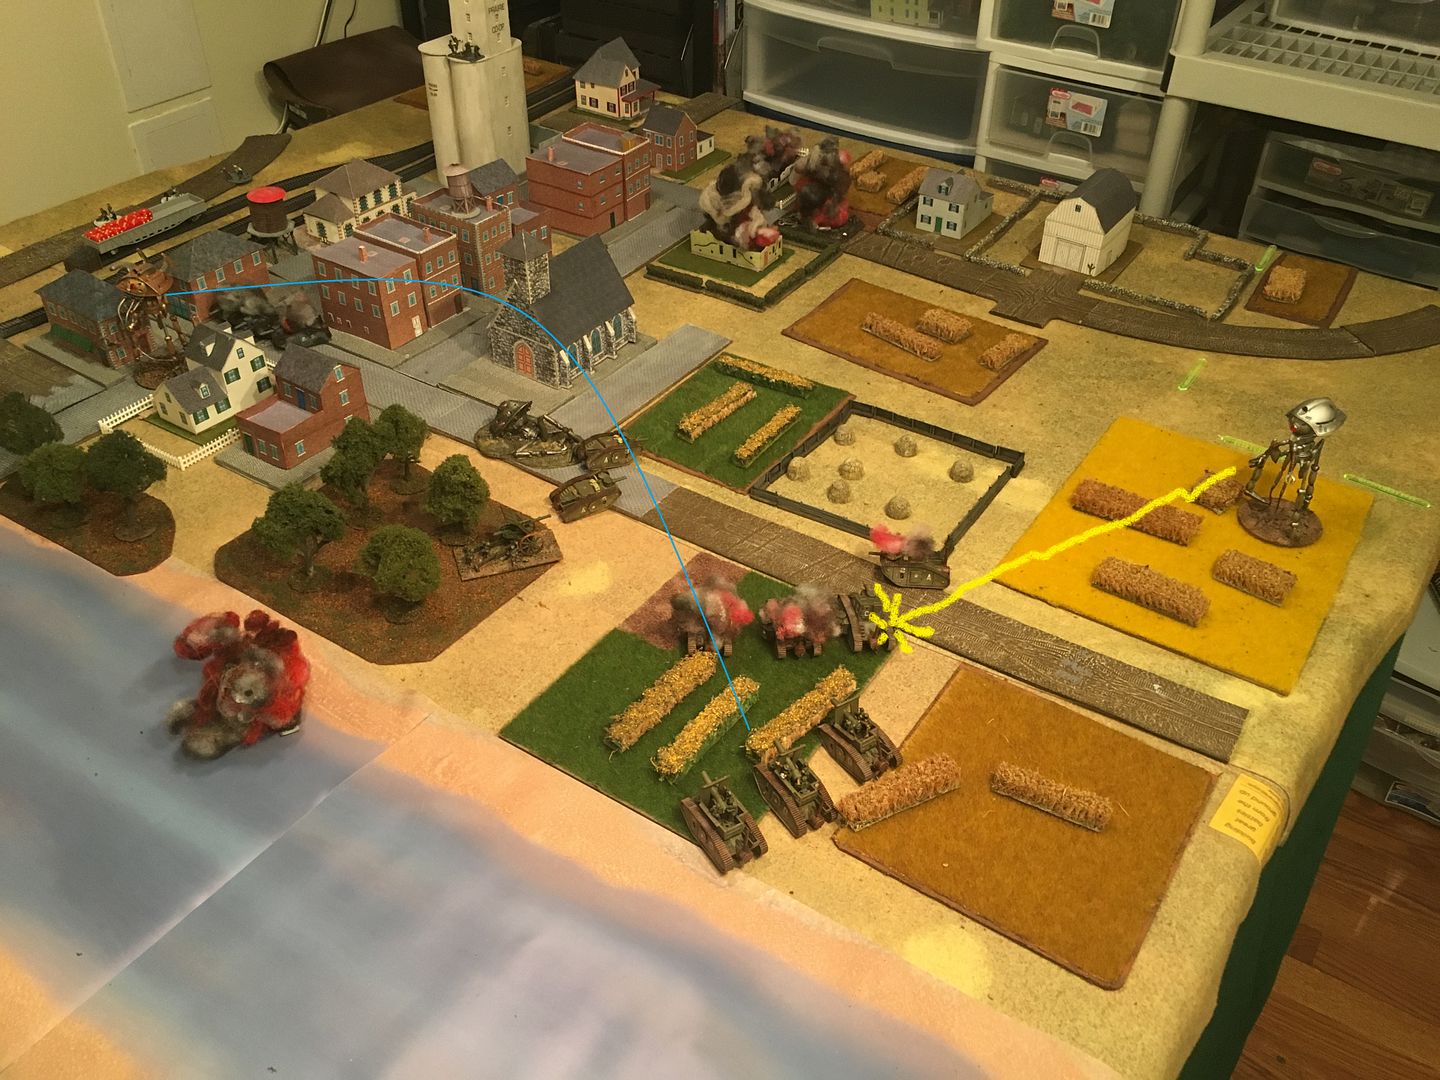
Turn 2 Continues - Mark II reinforcements move and shoot at scout B, no damage. Harvester arrives - kills a Mark II, keeps moving. ATG misses. Royal command tripod moves. HMG (ROF 1) fires to no effect. Martian fails next reinforcement
|
|
|
|
Post by Quendil on Dec 25, 2015 19:54:49 GMT
Looks like great fun, I shall go through it again when I have more time
|
|
|
|
Post by mikedski on Dec 26, 2015 1:21:11 GMT
Looks like great fun, I shall go through it again when I have more time Please let me know if you can follow on Photobucket or if better to post directly to forum. |
|
|
|
Post by Quendil on Dec 26, 2015 8:48:22 GMT
Looks like great fun, I shall go through it again when I have more time Please let me know if you can follow on Photobucket or if better to post directly to forum. I think photobucket is great for hosting images (I Use it) not so good when trying to follow the report. The amount of popups and adverts is annoying. Still a great job though. |
|
|
|
Post by mikedski on Dec 26, 2015 10:56:53 GMT
Turn 3
Turn 3: Human initiative. 1)Hvy Arty fires and misses. 2) Scout B fires and misses. 3) Militia tanks fires and no damage. 4) Scout A moves and destroys a gun. HQ prevents route of remaining gun. 5) Field guns fire and topple scout B.
Turn 3: Impulse 6) Harvester moves - assaults HMG teams and devours all three teams. moves again.
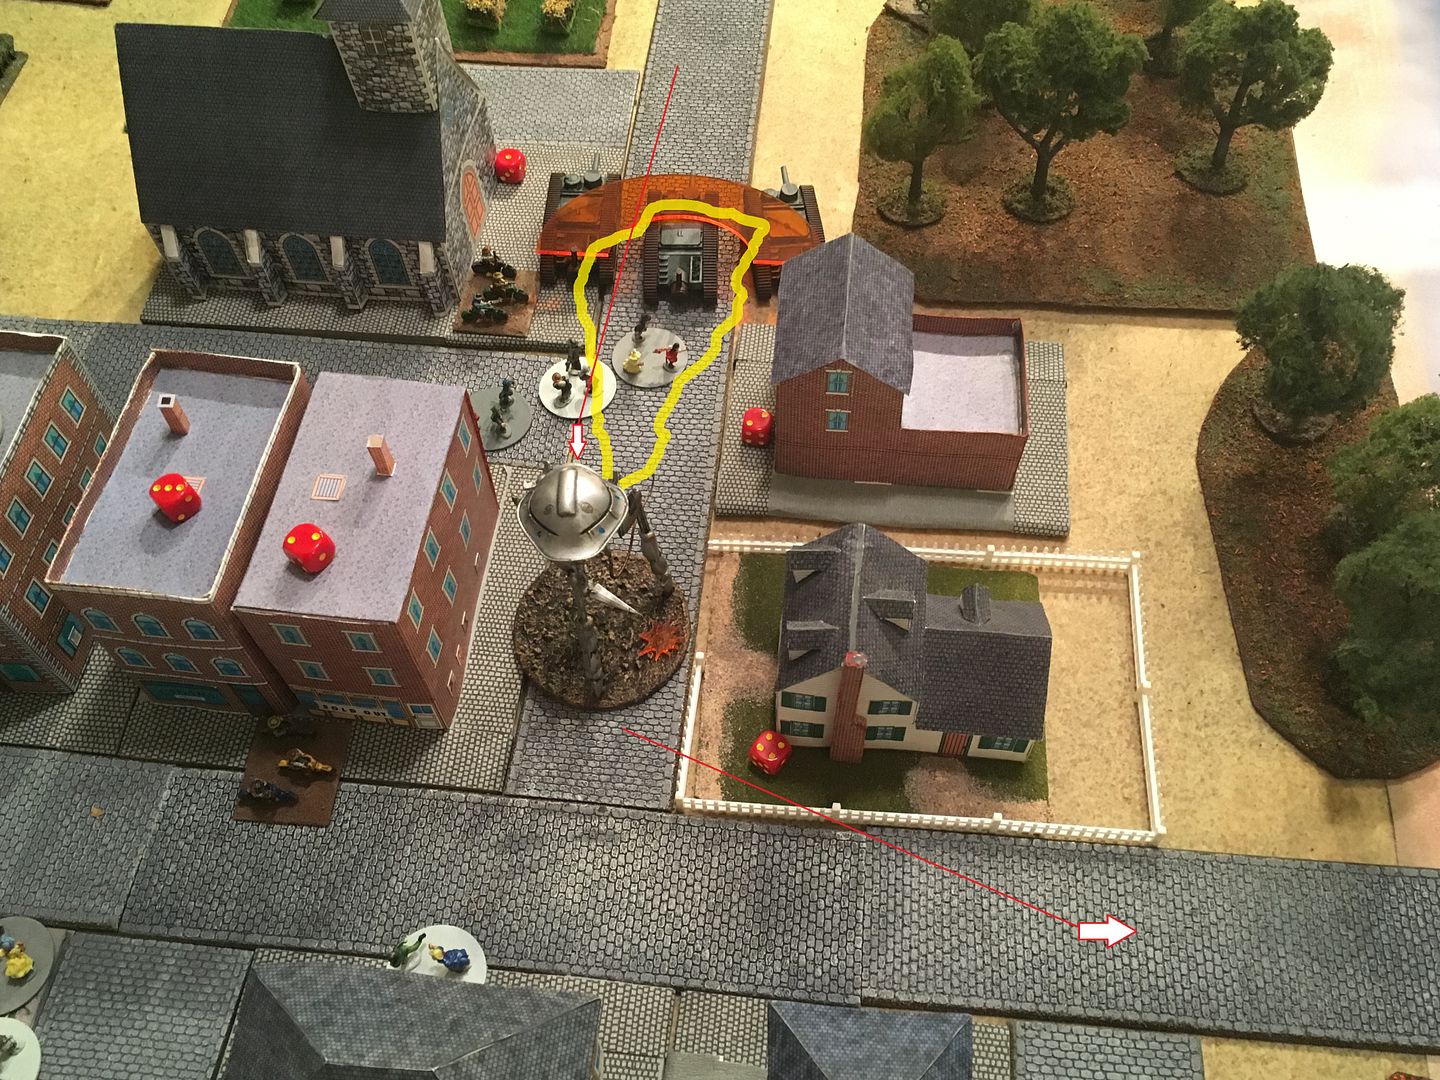
Turn 3: Impulse 7) ATG fires and inflicts heavy damage. 8) Command Tripod moves and attacks train station (see picture below) 9) Mark IIs move, fire, and inflict damage. 10) Martian fails reinforcement roll. 11) Mark IIIs arrive as reinforcements, can move, but no shoot. 12) Martian rolls reinforcement again and fails.
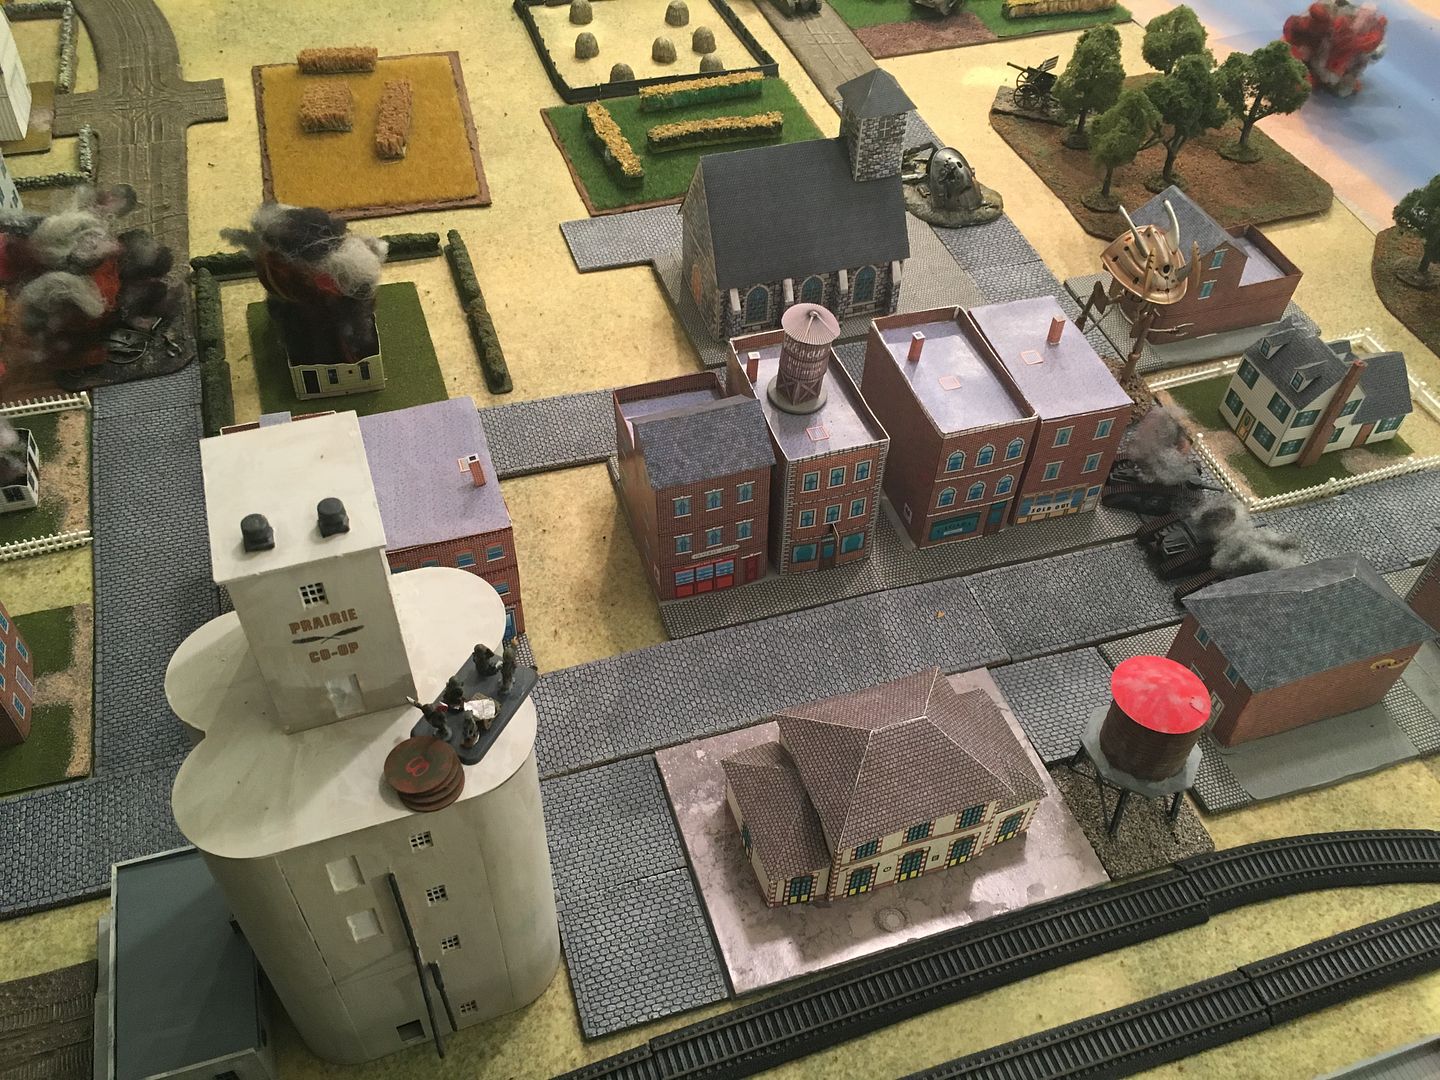
Turn 3: Royal command tripod moves into town and sweeps civilians at train station killing 4.
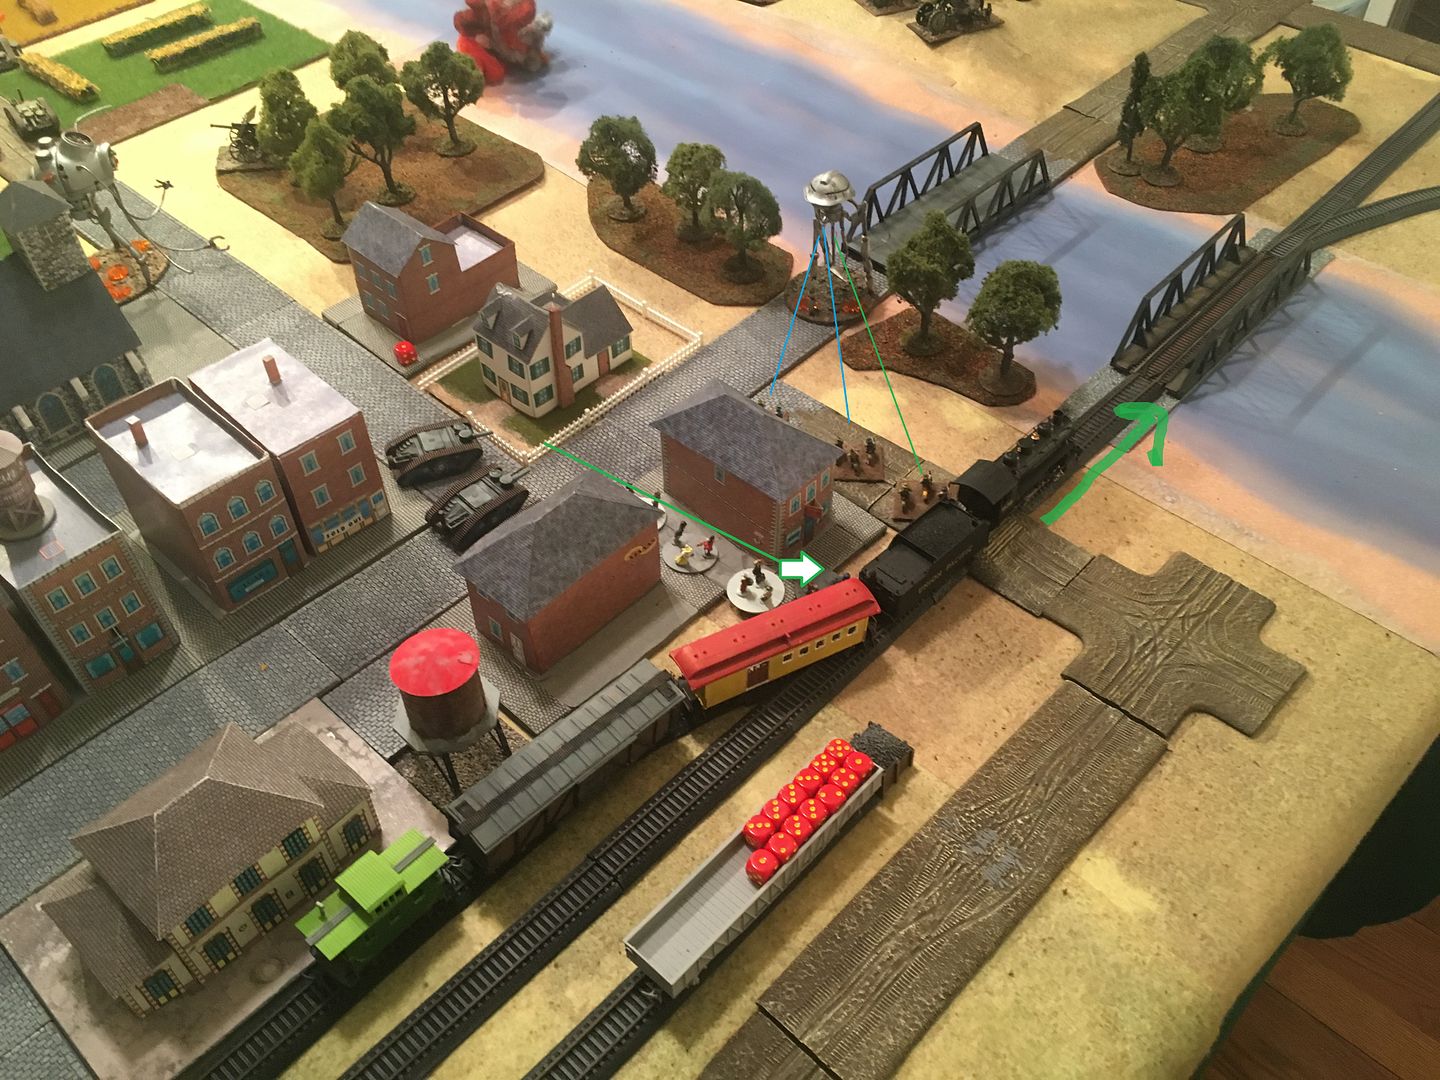
Turn 3: Humans continue; 13 civilians load train, train leaves station(4 inches 1st movement, 8 inches second). Police move and shoot hoping for luck strike. Remaining civilians make a break for south of town.
|
|
|
|
Post by mikedski on Dec 26, 2015 14:03:04 GMT
Please let me know if you can follow on Photobucket or if better to post directly to forum. I think photobucket is great for hosting images (I Use it) not so good when trying to follow the report. The amount of popups and adverts is annoying. Still a great job though. I am now with advertisement free version of Photobucket. Any improvement? |
|
|
|
Post by mikedski on Dec 27, 2015 11:45:57 GMT
Turns 4 and 5. The great escape.
Start turn 4. 1) Martians win initiative. Scout moves to one inch from train. Misses locomotive with a roll of "1". 2) Human moves train 12 inches x 2 across the river. 3) Command tripod moves fires sweep ray at militia tanks, destroys two, routes the other and with movement destroy the routed tank.
Turn 4) Mark IIIs move, fire main guns x9, HMGs x3 (ROF1) and only inflict two more damage points against the wounded harvester.
Turn 4 , Impulse 5) the Harvester moves towards its tormenters and sweeps Mark IIIs destroying two and routing third. Then moves back.
Turn 4. Impulse 6) Mark IIs move and engage Harvester. With six damage points takes little effort to bring it down. 7) Martian rolls for a reinforcement but fails to bring an assault tripod on board.
Turn 4) Impulse 8 Heavy arty fires and misses command tripod. 9) Martian rolls for next reinforcement and fails. 10) Field guns fire and miss. Human mobile arty arrives as reinforcements.
Start Turn 5. Martians win initiative despite loss of tripod. 1) Scout moves takes shot at train. Hits but whiffs again with a damage roll of '1"! Then moves back behind cover of trees. 2) Human now moves train and it escapes off board.
Turn 5: Impulse 3) Command tripod moves up and destroys last heavy arty gun. 4) Human field guns responds but to no effect.
Turn 5: 5) Martian rolls for 1st reinforcement but fails. 6) Mobile arty fires at command tripod but misses (obscured target). 7) 2nd Martian reinforcement roll is successful and tripod arrives and shoots Mark III but fails to destroy it.
Turn 5: 8) Orders token expended to rally Mark III. Mark II tanks arrive as reinforcement and can shoot. No further Martian impulses. Mass firing inflicts three damage points.
|
|
|
|
Post by americanelm on Dec 27, 2015 12:12:02 GMT
I'm curious as to what you thought about the altered turn sequence(which I didn't write - I stole it off of BGG).
|
|
|
|
Post by mikedski on Dec 27, 2015 13:06:17 GMT
I'm curious as to what you thought about the altered turn sequence(which I didn't write - I stole it off of BGG). 1) More fair in that you avoid the "two turns in a row effect" of watching one side get pummeled without any response.
2) You have to be more calculating in how you move and shoot individual units:
- "Do I move or fire this particular unit now or do I wait for a better opportunity but risk it's destruction during a subsequent enemy activation?"
- " I know a bunch of my units are going to die this turn. Which one do should I move/ shoot/ evacuate first for a chance at success?"
3) Disadvantage - less able to mass fires on a single target like a tripod before the target can respond.
4) I think it makes it more exciting. More of a brawl. Give it a try!
|
|
|
|
Post by mikedski on Dec 27, 2015 14:57:46 GMT
Turn 6;
Turn 6: Humans win initiative. 1) Mobile guns fire. Damage. 2) Tripod moves sweeps mark IIs, no damage. 3) Mark IIs fire no damage. 4) Command Tripod moves and misses Mk IIs. 5) Mk II fires and causes mobility damage.
Impulse 6) Scout moves into river and destroys field HQ. 7) ATG fires, misses 8) failed Martian reinforcement 9) field guns fire and miss 10) single mark III cause one point damage
Command transfers to militia HQ in grain elevator. Remaining civilains move. Game extended to turn 7 by die roll.
|
|
|
|
Post by leecptinf on Dec 27, 2015 17:44:10 GMT
Couldn't follow photobucket, too much bandwidth for my handheld. Can you elaborate on the alternate movement and how it impacted the game?
|
|
|
|
Post by mikedski on Dec 27, 2015 22:42:48 GMT
Turn 7 final turn
Martian wins initiative thanks to US HQ unit loss penalty. 1) The assault tripod begins the turn by sweeping a mark II platoon - destroys one unit and remainder route. Hoping to scatter the remainder and break the US force this turn the Martian tried to roll off for crippled movement and loses. Is sent the other direction 10 inches.
2) The human then moves the other mark II and fires at the damaged tripod (5 damage points) and is rewarded with an explosion.
3) The Royal tripod fires at the surviving Mark III and destroys it. 4) mobile arty adjusts position and fires on scout wading in river. Misses 5) Scout tripod moves (difficult terrain) but is still out of range 6) Field guns fires at scout as well and misses (despite 3 gun advantage). 7) Martian fails reinforcement roll 8) Routed Mk IIs move off board (any routed unit on board at game end is considered destroyed) - and passes moral check! 9) US fails last reinforcement roll.
Single civilian maker passes wreckage of heavy artillery battery and escapes.
Martian side breaks with > 50% losses (4 of 7 tripods) versus Human with 7 of 14 units lost (50%). 14 civilian markers evacuated, 7 destroyed, and 7 stranded.
|
|
|
|
Post by mikedski on Dec 27, 2015 22:52:41 GMT
Couldn't follow photobucket, too much bandwidth for my handheld. Can you elaborate on the alternate movement and how it impacted the game? as noted above |
|
|
|
Post by leecptinf on Dec 27, 2015 23:16:40 GMT
Thanks. Interesting. Very entertaining BaRep
|
|
|
|
Post by Quendil on Dec 28, 2015 9:48:35 GMT
Just read it again and looks like great fun
|
|


