|
|
Post by Quendil on Oct 6, 2016 8:06:20 GMT
They look great. Much better being wide like yours, I shall follow your example
|
|
|
|
Post by boxholder on Oct 6, 2016 12:40:24 GMT
Hardlec:
Morbius did not tell you the rest of the process for mass production.
Mix up a bit of the green stuff, roll it into a pencil-like cylinder that is the diameter you want. Then, snip,snip, snip with wire cutters and give them a little squeeze to flatten them a bit. Makes dozens of them faster than you can type the description.
Recommend NOT trying to do it with paper mache. The stuff wants to crumble too easily.
|
|
|
|
Post by madmorgan on Oct 6, 2016 17:49:51 GMT
Wow. I'm lazy and not talented, so I order sandbags from MI.Toy Soldier plastic vendors on their site. Premade. Loose and in stacks. Just spray paint your color scheme and done. I can see making your own. I agree with that making additions for the Ironclad 20 mm trenches would require a lot of time & effort. I prefer just to buy the plastic sandbags at this point. I seem to recall GW doing an article years back using the green putty to sandbag effect.
|
|
|
|
Post by morbius on Oct 6, 2016 21:25:47 GMT
They look great. Much better being wide like yours, I shall follow your example Boxholder has the right of it. Rolling them into a cylinder a couple of mm thick, roll it flat using a jam jar and cut it into small sections using a very sharp blade to cut each sandbag. I use a UHMWP cutting board which doesn't stick too much with a fine texture, which adds a little extra detail to the bags and scribe a line down the sides of some of them to look like seams. It takes me about an hour to do a section of trench on both sides at the moment. Craig |
|
|
|
Post by morbius on Oct 6, 2016 21:28:52 GMT
 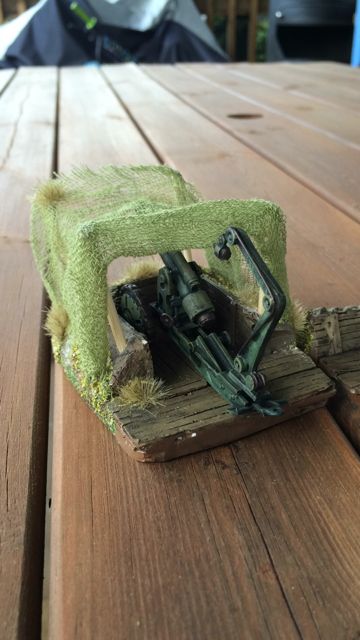 Hi all, I have to admit there are some great ideas of trenches here now, well done everyone. Here are some of my resin made trenches and artillery placements, I made the artillery emplacements too small for tanks but are perfect for the heavy artillery. I have cast loads of these now and have made them to match the AQMF trenches and bunker apart from they are only facing forward, but if you place them back to front they work just as well. Sputnik, I am colourblind, so am going to bump into problems painting my trenches. Can you tell me how you painted to wooden parts of your trenches, and what colours you used? (Sorry for trimming your original post, but didn't want to repost all of your terrific images). Thanks, Craig |
|
|
|
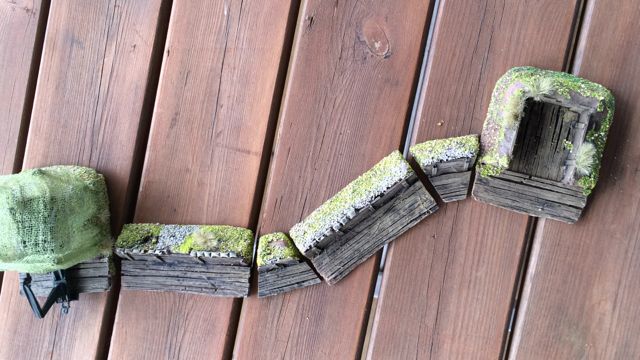
Post by morbius on Oct 7, 2016 0:08:32 GMT
Here we go, a picture of all the trenches I've done so far. I have yet to add sandbags to the rest of these.  Craig |
|
|
|
Post by madmorgan on Oct 7, 2016 9:03:14 GMT
Wow looks every bit professional quality! Sometimes I do get jealous of folks on this forums skill sets!
|
|
|
|
Post by morbius on Oct 7, 2016 11:38:51 GMT
Madmorgan, That's kind of you to say  Sadly my painting skills will let me down - I am colourblind  Very, very badly colourblind. Hence me taking the precaution of priming my trenches in brown to start off with. I am waiting for a few small pieces to arrive (a small steam engine from eBay, which will become a generator for my Edison Wires) and I'll start on my bunkers. I've also got to knock up two or three dividers from balsa and foam to seperate that large piece to make bays for artillery pieces. While I wait, I am taking a break from sandbagging (my sympathies to those of you doing REAL sandbags because of Mathew!) and build the farmhouse and barn from the kickstarter (a Scott Washburn production, no less!!!). Craig |
|
|
|
Post by loyalist on Oct 8, 2016 13:54:46 GMT
Looks like I'll be buying a batch of green stuff and making hundreds of sand bags to make the Ironclad Miniatures 20 mm scale trenches 2-3 mm deeper. Also have to raise the front wall on that system's anti-tank gun trench sections. They're designed for ATGs with barrels much closer to the ground than AQ artillery's. The ATG sections are too narrow for 50 mm wide heavy artillery bases. I had to make my 1 pdr coil gun bases 45 mm wide and sand the vertical wall support posts a bit narrower so they'd fit.
The AQ and IM trenches are too narrow for HMG teams, sniper teams or command teams on 40mm bases. If I remember correctly (not being at home to measure) the AQ trenches are about 35 mm wide; the IM trenches are about 25 mm wide between vertical wall supporting posts. I'm going to make some of my Command team bases narrow enough to fit both trench systems. Those will be lower level command elements (platoon and company).
Higher level command units are in KS ruined buildings, a nice IM bunker (photos posted on page 2 of this thread), and on an AQ oval base. Those have alternative models on 40 mm bases in case they have to 'flee' the diorama style bases.
I won't be re-basing HMG teams to fit the trenches because I bought some great 20 mm scale IM sandbagged field positions that will hold 40 mm circular and square bases and represent HMG and trench mortar pits. Also good for command units on 40 mm bases.
|
|
|
|
Post by madmorgan on Oct 10, 2016 10:22:33 GMT
I was looking at some of the Vietnam stuff for sandbagged positions. Almost all of it would work well for AQ scale and indeed looks good for the period. At some point, any fortified position that isn't based on a building will start to look much the same - the details of the cover obscured by the sandbags of war. As far as IM trenches, you can always leave a gap between the two pieces. Line it with some 'muddy' epoxy and this would be a realistic look as most trench lines had some sort of drainage running down the center between the boards and steps.
|
|
|
|
Post by morbius on Oct 10, 2016 11:36:00 GMT
|
|
|
|
Post by madmorgan on Oct 11, 2016 9:35:52 GMT
Hmmm I should of mentioned the Vietnam stuff I was referring to was the IM 20mm line (?mightyape.com?) The WW2 looked interesting as you said. For 'modern' AQ style ships I use the ZVE WW2 boat with its two guns and rockets in their small scale (see my ship listings). The story is these are designed by the Navy for support operations.
USN Revenge is a class of ships developed by the USN when they 'lost' the LIC to Army command. They dropped the armament to one each 12", 7", and multiple rocket launcher to give a major boost to handling, speed, and stability. The result is a powerful riverine and coastal ship that can influence any battle.
USN Revenge Scale 1/350 Modern Class @750pts Spd 24" Def 8 Arm 10 Spec: 1,2,4,5,6,8,12 (1) 12" Gun Rng 67" +7Pow Barrage 5 Spec: fore mounted turret, use 2d10 taking highest on Tripod Damage Table. (1) 7" Gun Rng 58" +4Pow Barrage 3 Spec: fore mounted above 12" turret (1) 5" Rocket Launcher Rng 42" +4Pow Salvo 2 Spec: 8 total rockets, no reload (during the game).
Figure is from Zvezda available from Michigan Toy Soldier. Its 1/350 scale and has a stock code of 6164. Its 6.4 cm long and doesn't need to be based as you wish. Its also a 'snap fit - no glue required', quick to put together. As you can see
|
|
|
|
Post by hardlec on Oct 14, 2016 16:02:28 GMT
Holes in the ground lined with local material, logs or sandbags, are common for just about any time period. The sandbags used in the civil war are not much different from the ones used currently.
It is also worth noting that there is very little consistency as to the size of a sandbag. Small 25mm sandbags can be used for big 15mm sandbags.
My hangup remains finding a material that is cheap enough I can use to make hundreds of them.
Most craft stores sell heavy card stock paper in a variety of colors. using a paper cutter and a lot of time, paper can be cut into rough strips, 1/8 inch wide and an inch (+or-) long, pretty close in scale to a rough wooden plank.
Then, too, there is Scott Washburns Paper Terrain. I have his trench system, and it is awesome-squared.
Moribus, your work is wonderful.
|
|
|
|
Post by boxholder on Oct 15, 2016 1:26:23 GMT
Thin wooden coffee stir sticks make great planks, too. A box of them has hundreds of them.
|
|
|
|
Post by madmorgan on Oct 16, 2016 11:59:14 GMT
Good stuff - coffee stirs a standard here. Don't forget round toothpicks with tips cut off for small logs. Was wondering if modeling clay (the kind that hardens after a while) would work as a cheap basis for sandbags?? Thought?
|
|


 Very, very badly colourblind. Hence me taking the precaution of priming my trenches in brown to start off with.